Building Restful APIs With Flask and SQLAlchemy (Part 1)
Create your first Python API today
I decided to write an article on building RESTful APIs with Flask. So what we’ll be building is an API for a to-do application. The API will allow users to log in, create, read, update, and delete to-dos but won’t be able to see to-dos created by another user.
There will be an admin section also. As an admin, you can see all user and to-do details. Admins can also filter their search results.
This will be a long walk — as a result, I decided to split this article into three parts. This part will focus on building the user and to-do functionalities only. Authentication and authorization will be covered in the second part. The final section will focus on code refactoring and error handling. I’ll also be introducing you to Flask-Restful, a Flask extension used to easily build RESTful APIs with Flask.
I’m excited to begin this with you, I hope you are also.
Getting Started
Microframework
Flask is a microframework for web development (back end) in Python. Even though it’s a microframework, we can build a complex application that scales well with Flask.
So what does microframework mean? It means it doesn’t force anything on us — we can decide to use one tool instead of another. This article will walk you through how to build restful APIs with Flask. If you’re new to Flask and would like to get an overview on how to set up a Flask application, you can read my article on that.
API
Before we start building our API in Flask, let’s start by defining what an API is and determining how our API will be. API stands for application programming interface and is like a connection/intermediary that allows two applications to talk to each other — say, server and a client.
The server is the back end (in this case, Flask), but the client might not necessarily be a web browser — it can be a mobile app or a single-page application (SPA). This is one reason why an API is important. This article goes deeper into what an API is.
Now that we have an understanding of what APIs are, let’s go deeper by talking about Restful APIs. RESTful APIs allow us to use HTTP requests (GET, POST, PUT, DELETE, PATCH, etc.). There are rules to be followed when building Restful APIs — I’ll list them below.
- Client — Server: The client and server are independent of each other.
- Stateless: The request sent by the client must contain all necessary information; the server must not store any state about the client.
- Cache: The server can label the response as either cacheable or not.
- Uniform resource: Clients must use a uniform, well-defined, and standardized protocol to access the server. The commonly used protocol in most RESTful APIs is the HTTP and HTTPS protocols.
- Layered system: Proxy servers can be inserted between clients and servers to increase performance.
- Clients can optionally download code from the server.
- Most APIs respond with JSON, but some uses XML (not common).
- Allow the filtering of data.
HTTP verbs
I mentioned HTTP verbs above, but what are they?
HTTP verbs are just methods that we use to tell the endpoint what we want to do. Although some of the HTTP verbs can be used in place of others, this isn’t a good practice. Use the most appropriate verb to make or process a request. There are a lot of HTTP verbs — some of them are GET, POST, PUT, PATCH, DELETE, HEAD, etc. I’ll be explaining the four most common ones.
GET: TheGETmethod is used to get a resource from the server. It fetches data from the server based on the resource path, which may include query parameters used to filter what we want to return. The status code to be returned from a resource path that uses this method should be 200 meaning OK.POST: ThePOSTmethod is used to create a new resource to the server. The status code to be returned from a resource path that uses this method should be 201 meaning CREATED. This resource should not return any value.PUT: ThePUTmethod is used to update a resource in the server. The status code to be returned from a resource path that uses this method should be 200 meaning OK or 204 meaning No Content.DELETE: TheDELETEmethod is used to delete a resource on the server. The status code to be returned from a resource path that uses this method should be 200 meaning OK or 204 meaning No Content.
Structuring our API
Now that we’ve spent some time understanding what APIs are, let’s think about what and how our API will be structured. I can decide to get an array of all of the users from the server or an individual user. I can also create a user or update user details. All of this has its respective HTTP request.
GET users/: Retrieve all of the usersGET users/id/: Retrieve a single userPOST users/: Create a new userPUT users/id/: Update an existing userDELETE users/id/: Delete an existing userGET todos/: Retrieve all to-dosGet todos/id/: Retrieve a single to-doPOST todos/: Create a new to-doPUT todos/id/: Update an existing to-doDELETE todos/id/: Delete an existing to-do
SQLAlchemy
Now let’s talk about SQLAlchemy.
What really is SQLAlchemy? SQLAlchemy is an object-relational mapper (ORM). What this means is that with SQLAlchemy we don’t have to write raw SQL commands. All we need to do is create models in the form of classes (objects), and SQLAlchemy will do the work of converting them to SQL (relational database) — hence the name object-relational mapper.
We can do a lot of things with an ORM — from doing our normal queries to inserting, updating, and deleting to doing advance things like joins, merges, etc. SQLAlchemy’s official website has more information here. But in this article, we’ll be using the Flask wrapper for SQLAlchemy, which is Flask-SQLAlchemy.
Creating our API
Let’s start creating our API. We’ll start by installing dependencies. We need just two: Flask and Flask-SQLAlchemy.
Let’s set up our Flask app, I’ll be using Postman to test my API — if you don’t know what that is, you can check it out here.
Let me briefly say a few things about Postman and how easy it is to use. Postman is an interactive and automatic tool for verifying the APIs of your project. Postman is a Google Chrome desktop app (it used to be a Chrome extension) for interacting with HTTP APIs. It also supports GraphQL. It presents you with a friendly GUI for constructing requests and reading responses.
You can always use any HTTP library to test the API if you prefer that.
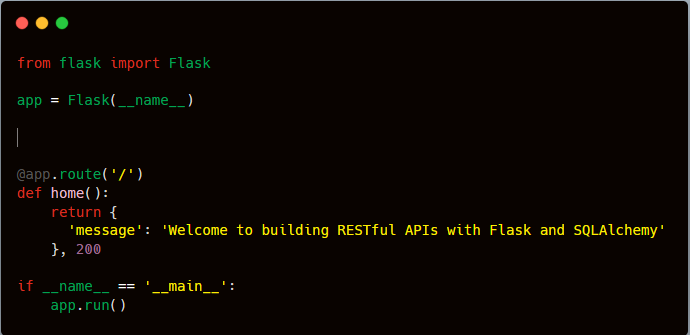
Let’s test the application. Run the server with flask run, and send a request to localhost:5000/.
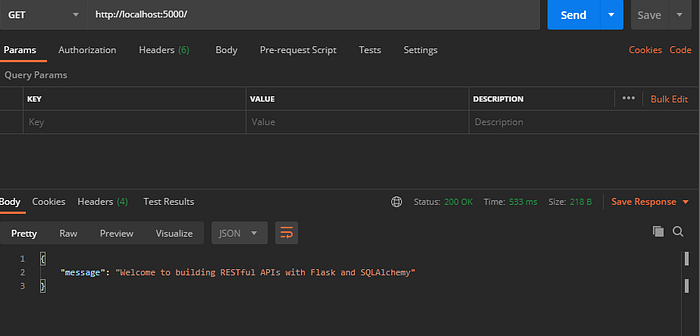
We can see that when we sent a request to the endpoint /, we got what we want, which means everything is working fine.
It’s time we build our user and to-do model so we can define endpoints for the user model. These two models will have a one-to-many relationship — i.e., one user can have many to-dos, and one to-do needs to have a user.
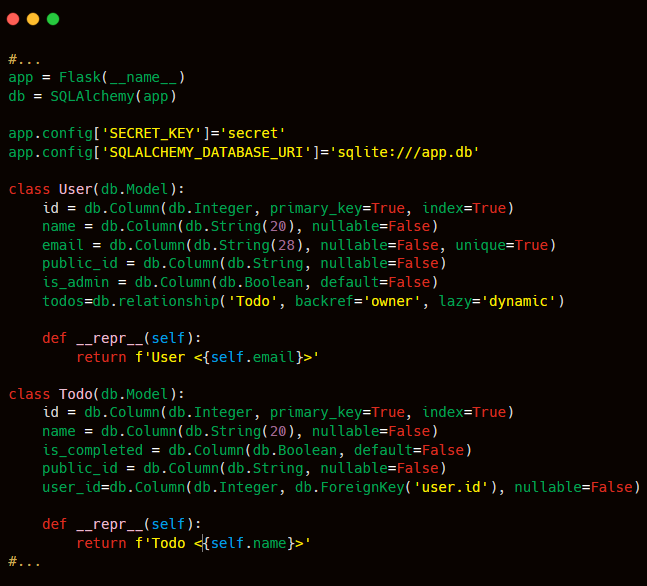
A lot is going on here! Let’s go through it in detail.
Firstly, we imported SQLAlchemy from Flask-SQLAlchemy, and we connected it to our app.
Next, we added two config variables to our app. The first is the secret key, which is a secret variable used to secure our app. It’s used by some middleware (extensions) that have to do with security (for now we have none — when we get to the authentication part, we’ll be using it). Second is the SQLALCHEMY_DATABASE_URI, which is the database curl for our app. Here I’m using SQLite, but you can use any SQL database of your choice (e.g., MySQL). Then the value will be mysql://username:password@server/db. You can check their official docs for more details and a list of other config variables.
We then defined our user model, which extends from the db.Model class.
Lastly, we defined the columns. The db.Column is used to create a column. The first column we defined is the id, which will be automatically created by SQL. The second column is the name and email field, which have to be a string. Additionally, the email field is unique.
I also added a public_id field, which is what I want to use as route parameters since SQL gives id as an integer, and I’d like to have something like a UUID value similar to what we get from a Mongo ID.
I also added an is_admin field/column, which we’ll be using for authorization.
And lastly, we added a todos field, which is what we use to connect to the to-do model, as the name implies (relationship). This part takes three values: The first is similar to others, which is the type of field it is. The second is backref, which is the field (variable) we use to reference the user model in the to-do model. And the last argument is lazy, which is how the data is loaded.
The to-do model is similar to the user model. It has the id, name, is_completed, and user_id fields, the last of which is a foreign key — i.e., a key that’s used to reference another model. With this user_id field, I can get the user ID of a to-do app, and with the owner field (from the backref), I can get the user that created the to-do.
Now, even though the database exists, the models themselves haven’t been created. To create these, you can open your database driver. But if you’re using SQLite and you don’t have a database driver, you can open your terminal and run db.create_all() after importing the db variable. This creates the database and all of the models defined with it. Another useful method is db.drop_all(), which does the exact opposite.
Open a Flask shell, and let’s test our models.
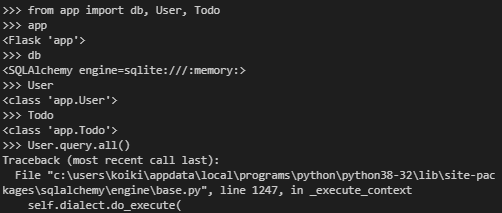
As you can see, trying to query from the user model gave an error because I haven’t created the database.
There’s a Flask extension that works as a middleman between us and SQLAlchemy (and Flask SQLAlchemy): flask-migrate. It gives us a command that helps us to create and manage our models. It uses Alembic to achieve this. The advantage of doing this is if we’ll be updating our model in the future, all we need to do is run some commands, and the database will be updated. If we don’t use this extension, we’ll have to handle this ourselves.
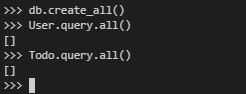
After running db.create_all(), these models have been created, and we can query them.
The db.Model object exposes our models to a query method that we use to query them. There are a lot of queries we can do — we’ve seen all, which returns an array of all of the rows; first, which returns the first row in the query; filter and filter_by for filtering our query; get takes in an ID and returns the row with that ID; and first_or_404 and get_or_404 returns a 404 if the query itself (get or first) returns None.
Let’s insert some rows into the database.
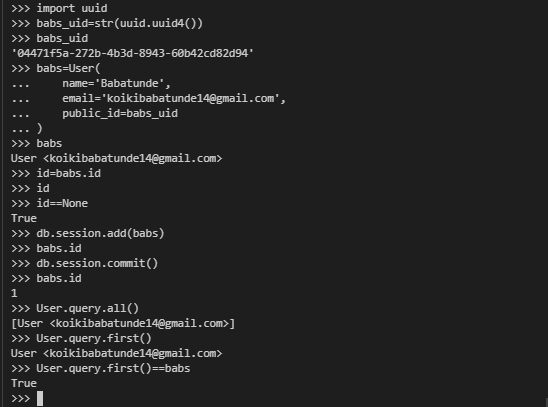

From the image, I used the uuid module for the public ID so as to make it unique. I created an instance of the object and stored it in a variable but actually haven’t created the row. I confirmed that by getting the value of babs.id, which gave None.
The function db.session.add adds a variable to the database temporarily. The second function, db.session.commit, saves it permanently. Other functions include db.session.add_all, which takes an array of objects to be added to the database, and db.session.delete, which deletes an object.
The way the database objects are represented in the terminal is done using the __repr__ method in the class definition. The todo method is also similar. but the moment we add a new todo to the database, the object will have a new attribute owner, which we used as the backref to the user model. The todo object gets stored in the user.todos object also.
Endpoints
Now let’s start creating endpoints.
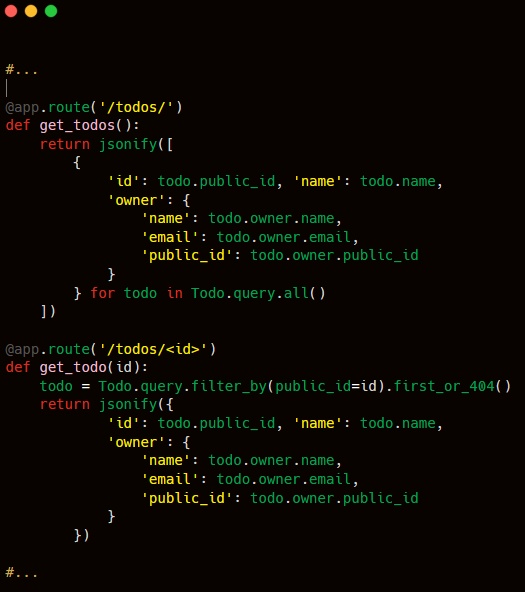
Let’s create the endpoint for getting all users and for getting a single user.

The endpoints for these two functions are given in the app.route decorator. If we’re returning a dictionary, Flask automatically converts it to JSON, which is why we aren’t using the jsonify function in the second function.
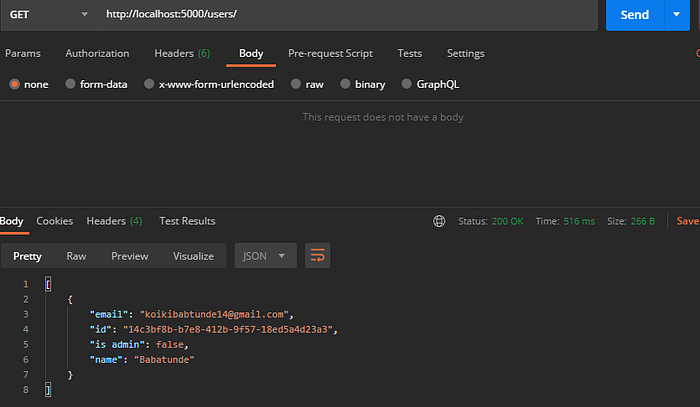
In the get_users function, we return an array of users. Instead of returning the id, we returned the public_id, which is what is used as the route parameter. The default status code is 200, so we don’t need to pass it here. Let’s test these endpoints now.

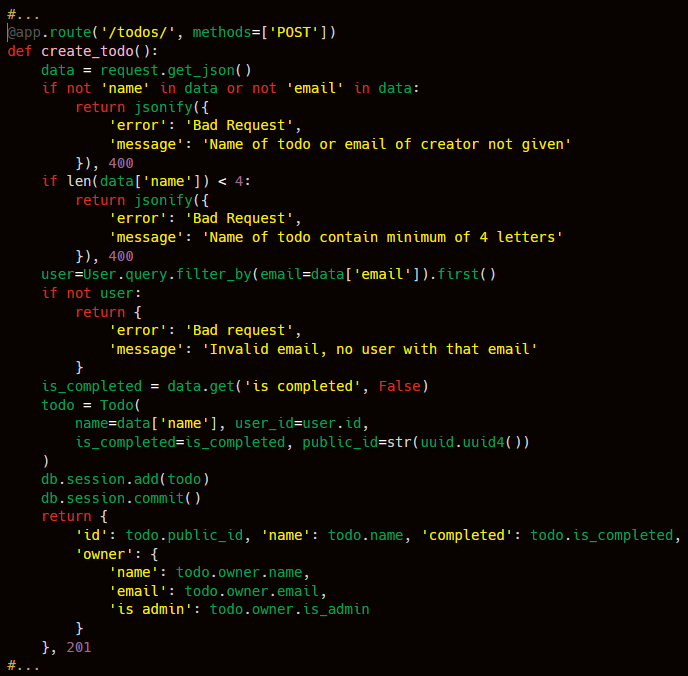
Next is for us to create endpoints for creating, updating, and deleting users.

The decorator for this function takes another parameter, method, which by default is [‘GET’]. We specify it to be a POST method here.
The create_user function POST receives a bit of JSON data. It first verifies the name and email was given and that the length is at least four characters (there will be some validation in the front end also). We could also use a regex to do some more advanced validation, but it isn’t in the scope of this article.
We finally created the row and saved it to the database. We return JSON data of the user and a status code of 201 for CREATED.
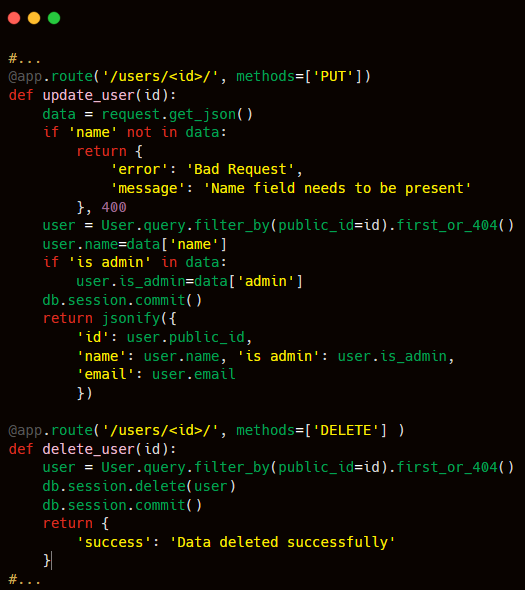
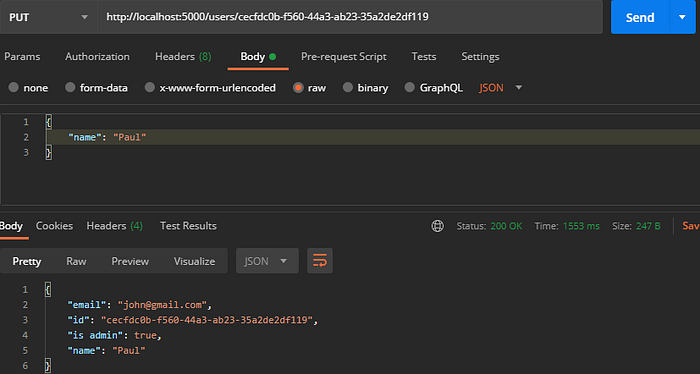
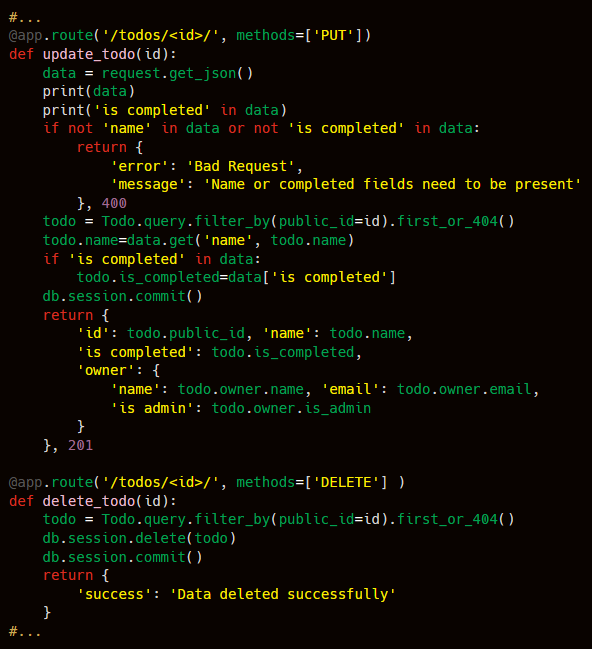
The update_user function has a PUT HTTP verb registered to it. It also has JSON data for what we want to update — in this case, it has to be the name.
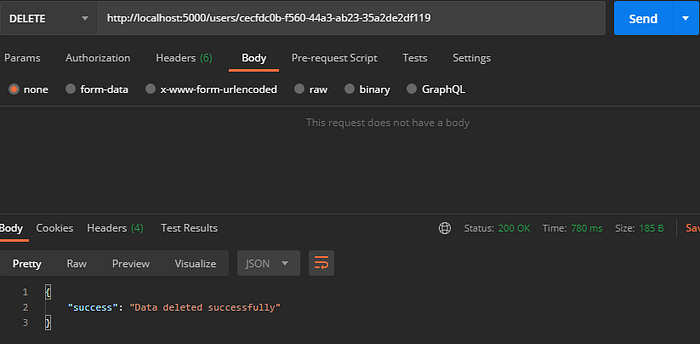
We did some validation before updating the database. We first got the user with the public ID in the route parameter. Then, we updated the field and called db.session.commit(). We finally returned the updated user data with a status code of 200 (default). Similarly, the delete_user function uses the ID in the route parameter to get the user and finally deletes it.
These two functions use the first_or_404 function in filtering the data — that way a 404 error will be returned if no user has that public ID in the URL. Let’s head over to Postman to test these endpoints.

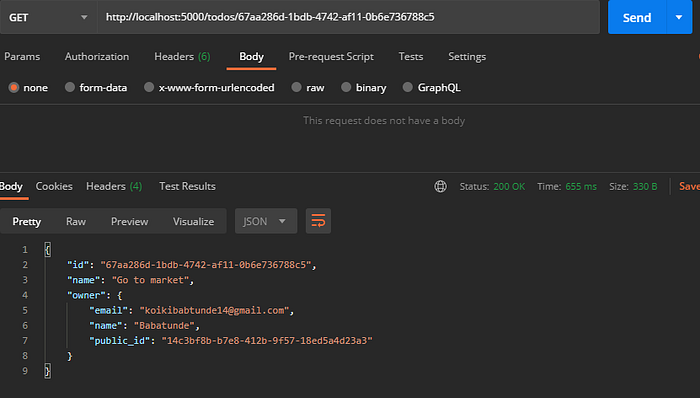
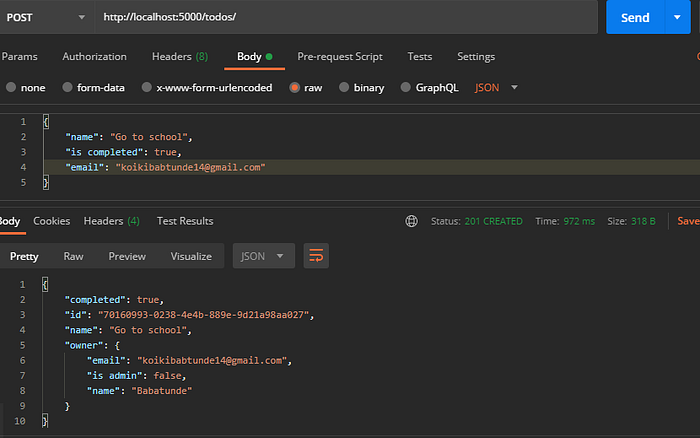
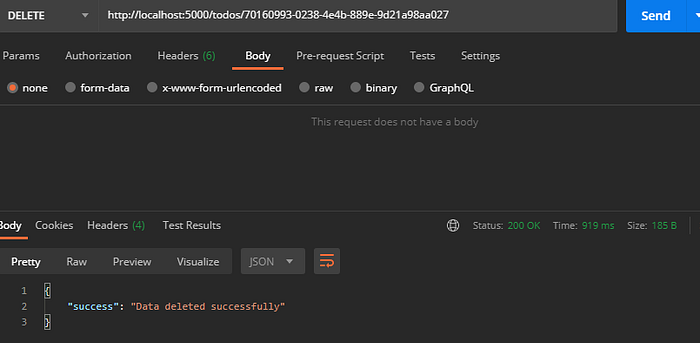
Yaay! we’re done with the user endpoints. Let’s now start with the todo endpoints. Firstly, a todo needs to have a user attached to it. We can use the public_id or email to get the user object since these two fields are unique. I think I’d go for email since that’s easy to remember. So when creating a new todo, we need to pass the email of the creator also.
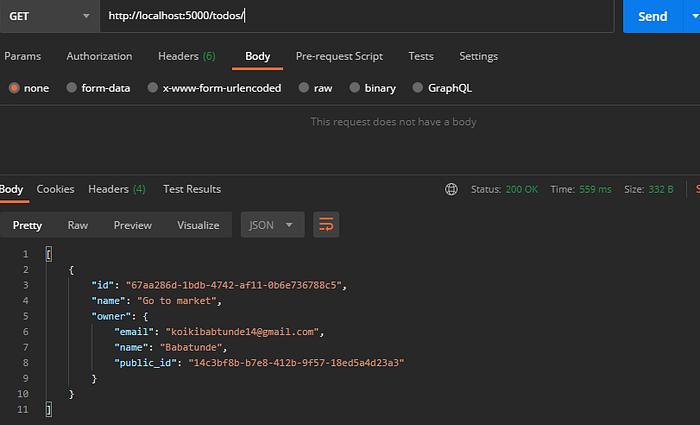
The endpoints are similar to what we’ve seen before. Let’s head over to Postman to test these endpoints.

Conclusion
Yay! We’re done with the first part of this series. This article has walked you through how to build a simple to-do API with Flask and SQLAlchemy. You can get the full code on GitHub here. The next part will be focused on authentication and authorization.