Build an iOS Networking App With Automated JWT Authorization
JWT management in the mobile app made easy

This article will consider an approach to automating JWT authorization with refresh tokens in an iOS application. We will write an application that demonstrates the proposed approach and interacts with a JWT authorization server.
The entire source code of the demo application can be found in the repository. The main code of JWT authorization automation logic is located in the Networking/Requester.swift file. You can try it out, check logs about the auth process, etc.
JWT (JSON Web Token) is a standard for holding your identification data in signed authorization tokens. Usually, after login-password authorization, the server generates a JWT with user data, signs it, and returns a token to the client. The client can then authenticate with this token — when the server receives the JWT, it verifies the signature and checks that the token has not expired.
Quite often, some systems modify the general approach of working with JWT — adding refresh tokens. In this case, the access token is short-lived, and the refresh token remains valid for an extended amount of time and is used to generate a new access token when it expires.
This approach improves security since a short-lived token is less of a problem than a compromise of a long-lived or permanent token. Usually, when refreshing an access token, a new refresh token is also generated. That reduces the chance of compromising a valid refresh token.
When working with such a model, authorization from the client side becomes more complicated because when sending each request, you need to manage tokens, and a short-lived access token can expire anytime. It will need to be updated in time. This article will consider the automation of such a modification of JWT authorization.
SwiftUI will be used in this article to create a demo application, but this is not so important since the general JWT authorization logic will not be tied to the UI.
Backend
A simple backend was implemented for the application, which processes four requests:
- User registration. On success, the server will return a user entity containing access and refresh tokens and their expiration time.
- User authorization by login and password. If successful, the server response will be the same as in the case of registration.
- Refresh tokens. Returns a new set of tokens on success. To execute the request, you must send a refresh token in the Authorization header and an empty body.
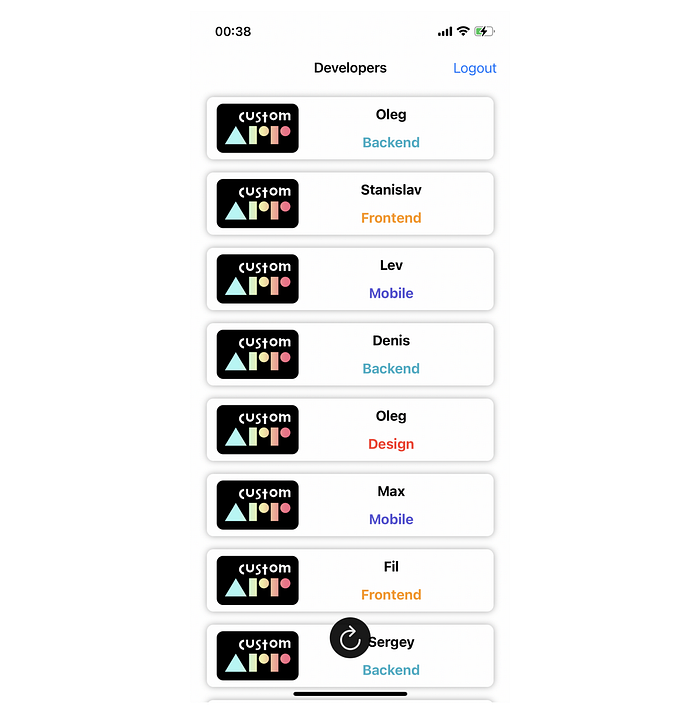
- Getting data that requires authorization. In this case, the server will return a list of CustomApp company developers containing their names and departments. To complete this request, you must send a valid access token in the Authorization header. On the backend for the demonstration, only one request was made that requires authorization, but in real applications, of course, there will be many of them.
Almost any backend that implements this type of authorization will have such a set of requests.
An important point about the token refresh request is that depending on the backend, the implementation of this request may differ. For example, there may be a need to send a refresh token in the request body. It doesn’t really matter because requesting the application will be easy to modify.
On the server we will interact with, the following tokens’ lifetime values are set: one minute for the access token and five minutes for the refresh token. In reality, these values will, of course, be much larger. In our case, they are chosen as such for the convenience of testing.
iOS application
The application will use the MVVM approach, which is generally quite optimal when using SwiftUI and is also suitable for writing a small application with a single ViewModel.
Let’s start with models. We need the structure of the authorization body that we will send in registration and authorization requests and the user entity that will respond to these requests.
We will also need a token pair entity responding to a token refresh request and a single token entity for easy storage in a future requester.
For all requests on the server, there is a common error response. We will also create a structure for it, as shown below:
This structure has an isAuth method that will help you determine if the error is an authorization error (invalid token or token expired) by checking its message. The method uses a call to the Errors class, which will be discussed below.
And finally, the structure for the developer entity:
To save JWT tokens for further authorization, we need local storage. In our case, for simplicity, I will use UserDefaults. If necessary, you can use more secured data storage. Let’s write a small singleton class to work with UserDefaults and save/get tokens:
For the convenience of interacting with the server and generating URLs, let’s create an Endpoint enum. Here’s the code:
Also, to return a generic value from our requests processor, we will create a Result wrapper that will make it clear what response was received from the server.
The ViewModel will work with the final result and, if necessary, will be able to send the user to the authorization screen if we receive an error about the impossibility of authorizing via JWT (both access and refresh tokens have expired or are invalid).
Implementing requester
Let’s go directly to the logic of our request processor-authorizer (from now on, I will call it Requester), the algorithm of which can be described using the following scheme:
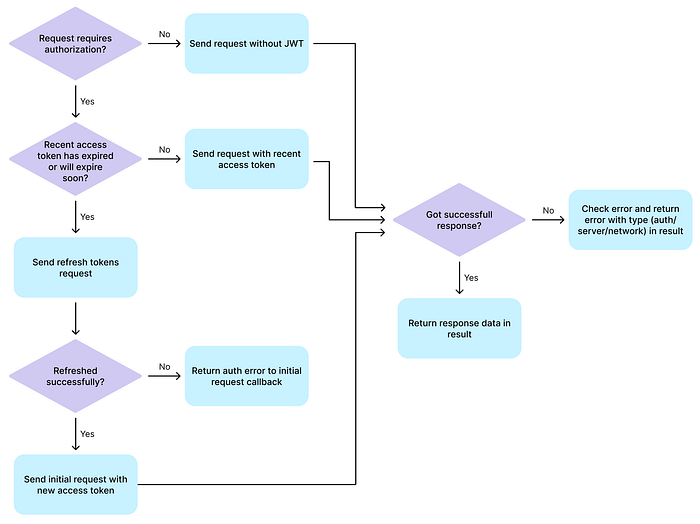
So, we’ll see the following:
- Requests that do not require JWT authorization (in our case, registration and authorization by login and password) are sent directly without additional checks
- For requests that require JWT authorization, the validity of the access token is checked before being sent. If the token has expired or will expire soon (the time to expiration is less than the specified threshold), then before sending the request itself, tokens are refreshed
- In case of failure to refresh the tokens, it is necessary to return an authorization error so that our
ViewModelcan determine that we need to move the user to the authorization screen since we cannot authorize using JWT.
Let’s start implementing the requester by working with user defaults. The requester should be able to get and save tokens in storage after the update to have recent tokens when starting a new session with the application. We will also prepare a method for resetting the current tokens in case of a logout.
Here, we declared a private constructor and a static shared field to access the only existing requester through it, thereby implementing the singleton pattern. This is necessary since API calls can usually be invoked from more than one place in the application. For example, when using the MVVM approach, you usually have several ViewModels that can independently send requests.
To execute requests, I will use Swift’s URLSession. Let’s write a universal method for generating URLRequest, which we will use for all our requests, and a couple of helping methods.
In the formRequest method, in addition to the request arguments, there are two flags — refreshTokens — signaling that a request is being formed to update tokens and the requester needs to put a refresh token in the Authorization header — ignoreJwtAuth — signaling no need to use JWT authorization (access token) in the request.
Here we also need a method for generating a request to update tokens, which will be called only from our requester.
The renewAuthHeader method replaces the access token in the Authorization header with the current one. This is needed when, after generating a request requiring a JWT, it is necessary to refresh the tokens. The Authorization header will contain the old invalid access token in this case.
Let’s move on to the logic of sending requests. The next block of code will be quite large due to the many checks, but it does not contain very difficult-to-understand things, which I will describe below:
The main approach for writing requester methods is as follows — the request itself and the escaping callback function are passed to the parameterized request-sending method, which will return Result<Type>, where Type is the data type that should be contained in the response if the request is successful. Depending on the result of the request, Result.success or Result containing an error will be returned.
The needReAuth helper function lets you know if tokens need to be refreshed before sending the request. It checks that the token has not expired and there is more time left before it expires than the threshold we set (10 seconds). It uses a simple extension function that returns a UNIX timestamp in milliseconds.
Please note that to determine the current time, a Date object is created with the current time on the device, and if time synchronization is disabled, then it may turn out to be incorrect. A safer option would be to get the current timestamp from the server and remember the difference between the actual time and the time on the device.
The request method should be used by requests that require JWT authorization. It determines whether to refresh the tokens before the request and call authAndDoRequest or just call doRequest.
In the authAndDoRequest method, we form and send a request to refresh tokens. We do classic checks that we did not have a network error, the response was successfully cast to the HTTPURLResponse type, and we received a non-nil response body. Next, we check that the request was successful (a simple extension function that checks the HTTP response code for 2XX).
If successful, we update the tokens in the requester, replace the Authorization header in the original request, and send it with doRequest. In case of failure, you must return Result.authError, because the user will not be able to make further requests, and must log in using a login password.
The doRequest method simply executes the request without authorization checks. It is called from authAndDoRequest, as well as directly to execute requests that do not require authorization.
The parseResponse method attempts to decode the response JSON to our expected response structure. If it fails, then the parseError method is called, which tries to decode the error body to our ErrorResponse struct. Inside parseError, a check is made to see if the error we received is an authorization error or another error.
Then it remains only to add public methods to call the API (registration, authorization, getting a list of developers).
Please note that here, to process the results of register and login requests, we use a separate handleAuthResponse wrapper function, and only inside it do we call the initial onResult callback after we have saved the tokens. This is necessary to encapsulate the entire management of tokens inside the requester, and external instances (for example, the ViewModel) will not know about their existence. Thus, all automated work with tokens takes place inside the requester, and the ViewModel only uses API call methods.
In our code, we also used the Errors class, which contains constants for string descriptions of errors and a couple of helper methods.
An important note — this requester will work with sequentially sent requests since if the access token has expired, then when sending requests at the same time, the refresh tokens method will be called several times at once, which will cause errors. If you need to send several requests simultaneously, then a slight modification of the requester will be required. In any case, you will have to refresh the tokens and only then send requests initially. I will offer two most logical solutions:
- Store all requests and callbacks until tokens are refreshed, and then send them. There might be useful some kind of mutex or DispathSemaphore to lock the flow until refresh finishes.
- Create a queue for requests that require JWT authorization and send them one by one.
Adding other parts of the app
The main most interesting networking logic is written. Now we will move on to the block of writing the rest of the application. We will not focus on a specific description of the UI part because it’s pretty simple. Let’s look at some important points.
The ViewModel will contain our requester calls and the processing of their result, as well as the published part, which will be displayed in the UI.
When initializing the ViewModel (when the application starts), we check if we have a valid refresh token, and if we do, we programmatically skip the authorization screen by changing the showAuthContainer field, which is responsible for whether the authorization/registration screen or the internal screen with a list of developers will be displayed.
Here, the programmatic navigation approach suits you quite well since if you receive an authorization error within the application, you can easily redirect the user to the authorization screen.
In the methods for sending requests, we determine what type of response we receive. Upon receiving an authorization error for an authorized request (getting a list of developers), we return the user to the authorization screen. When we receive an error of a different type, we will show an alert.
In the code of the root ContentView, we need to implement the above programmatic navigation, as well as create our ViewModel and pass it to the child views as an EnvironmentObject.
On the login and registration screens, we will only have fields for entering a login and password and an authorization/registration button. Also, the login screen will contain a NavigationLink to the login screen.
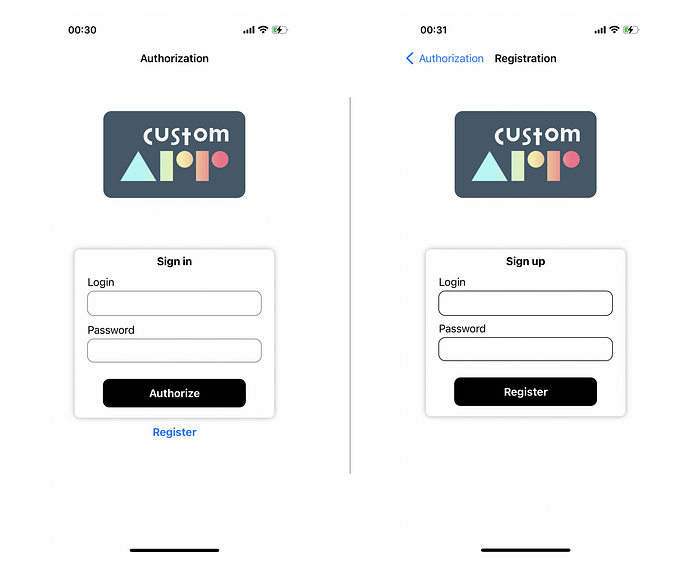
Upon successful authorization or registration, the user will be redirected to an internal screen with a list of developers. For the convenience of full-fledged testing of the authorization work, we have made a list refresh button and a logout option.
This completes the writing of the application. As I said earlier, you can look at the full source code in the repository, clone the project and see the entire flow of the authorizer.
Want to Connect?Full application code | Custom app companyChat with me on Twitter.
If you are interested in web3 development there is my colleague’s cool article about implementing some web2 features in blockchain.

