iOS Dev Tools
Building iOS apps faster using Bazel
Learn how to build iOS apps without Xcode and faster
Do you think about grabbing a coffee every time you make a clean build of your iOS app? Maybe you are like me and start scrolling through instagram whilst you wait. Worse is when the build finishes you have forgotten what you were supposed to do next or why you did this clean build, to begin with.
As iOS codebases grow they become slower and slower to build. Slower build times can lead developers to be less productive and more frustrated.
So how can we speed up build times? One way is to modularise your app into separate chunks and then using compiled modules of the chunks you will not be working on. However, this can be quite complex to manage. The developer needs to know which modules they will be working on. The rest of the modules will need to be fetched from cache. Additionally, they may need to configure Xcode differently for each branch they will be working on.
So is there a better way that we can speed up app build times? Yes, there is! Bazel is open-source build tool for many languages and applications. Bazel also adds the option to cache builds and use them seamlessly.
In this tutorial, I will show you how to migrate an existing app to use Bazel. Bazel does not use Xcode build system, tooling and IDE. Thus I will follow up with a guide on how to debug Bazel managed iOS apps on the simulator. Then I will guide you on caching builds to speed up the build time. Finally, I will cover when not to use Bazel.
Here is an overview of how this post will be divided:
- How to convert an existing iOS project to use Bazel
- Debugging iOS apps when using Bazel
- Remote caching build outputs in Bazel
- When not to use Bazel
I have used Swift 5.6 and Xcode 13.3 for this article.
How to convert an iOS app project to use Bazel
In this section, we’ll start by installing Bazel. We’ll then download an already existing iOS app project. Finally, we’ll migrate the project to use Bazel.
Here are the steps we are going to take:
Let’s get started!
1. Install Bazel
There are multiple ways to install Bazel. However, in this tutorial, we’ll be using Homebrew to install Bazel.
Homebrew is a software package management system. It is a very popular tool for macOS. If you haven’t already installed it then go ahead and do so. Follow the installation instruction for Homebrew in its website brew.sh.

Once Homebrew is installed let’s install Bazel. Run the following command in the terminal:
brew install bazelOnce completed successfully we’ll be ready to start using Bazel.
2. Download the starter pack
In this tutorial we’ll use an existing iOS app project to exemplify how to migrate to using Bazel. Let’s download an already existing iOS app project. Open a terminal and run the following commands:
cd $HOME
curl https://github.com/anuragajwani/bazel-ios-tut/archive/starter.zip -L -o starter.zip -s
unzip -q starter.zip
cd bazel-ios-tut-starter
3. Converting the project to use Bazel
In this step, we will be migrating the app project in the starter project to use Bazel.
First, let’s analyze the project structure of the Xcode-managed project.
.
├── README.md
├── SaladMaker
├── SaladMaker.xcodeproj
└── SayHelloKit
The SaladMaker project is comprised by 2 targets:
SaladMakeriOS appSayHelloKitframework
The source code for SaladMaker sits inside a directory named SaladMaker.
The source code for SayHelloKit sits inside a directory named SayHelloKit.
Both of these targets support iOS 14 and above. SayHelloKit framework is consumed by the SaladMaker app.
Next, let’s recreate the project structure in Bazel. At the root of the project we need create a file named WORKSPACE.bazel. A Bazel workspace is:
a directory tree on your filesystem that contains the source files for the software you want to build
- Bazel docs
In simple it marks the root of the project. Targets must live under the directory that contains the WORKSPACE.
Let’s create the WORKSPACE. In terminal run the following command:
cat > WORKSPACE.bazel <<-EOF
load("@bazel_tools//tools/build_defs/repo:http.bzl", "http_archive")http_archive(
    name = "build_bazel_rules_apple",
    sha256 = "4161b2283f80f33b93579627c3bd846169b2d58848b0ffb29b5d4db35263156a",
    url = "https://github.com/bazelbuild/rules_apple/releases/download/0.34.0/rules_apple.0.34.0.tar.gz",
)load(
    "@build_bazel_rules_apple//apple:repositories.bzl",
    "apple_rules_dependencies",
)apple_rules_dependencies()load(
    "@build_bazel_rules_swift//swift:repositories.bzl",
    "swift_rules_dependencies",
)swift_rules_dependencies()load(
    "@build_bazel_rules_swift//swift:extras.bzl",
    "swift_rules_extra_dependencies",
)swift_rules_extra_dependencies()load(
    "@build_bazel_apple_support//lib:repositories.bzl",
    "apple_support_dependencies",
)apple_support_dependencies()
EOF
Above we are fetching and loading the code that knows how to build iOS apps (bazelbuild/rules_apple) and swift libraries (bazelbuild/rules_swift). The functions that do the building are known as rules in Bazel.
You may have noticed that our workspace does not contain information about the targets to build. Bazel will search things to build inside the directories under the root of our project. Bazel will look for a file named BUILD.bazel where we specify what to build. We usually refer to these as targets in Xcode. There are 2 things to build:
SaladMakeriOS appSayHelloKitlibrary
Thus we’ll create a BUILD.bazel for each of these.
Note: the original SayHelloKit target was a dynamic framework. For simplicity we’ll convert it into a static library for this post. Knowledge of module types is not required for this post. You can learn more on dynamic vs static in my Modular iOS Guide.
Let’s create BUILD.bazel for the SayHelloKit first. In terminal run the following command:
cat > SayHelloKit/BUILD.bazel <<-EOF
load("@build_bazel_rules_swift//swift:swift.bzl", "swift_library")swift_library(
    name = "SayHelloKit",
    module_name = "SayHelloKit",
    srcs = ["SayHello.swift"],
    visibility = ["//visibility:public"],
)
EOF
Above we have created a BUILD.bazel file with Swift static library as the product. To produce the library we make use of swift_library function or rule. Remember that we loaded the swift build rules at the WORKSAPCE.bazel file. At this BUILD.bazel file we have loaded the swift_library rule.
Next, let’s create a BUILD.bazel file for the SaladMaker target. However before we do that let’s restructure the SaladMaker directory. Why? You may have noticed that we listed the file SayHello.swift as the only file under sources (srcs) for SayHelloKit. It is not very scalable to list each file in large application. We can use double glob function and asterisks (**) in the directory path to tell Bazel to take all files under a directory as its sources. However, the rule only accepts Swift files. Thus and Info.plist or images will not be accepted and the build will fail.
Let’s restructure SaladMaker. In terminal run the following commands:
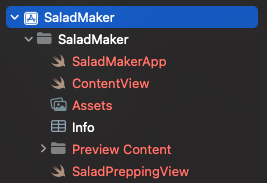
mkdir SaladMaker/Sources
mkdir SaladMaker/Resources
mv SaladMaker/*.swift SaladMaker/Sources
mv SaladMaker/Assets.xcassets SaladMaker/Resources && mv SaladMaker/Preview\ Content SaladMaker/Resources
Now all SaladMaker’s Swift files live under SaladMaker/Sources and all other resources live under SaladMaker/Resources. Next let’s create the BUILD.bazel file for SaladMaker.
In the terminal run the following command:
cat > SaladMaker/BUILD.bazel <<-EOF
load("@build_bazel_rules_apple//apple:ios.bzl", "ios_application")
load("@build_bazel_rules_swift//swift:swift.bzl", "swift_library")
load("@build_bazel_rules_apple//apple:resources.bzl", "apple_resource_bundle")apple_resource_bundle(
    name = "SaladMaker_Resoures",
    bundle_id = "com.anuragajwani.SaladMaker_Resources",
    resources = [
        "Resources/Assets.xcassets",
        "Resources/Preview Content"
    ],
    visibility = ["//visibility:public"],
)swift_library(
    name = "Sources",
    srcs = glob(["Sources/**"]),
    deps = [
        "//SayHelloKit:SayHelloKit"
    ],
    visibility = ["//visibility:public"],
)ios_application(
    name = "SaladMaker",
    bundle_id = "com.anuragajwani.SaladMaker",
    deps = [
        ":Sources",
        ":SaladMaker_Resoures"
    ],
    families = [
        "iphone"
    ],
    infoplists = ["Info.plist"],
    minimum_os_version = "14.0",
    visibility = ["//visibility:public"],
    resources = [":SaladMaker_Resoures"]
)
EOF
Above we have three rules to call:
SaladMakerappSaladMakerapp source code files wrapped in a librarySaladMakerresources wrapped in a resource bundle
The ios_application rule does not take parameters for the source code files or the resources files. The rule expects code and resources as artifacts built separately and then linked to the app. Thus the source code is built as a static library and the resources are wrapped in a resource bundle.
Two things noteworthy are the srcs parameter in the sources library and linking to the SayHelloKit dependency.
Firstly, for the srcs note that we haven’t declared all of the Swift files. This could easily become a large list thus we are selecting all files from the SaladMaker/Sources directory. All of these files must be Swift otherwise the build would fail.
Second note that we are declaring SayHelloKit as a dependency; //SayHelloKit:SayHelloKit. Basically, we are saying that the dependency lives under the SayHelloKit directory from the root of the project (where WORKSPACE.bazel is located) with a module name SayHelloKit (after the colon :).
That’s it with the migration. You are ready to build now. In the terminal run the following command:
bazel build //SaladMaker:SaladMaker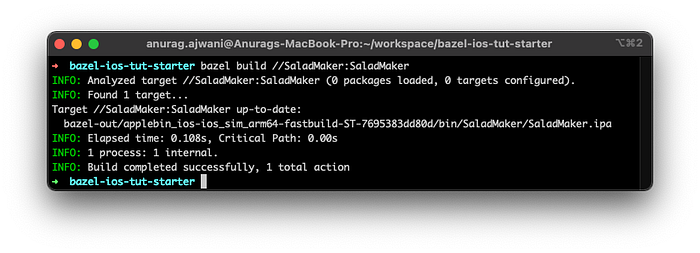
Debugging iOS apps built with Bazel
In the previous section, we migrated an existing app project from the Xcode build system to the Bazel build system. In the process, we restructured the directories. Finally, we built the app with Bazel through the command line.
However, how can we debug our app? Usually we’d run the app through Xcode in a simulator or device. At the time of writing there is no alternative debugging iOS apps to Xcode.
If you try to open the xcodeproj in the project it will not work as the files have moved and the references to the file locations are broken.
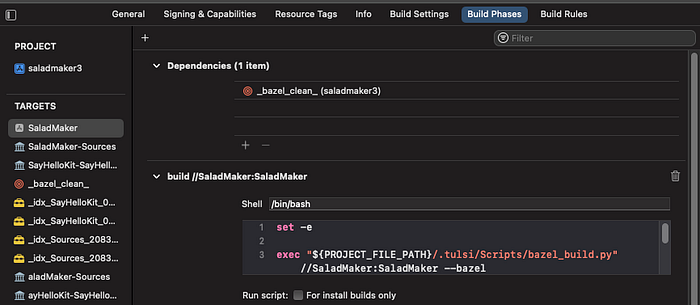
Furthermore, we want to use Bazel’s build system to benefit from the speedier build times. So how can we use Xcode to debug iOS apps whilst using the Bazel build system? There are two popular ways to generate xcodeproj’s for Bazel managed iOS projects:
These tools will generate xcodeproj’s and invoke the Bazel build system instead of Xcode’s default one. Then Xcode will use the build from Bazel and run the app on your choice of physical or simulator device. Which tool should we use and why? Let’s take a look at each of these.
Tulsi is UI based tool that leverages Bazel files to then build intermediate files. Then using those intermediary files it generates the xcodeproj. Tulsi needs to be installed and managed separately to Bazel.
XCHammer is a tool that can be installed through Bazel itself. It’s a rule that can be invoked through Bazel.
I won’t cover how to implement these. I will leave links to both tools how to’s:
Remote caching build outputs in Bazel
Bazel is fast at incremental builds–that is rebuilding only what’s been changed. However, building from a clean state can still take a significant amount of time. Parts of your app won’t change from feature branch to feature branch. Bazel allows us to cache build outputs in a remote server and reuse these when building from scratch.
In simple all you need is a managed object server. You can create, deploy and manage your own server. Alternatively, you can use Google Cloud Storage or AWS S3.
Once you have a remote server up and running we just need to remote cache parameter on bazel builds:
bazel build --remote_cache=http://replace-with-your.host:port //SaladMaker:SaladMakerYou can find more information on how to use remote caches with Bazel in the Bazel docs:
When not to use Bazel
Bazel is frequently used in fairly large projects with a large team contributing to it. These projects build times usually take tens of minutes or even close to the hour to build. Bazel is a powerful tool that can reduce build times to a fraction of the time. However adding any new tool to your project adds complexity to the project. Thus it is important that benefits outweigh the drawbacks when deciding to use a tool.
Bazel uses a language called Starlank which is a dialect of Python. The iOS engineers within your team will require to learn a new language to maintain the project and build configurations.
Also it’s important to note that Bazel is a third party tool not maintained by Apple. Thus when Apple launches new features or capabilities in the Xcode build system then Bazel will need to updated by the open source community. For example, the M1 Mac was introduced November 2020 however Bazel only fully supported it January 2022.
Additionally you rely on the Bazel community to keep tutorials and other resources to be up to date. At the time of writing the iOS tutorial of bazel.build points to the apple rules modules of nearly 3 years ago. This tutorial is broken and doesn’t work.
Here is a summary of why to avoid using Bazel:
- New tool and language to learn and maintain
- Slow to support to latest Apple features and capabilities
- Poor documentation
Summary
In this post we learned:
- What is Bazel
- How to migrate an existing app to use Bazel
- How to cache builds remotely in Bazel
- When not to use Bazel
Final Thoughts
I mentioned the drawbacks of using Bazel in this post. Companies using Bazel are those with large iOS app projects with modules numbers on the 10s or even 100s of modules. It’s in these projects where the impact of using Bazel are more likely to outweigh effort of implementing its use and maintaining it.
It is important to note that Bazel can require some effort. You will find developers tweeting about this often.
There are alternatives to Bazel for speeding up build times. One such alternative is Tuist. With Tuist the developer needs decide which modules to work on and use caches for the rest. Tuist is configured and written in Swift and works around Xcode. Thus iOS developers are likely to easily manage and maintain it. If you are interested to learn more about Tuist check out my tutorial.
Want to Connect?For more on iOS development follow me on Twitter!

