Build a Highly Available Kubernetes Operator Using Golang
Develop a simple Kubernetes operator from scratch
When a task operating in a Kubernetes cluster becomes repetitive, it probably means that we are not taking advantage of all the features that Kubernetes offers, because it is designed for automation. Normally, these tasks are performed by human operators, who have deep knowledge of how the system ought to behave, know how to deploy the application, and troubleshoot problems.
Before building an operator, we should consider the standard approach, which is choosing the right Kubernetes resource for our application. For example, if our application is stateful, a StatefulSet may be a better fit for our needs than a regular Deployment, because it providers extra features that you can benefit from, such as unique network identifiers, persistent storage, ordered deployments, and more.
If this approach does not succeed and standard resources do not cover the domain-specific logic of our application, we will need to extend Kubernetes behaviour to achieve automation and implement a Kubernetes operator.
In this article, we are building a hello world operator using the client-go library, making adaptations to it to achieve high availability, and deploying it to a Kubernetes cluster using Helm.
What Is a Kubernetes Operator?
Operators are extensions of Kubernetes that handle custom resource definitions (CRDs) to deal with specific use cases of our application. To do so, they follow the operator pattern, notably the control loop, which is a non-terminating loop that ensures that the state of the cluster fulfills the requirements defined declaratively by the user in the CRDs.
Some use cases of operators can be:
- Creating an application
Deploymentand auto-scaling the number of replicas depending on traffic patterns and other metrics. - Taking and restoring backups of a
StatefulSet, for example, a database. - Extending a standard resource to add new features and provide more flexibility. For example, Traefik defined the
IngressRouteCRD for extending the standardIngress.
In our case, since developing an operator can be complex, we will be building a very basic one that watches some CRDs and creates their Job counterpart resource.
Architecture of An Operator
The main goal of an operator is watching and reacting to Kubernetes API changes to ensure that the state of the cluster fullfils the requirements defined by those used in the CRDs. Since the number of events in a cluster can be massive, properly architecting your operator will be critical to ensure its good performance and scalability:
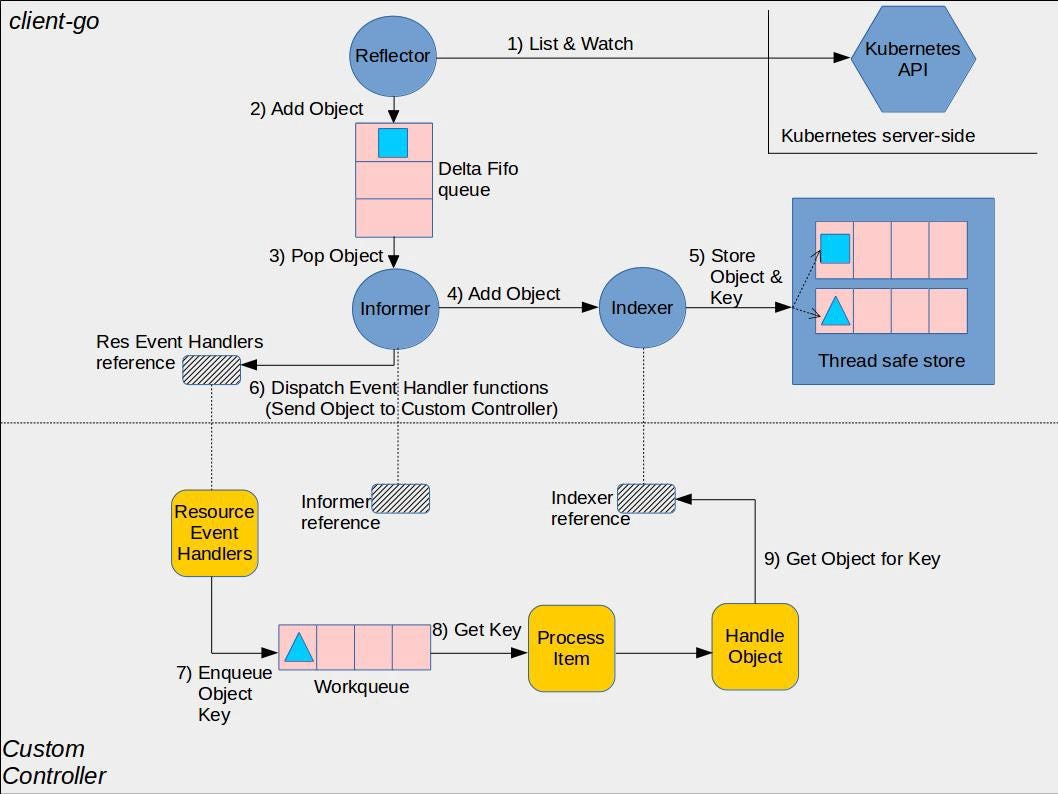
In this article, we will focus on the following client-go components:
- clientset: Clients interact with the different API Groups.
- informer: Keeps track of the changes in the API.
- indexer: Indexes the API objects in memory to avoid API calls.
- workerqueue: In-memory queue for processing the events related to the API objects in a concurrent safe way. This way we ensure that we never process the same event simultaneously in two different workers.
- leaderelection: Mechanism to elect a leader among multiple replicas that uses the Kubernetes lease objects under the hood.
Custom Resource Definitions
Before we start coding our operator, we need to define the CRDs that it will handle. As with any other API, Kubernetes allows you to define its custom API objects using an OpenAPI schema. Here’s some code:
This CustomResourceDefinition resource will be created by Helm when installing our chart; we just need to place it in the crds folder. We will go through the Helm chart details further.
Now, we can define the types used by the operator in the following code:
The structs are annotated for generating the clientsets and informers related to our CRDs as well as their deep copy methods. To achieve this, we will use the following script based on k8s.io/code-generator:
Controller
The first thing we need to configure is the connection to the Kubernetes API. There are two options here:
- KUBECONFIG: Environment variable that points to a kubeconfig file. Suitable for local development.
- InClusterConfig: Uses the pod’s service account token for accessing the API, so it also requires configuring RBAC properly. We will explain this in detail later.
Once we create our connection, we can instantiate a core Kubernetes clientset and also use our CRDs clientset to pass them to the operator (aka controller) as dependencies:
After that, we can configure the controller’s informers so that we can start receiving events about the resources we are interested in. We will be using cache.SharedIndexInformer for this purpose and centralizing the informer and indexer responsibilities in the same object. In other words, this object maintains the index updated by itself and allows you to configure event handlers to be notified about resource changes. The only requirement is that it needs to be synchronized on startup.
Events will be enqueued in a workerqueue.RateLimiterInterface. This is used to queue work to be processed instead of performing it as soon as an event happens. This way, we can ensure that only a fixed amount of objects at a time are processed, and also that we never process the same item simultaneously in different workers:
Worker
The worker’s responsibility is processing the events from the queue by performing operations that will ensure that the cluster is in the desired state. For doing so, the worker implements a non-terminating control loop that regulates the state according to the user’s requirements. In our case, regulating the state means creating a Job in response to an add Echo event.
For programmatically creating Kubernetes resource we will be using k8s.io/api, which is shown below:
The event type determines which method to call and where we will create or update the corresponding object. It is important to note that, when the controller starts, we will receive add events for consistency reasons, so we will need to check if we already have created the object to avoid creating it twice. The strategy for achieving this will be obtaining a key from the object meta and check if it already exists in the index. Here’s the code:
Running the Controller in High Availability
The last thing before deploying our controller is determining which architecture to use based on configuration: standalone or high availability. This is precisely the runner’s responsibility, but in this article, we will focus on high availability.
High availability implies running multiple replicas of the controller for ensuring that, if the leader goes down, another replica will acquire the leadership and start running the control loop for handling the CRDs.
Kubernetes is designed for solving distributed systems problems like this one and provides solutions out of the box for dealing with them. In this case, a lease object will do it; it will think of it as a distributed mutex, which can only have one replica, indicating that the corresponding replica is the leader, in this case.
That looks great, but… how can Kubernetes do this efficiently?
Kubernetes uses a distributed, key-value store called etcd which, unlike other key-value stores, provides a native mechanism for watching keys out of the box. This allows the consumer to reactively get changes without doing long polling or consuming extra network.
Besides, client-go includes the leaderelection package, which provides an abstraction for this using lease objects underneath as well. Here’s what that code looks like:
Let’s take a look at how the leader election works with our controller:
Deployment to Kubernetes Cluster
The code of our operator is ready to be deployed now. The next step will be creating a Helm chart. We will first define the values.yml for configuring the Kubernetes resources. Here’s the code:
As you can see, there’s an object ha for configuring the high availability. With that done, now we can conditionally create the keys related to high availability in our configmap, as shown below:
The deployment will set the replicas key if the high availability is enabled and also reference this configmap to export its keys as environment variables in the pods. The code is as follows:
Note that we are specifying a custom serviceAccountName in the deployment spec. The reason is that we need to define the security policies for that account so we can access the CRDs from the pods. Otherwise, we will access them with a default service account, which does not have access to the CRDs.
Behind the scenes, when using a service account in deployment, a volume with a token (/var/run/secrets/kubernetes.io/serviceaccount/token) will be mounted on the pods so they can authenticate in the Kubernetes API.
For defining the security policies for that token, we will use Kubernetes RBAC:
- ServiceAccount: Subject that will be granted permissions in the cluster.
- ClusterRole: Cluster-scoped role in the cluster that can perform certain operations on some resources.
- ClusterRoleBinding: Assigns a role to a service account.
Finally, we can deploy our operator executing the following commands:
helm repo add mmontes https://mmontes11.github.io/charts
helm install echoperator mmontes/echoperator
Creating a CRD
Last but not least, let’s see our operator in action creating a hello world Echo CRD, as shown below:
Wrapping Up
Building a Kubernetes operator is a tailored solution that should only be on the table if the standard Kubernetes resources do not cover the domain-specific needs of your application. The reason is that it requires a lot of time and Kubernetes knowledge of your team to tackle a very specific problem.
However, if you consider that your use case is advanced enough and you’ve decided to assume the cost, there are great tools in the Kubernetes community that will back you up:
As an alternative, you can consider investing this time in automating your development lifecycle using GitOps practises and keep on using standard resources.
Happy hacking! Thanks for reading.
Resources
- https://github.com/kubernetes/api
- https://github.com/kubernetes/apimachinery
- https://github.com/kubernetes/client-go
- https://github.com/kubernetes/code-generator
- https://pkg.go.dev/k8s.io/client-go@v0.21.3/tools/leaderelection
- https://kubernetes.io/docs/concepts/extend-kubernetes/operator/
- https://kubernetes.io/docs/concepts/architecture/controller/
- https://kubernetes.io/docs/concepts/extend-kubernetes/api-extension/custom-resources/
- https://kubernetes.io/docs/concepts/workloads/controllers/job/
- https://kubernetes.io/docs/reference/kubernetes-api/cluster-resources/lease-v1/
- https://kubernetes.io/docs/reference/access-authn-authz/rbac/

