Build Scalable Event-Driven Applications With Nest.js
We’ll explore a hands-on example of scalability issues that can happen and the common approaches to solving them.
In this article, I want to chat about elements of scalable event-driven applications available to developers with the Nest.js framework. I will demonstrate how easy it is to get going with a modern framework for building backend Node.js applications.
Agenda

What is Nest.js?

How Does Nest.js Help Build Highly-Scalable Apps?

Demo App and Tools

Demo App in Action
I want to briefly write about what is Nest.js and how does it help build scalable applications? I have a demo ready for you. We will describe the overall architecture and the tools used, then run and see our demo in action.
What is Nest.js?

It’s a framework for building Node.js applications.
It was inspired by Angular and relies heavily on TypeScript.
So it provides a somewhat type-safe development experience. It’s still JavaScript after transpiling, so you should care when dealing with common security risks.
It is a rather popular framework already, and you have probably heard about it.

Why use another framework?
- Dependency injection
- Abstracted integration with databases
- Abstracted common use cases: caching, config, API versioning and documentation, task scheduling, queues, logging, cookies, events, and sessions, request validation, HTTP server (Express or Fastify), auth.
- TypeScript (and decorators)
- Other design elements for great applications: Middleware, Exception filters, Guards, Pipes, and so on.
- And some more, which I will talk about later
Let’s quickly recap what the framework offers us.
One of the main advantages of using a framework is having a dependency injection. It removes the overhead of creating and supporting a class dependency tree.
It has abstract integration with most databases, so you don’t have to think about it. Some of the most developed and popular packages supported are mongoose, TypeORM, MikroORM, and Prisma.
It has abstracted common use cases for web development like caching, configuration, API versioning and documentation, queues, etc.
For the HTTP server, you can choose between Express or Fastify.
It uses TypeScript and decorators. It simplifies reading code, especially in bigger projects, and allows the developers’ team to be on the same page when reasoning about components.
Also, as with any framework, it provides other application design elements like middleware, exception filters, guards, pipes, and so on.
And finally, we’ll talk later about some other features that are specific to scalability.
How Does Nest.js Help Build Highly-Scalable Apps?
Let’s first recap the main strategies for building highly scalable applications.
Here are the options:
- Monolith (modular)
- Microservices
- Event-driven
- Mixed
Software development is all about trade-offs.
The first approach I want to talk about is using monolith.
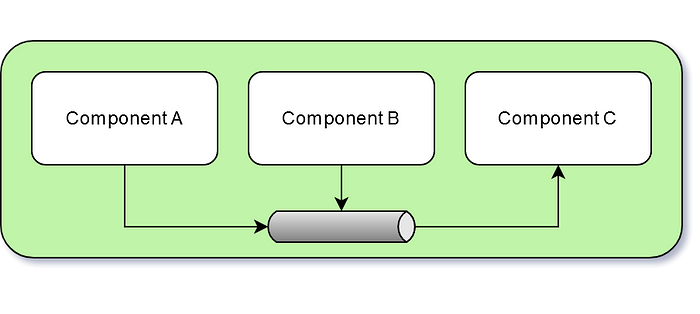
It’s a single application that has components tightly coupled.
They are deployed together, supported together, and usually, they can’t live without one another.
If you write your application that way, it’s best to use a modular approach, which Nest.js is very good at.
When using the modular approach, you can effectively have one codebase, but components of your system act as somewhat independent entities and can be worked on by different teams. This becomes harder as your team and project grow. That’s why we have other models for architecture development.
Microservices
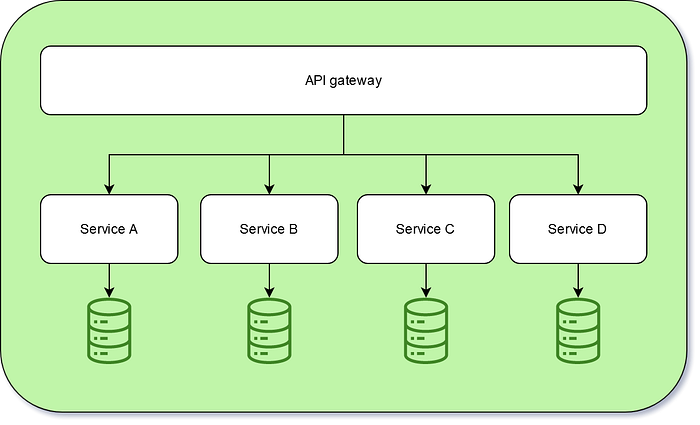
Microservices are when you have separate deploys for each service. Usually, each service is only responsible for a small unit of work and will have its store.
The event-driven approach is similar to microservices.
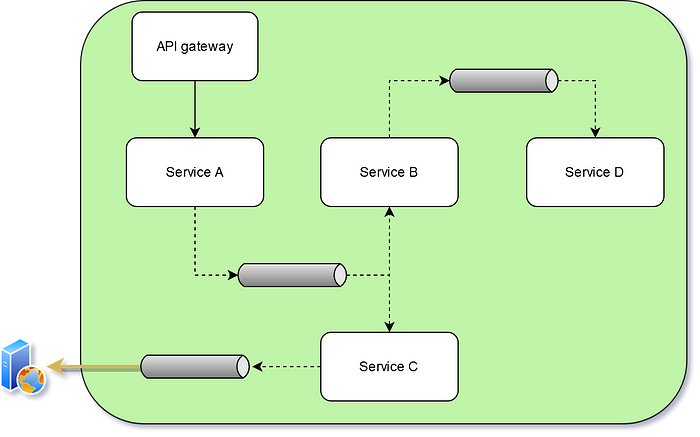
Now, you don’t have direct communication between services. Instead, each service will emit an event, and then it doesn’t care.
There can be listeners to this event, but there can be no listeners. If someone consumes the event, it can again produce another event that another service can consume, and so on.
Eventually, someone will produce a response for the client waiting. It could be a WebSocket response or webhook or whatever.
Services will communicate with other services via HTTP requests or messaging.
Mixed architecture
Usually, our larger projects are a mix of all designs — some components are tightly coupled and deployed together, some components are deployed separately, and some are communicating exclusively via event messaging.
Nest.js = Easy Event-Driven Application Development
Let’s think about why this framework simplifies event-driven development.
- Integrates with Redis/Bull for queue management (github.com/OptimalBits/bull)
- Integrates with most messaging brokers
- Promotes modular development
- Great documentation and examples
- Unit and integration testing is bootstrapped (DI, Jest)
First, it allows fast and simple integration of the popular Bull package for queues.
For microservices development and communication, it has integrations with the most popular messaging brokers like Redis, Kafka, RabbitMQ, MQTT, NATS, and others.
Third, it promotes modular development, so it’s naturally easy for you to extract single units of work later in the project’s life cycle.
My next point is that it has great documentation and examples, which is always nice. You can be running your first distributed app in minutes.
And another thing I want to note is unit and integration testing is bootstrapped for you. It has DI for testing and all other powerful features of the Jest testing framework.
Queues (npm/bull)
Now, let’s see how a simple queue can be created in NestJS.
Queues: adding the connection
First, you install the required dependencies with the following command:
npm install --save @nestjs/bull bull
npm install --save-dev @types/bull
Then you create a connection to Redis.
An example of Nest.js connection to Redis with Bull.
BullModule.forRootAsync({
  imports: [ConfigModule],
  useFactory: async (configService: ConfigService) => ({
    redis: {
      host: configService.get('REDIS_HOST') || '127.0.0.1',
      port: +configService.get('REDIS_PORT') || 6379,
      password: configService.get('REDIS_PASSWORD') || undefined,
    },
  }),
  inject: [ConfigService],
}),
And finally, register a queue.
An example of Nest.js queue registering with Bull.
BullModule.registerQueue({
  name: TRADES,
}),
Queues: event producer injects a queue
An example of Nest.js emitting events with Bull.
export class TradeService {
  constructor(@InjectQueue(TRADES) private queue: Queue) {}

  async add() {
    const uuid = randomUUID();

    await this.queue.add({ uuid });
  }
}
Next, somewhere else in a service constructor, you type-hint your queue, and it gets injected by the Dependency Injection container — you now have full access to the queue and can start emitting events.
Queues: event consumer processes the queue
An example of Nest.js consuming events with Bull.
@Processor(TRADES)
export class TradeService {
  @Process()
  async process(job: Job<TradeCreatedDto>) {
    // ...
  }
}
Somewhere in another module, you decorate your processor class with Processor() and Process() a minimal setup to have a queue system working.
You can have producers and consumers exist in one application or separately. They will be communicating via your message broker of choice.
Messaging Integration — Connection
Message provider connection starts with adding a client module connection. In this example, we have Redis transport and should provide Redis-specific connection options.
An example of Nest.js registering messaging client module with Redis.
@Module({
  imports: [
    ClientsModule.register([
      {
        name: 'MATH_SERVICE',
        transport: Transport.REDIS,
        options: {
          host: 'localhost',
          port: 6379
        }
      },
    ]),
  ]
  ...
})
Messaging Integration — Producer
The next step is to inject the client proxy interface into our producer service.
An example of Nest.js injecting messaging client modules into a service class.
constructor(
  @Inject('MATH_SERVICE') private client: ClientProxy,
) {}
Our options further are either SEND method or EMIT.
SEND is usually a synchronous action, similar to an HTTP request, but is abstracted by the framework to act via selected transport.
In the example below the accumulate() method response will not be sent to the client until the message is processed by the listener application.
An example of Nest.js sending messages to remote service via a messaging broker.
accumulate(): Observable<number> {
  const pattern = { cmd: 'sum' };
  const payload = [1, 2, 3];
  return this.client.send<number>(pattern, payload);
}
EMIT command is an asynchronous workflow start, it will act as fire and forget OR in some transports, this will act as a durable queue event. This will depend on the transport chosen and its configuration.
An example of Nest.js emitting messages to remote service via a messaging broker.
async publish() {
  this.client.emit<number>('user_created', new UserCreatedEvent());
}
SEND and EMIT patterns have slightly different use cases on the CONSUMER side. Let’s see.
Messaging Integration — Consumer
MessagePattern decorator is only for sync-alike methods (produced with the SEND command) and can only be used inside a controller-decorated class.
So we expect some response to the request received via our messaging protocol.
An example of Nest.js responding to remote service via a messaging broker.
@Controller()
export class MathController {
  @MessagePattern({ cmd: 'sum' })
  accumulate(data: number[]): number {
    return (data || []).reduce((a, b) => a + b);
  }
}
On the other hand, EventPattern decorator can be used in any custom class of your application and will listen to events produced on the same queue OR event bus, and it does not expect our application to return something.
An example of Nest.js processing a message from a remote service via a messaging broker.
@EventPattern('user_created')
async handleUserCreated(data: Record<string, unknown>) {
  // business logic
}
This setup is similar to other messaging brokers. And if it’s something custom, you can still use a DI container and create a custom event subsystem provider with Nest.js interfaces.
MQTT and NATS examples of consumers for Nest.js.
// MQTT
@MessagePattern('notifications')
getNotifications(@Payload() data: number[], @Ctx() context: MqttContext) {
  console.log(`Topic: ${context.getTopic()}`);
}

// NATS
@MessagePattern('notifications')
getNotifications(@Payload() data: number[], @Ctx() context: NatsContext) {
  console.log(`Subject: ${context.getSubject()}`);
}
RabbitMQ and Kafka examples of consumers for Nest.js.
// RabbitMQ
@MessagePattern('notifications')
getNotifications(@Payload() data: number[], @Ctx() context: RmqContext) {
  console.log(`Pattern: ${context.getPattern()}`);
}

// Kafka
@MessagePattern('hero.kill.dragon')
killDragon(@Payload() message: KillDragonMessage, @Ctx() context: KafkaContext) {
  console.log(`Topic: ${context.getTopic()}`);
}
This is how easy it is to integrate with most common messaging brokers using Nest.js abstractions.
Demo App and Tools
Available at the following link github.com/dkhorev/conf42-event-driven-nestjs-demo.
In this section, I will review a part of a real application (simplified, of course). You can get the source code at my GitHub page to follow along or try it out later. I will demonstrate how properly designed EDA can face challenges and how we can quickly resolve them with the framework's tools.
Demo app overview
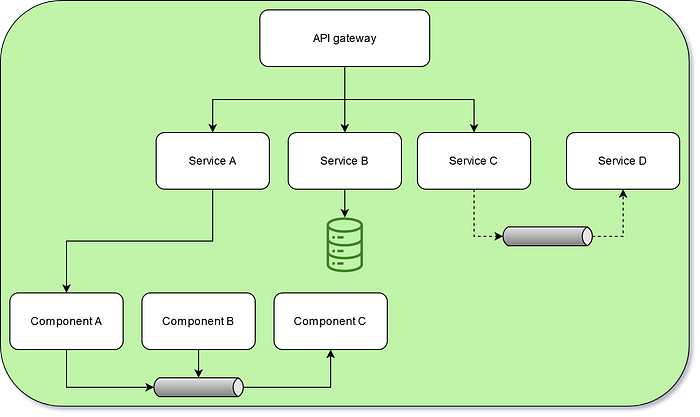
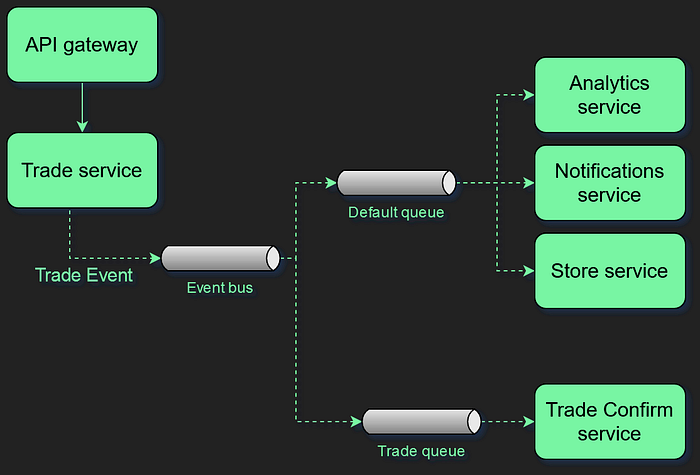
Let’s first do a quick overview. Our expected workflow is like this:
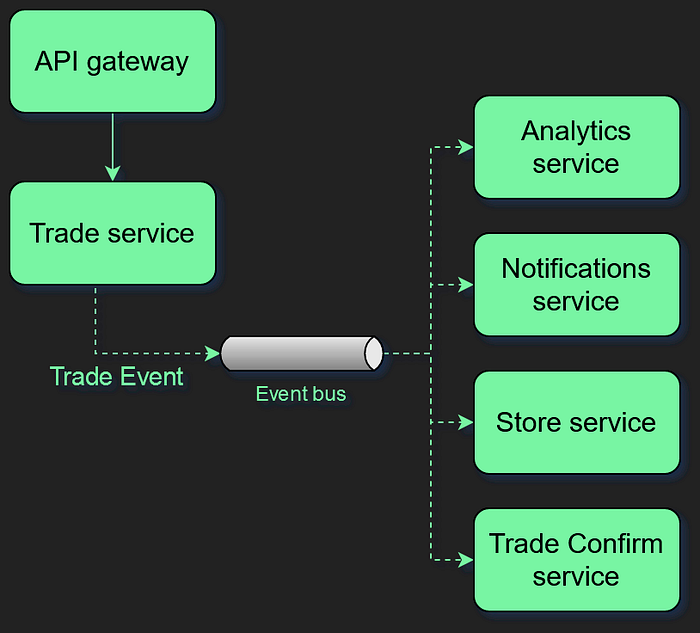
We have an action that has happened in our API gateway, and it touches the trade service, which emits an event.
This event goes to the queue or event bus. And then, we have four other services listening to it and processing it.
To observe how this application performs, I use a side application which is my “channel monitor.” This is a powerful pattern to improve observability and can help automate scaling up and down based on channel metrics.
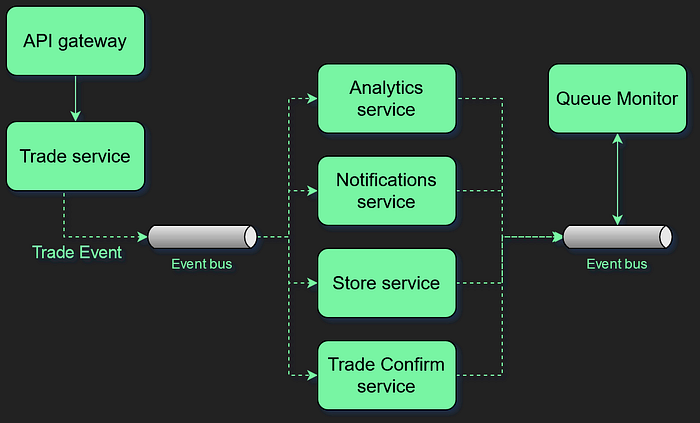
I’ll show you how it works in a bit.
Demo App in Action — Normal Conditions
I prepared a Makefile so you can follow along.
First, run a make start command that will start docker with all required services. Next, run a make monitor command to peek into application metrics.
The monitor shows me the queue name, the count of waiting jobs, the count of processed jobs, and the number of worker instances online.

As you can see, under normal conditions, the jobs_waiting count is zero, the event flow is slow, and we don’t have any jobs piling up.
This application works fine with a low event count. But what happens if traffic suddenly increases?
Demo App in Action — Traffic Spike
You can start this demo by running the make start-issue1 command and restarting the monitor with the make monitor command. Our event flow is increased by three times.
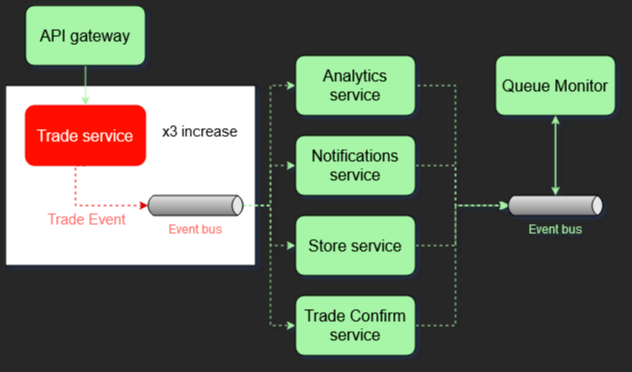
You will notice eventually in the monitor app that the jobs_waiting count will start to increase, and while we still are processing jobs with one worker, the queue has already slowed down compared to the increased traffic.

Now we can see that this throttles our mission-critical trade service confirmation.
The worker would process all events without priority, so each new trade confirmation must first wait for some over events to complete.
You can imagine this creating slower response times on our front-end client applications for trade processing.
Solutions?
Let’s explore the options we have to fix this:
- Scale the worker instance so it will process the queue faster
- Increase the worker instance count
- Application optimizations
- Separate the queues
- Prioritize events
The first and most obvious is to scale the worker instance so it will go faster. In the Node.js world, this is rarely a good solution unless you are processing high CPU-intense tasks such as video, audio, or cryptography.
The second is to increase the worker instance count. This is a valid option but sometimes not very cost-effective.
Next, we can think about application optimizations, including profiling, investigating database queries, and similar activities. This can be time-consuming and render no result or very limited improvements.
Our last two options are where Nest.js can help us with. It’s to separate the queues and prioritize some events.
Step 1 — Separate the Queues
I will start by applying a queue separation method.
The trade queue will only be responsible for processing trade confirmation events.
My code for this will look like this:
this.queue.add(JOB_ANALYTICS, { uuid });
this.queue.add(JOB_NOTIFICATION, { uuid });
this.queue.add(JOB_STORE, { uuid });
// this.queue.add(JOB_TRADE_CONFIRM, { uuid });
this.queueTrades.add(JOB_TRADE_CONFIRM, { uuid });
The first step is to ask our PRODUCER to emit a TRADE CONFIRM event to a new queue - TRADES.
On the consumer side, I extracted a new class called TradesService and assigned it as a listener to the TRADES queue.
@Processor(QUEUE_TRADES)
export class TradesService {
  protected readonly logger = new Logger(this.constructor.name);

  @Process({ name: '*' })
  async process(job: Job<TradeCreatedDto>) {
    // ...
  }
}
The QUEUE DEFAULT listener service stays the same. I don’t have to make any changes here.
@Processor(QUEUE_DEFAULT)
export class DefaultService {
  protected readonly logger = new Logger(this.constructor.name);

  @Process({ name: '*' })
  async process(job: Job<TradeCreatedDto>) {
    // ...
  }
}
Now, whatever happens, whatever spike we have — the trades will never stop processing (they’ll slow down but will not wait for unimportant events).
You can run this example with the start-step1 command and restart the monitor.
You will notice that the trades queue has a jobs_waiting count of zero, but the default queue is still experiencing problems.

And now, I will apply our second step for scaling based on the information I have, I increase the worker instance count to 3 for the DEFAULT QUEUE only.
Step 2 — Scale Workers
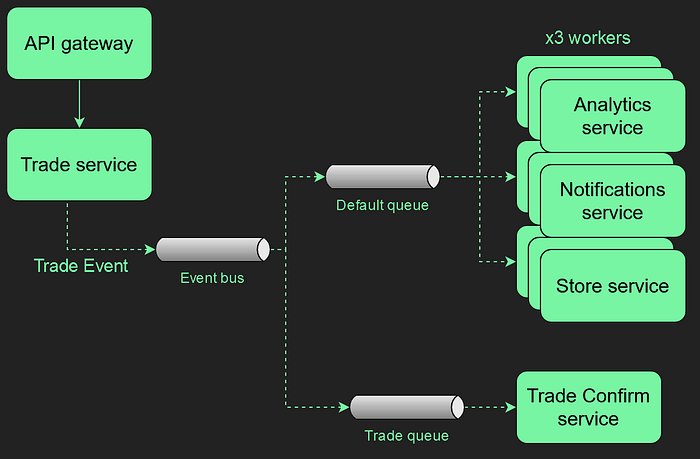
You can start this demo by running the start-step2 command and restarting the monitor. Over time, this application goes to zero jobs_waiting on both queues, so good job!

As you can understand, my example is a bit contrived and is mostly for demo purposes. You can easily see tho how we can leverage channel monitor patterns to programmatically react to our app performance changes by scaling up or down separate queue workers.
Solutions — Recap
Let’s recap. I applied the following solutions here from my list:
- Scale the worker instance so it will process the queue faster
- Increase the worker instance count
- Application optimizations
- Separate queues
- Prioritize events
Created a separate TRADES queue that also automatically prioritized those events over others.
Next, I increased the worker instance count for the DEFAULT QUEUE to 3.
All of this was majorly done for me by Docker and the Nest.js framework.
The next step you can implement by just using the framework's tools is prioritizing some other events over others. For example, anything related to logging or internal metrics can be delayed in favor of more mission-critical events like DB interactions, notifications, etc.
The repository with the test code is here: github.com/dkhorev/conf42-event-driven-nestjs-demo.
For containers and modular development, I use a Container Role Pattern described at this link.
I hope this was helpful. Good luck, and happy engineering!