How To Build a Redux-Like Store With React Context and Hooks
And add authentication along with routing to your app

On a fine Saturday morning, you wake up with a brilliant idea for your next side-project. You have been thinking about it all week and now you’re ready to dive in. Anyway, you wanted to experiment with all that hot new tech and frameworks you have been missing out on in your boring day job.
You have the idea roughly sketched out for a front-end application, using all the latest and greatest features of React (Context, Hooks, etc., etc.) along with a serverless back end (maybe using Cloudflare Workers?)
You open your favorite editor with a shiny new create React app running, ready to be the next big thing.
And bam! A few hours into development, you realize you actually haven’t done anything but ended up with dozens of tutorial tabs and docs open, only to be confused and frustrated with all these new features and jargon.
That’s exactly where I was when I decided to write this guide to help myself organize my learning and hopefully share that knowledge with a frustrated dev like me.
In this guide, I’m going to start with the basics of both Context and Hooks, and gradually integrate them with each other to create a simple but functional state manager like Redux.
State Management in React
So, let’s go back a little and define my requirements. I want to set up a React application and:
- Use Context and Hooks for global state management.
- Implement authentication using global state.
- Configure routing with public and private routes.
If you have these three in place, the rest of the app is pretty much the usual React business.
Working with global state using Redux is fairly straightforward. You implement a store with some initial value, write reducers that will help you update the store, write actions and action creators, used to dispatch updates to store.
Then you simply connect any component in your application to the store to be able to use the global state or make updates.
We are going to see how we can achieve something similar using Context and Hooks. Our plan would be to:
- Implement simple state management using Hooks.
- Convert this state to be a global state using React Context.
- Abstract away the Hooks+Context logic into a nice, reusable API similar to Redux with a store, reducers, and actions.
- Use the created store to implement simple authentication along with Routing
Let’s start with Create React App and experiment a little.
npx create-react-app react-context-example
cd react-context-example
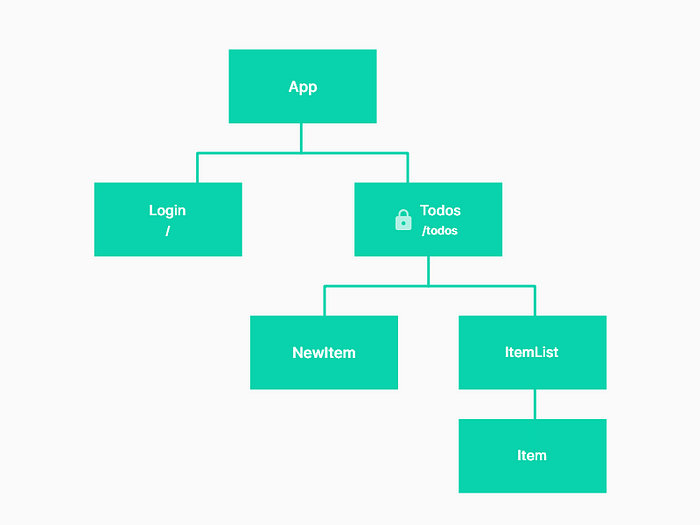
yarn startWe will start with a very simple to-do application which has three components, as follows:


Let’s add the following components:
Next, we want to introduce a state to store the list of to-dos and be able to add and remove to-do items.
State Using Hooks
Hooks are a new addition in React 16.8. They let you use state and other React features without writing a class.
Previously, we would have converted the App component into a class component and introduced state to the class.
But, with React Hooks, we can keep it as a functional component and introduce state using the useState Hook. A very nice introduction to Hooks can be found in the Hook’s documentation.
Let’s update App.js as follows:
Here, we have declared an array of items as a state variable using the useState Hook. It takes the initial state as a parameter and returns two values, the first is the state itself and the second is a function to update the state.
Note that unlike setState in class components that you may be used to, the Hook’s state update method does not merge existing data. Therefore, we have to take care of merging before passing the updated state.
For this, we define two functions, handleAddItem and handleRemoveItem, to add and remove items. Also note that these functions are passed down into our child components NewItem and ItemList as props.
Now we have a basic but functional to-do list. You can go ahead and introduce another state Hook into the NewItem component to capture the text input by user.
As you can see, using Hooks make our code a little bit cleaner and makes us avoid class components and lifecycle Hooks we may need to be concerned about.
Moving forward with our goal of creating a Redux-like store, this lets us abstract away state management logic and makes it reusable. Especially the useReducer Hook, which we will take a look at in a moment, allows us to wrap this in a nice API.
Using React Context
Now, let’s explore what React Context is. React describes context as:
“Context provides a way to pass data through the component tree without having to pass props down manually at every level.”
This is exactly what we need for global state management. You start with a top-level component that uses Context to store global state.
Then, anywhere within your component tree, you can access and/or make updates to this state. This is pretty much the basic idea behind global state managers like Redux.
Remember we had to pass down the handleAddItem and handleRemoveItem methods as props to child components? Let’s refactor this to be obtained from the Context without having to drill down the props.
Using React Context is pretty easy. It takes the following form. First, you create a Context with a call to React.createContext(). This takes an optional initial value as an argument.
Then, you need to provide the Context somewhere in your component tree, using Context.Provider, so that components below that will have access to it. Then, wherever you want to use the Context, use Context.Consumer which will have access to the value.
const MyContext = React.createContext(/* initialValue /*)<MyContext.Provider value={/* value*/}>
  <MyContext.Consumer>
    { value => /* components can access the value object */ }
  </MyContext.Consumer>
</MyContext.Provider>
A good explanation of React Context is available in the documentation.
Let’s start by creating a new Context for our to-dos in contexts/TodoContext.js.
Update the App component as follows, to provide the TodoContext to our component tree.
Next, we can use the TodoContext.Consumer within our child components and have access to the state value passed to TodoContext.Provider.
You may notice that we are repeating the TodoContext.Consumer wrapper everywhere we need to consume the Context value. We can refactor this using the useContext() Hook and make it less verbose.
At the moment, we are storing our global state in the App component. This is not a very desirable behavior, especially as our to-do state grows in complexity and it’s not exactly the responsibility of the App component to hold the global state.
So, let’s move it to our already created TodoContext.
We are exporting two functions here. One is a the TodoProvider component, which is actually a higher-order component, wrapping the TodoContext.Provider along with a state.
This becomes our global store and we need to update the App component as follows:
The second export is simply a custom Hook, wrapping the useContext Hook which already has TodoContext passed into it. In Items.js, you need to import useTodoContext and replace:
const todoContext = useContext(TodoContext);With:
const todoContext = useTodoContext();That’s it! Now we pretty much have a neat global store built with React Context and Hooks.
Following the same pattern, you can create new ContextProviders, wrap your application with it, and then use a custom useContext Hook anywhere in your component hierarchy to use it as a store. Feel free to take a break at this point.
Adding Reducers and Actions
The following sections are heavily inspired by Redux. If you are not familiar with Redux please check out the documentation first.
Our state update logic is defined as functions in TodoProvider and each of these functions is stored as reference in the state itself, which can be accessed by consuming components to update the state.
Following the Redux pattern, we can introduce Actions and Reducers to our state manager. We can have actions that describe what happens to our state and a reducer that will handle state changes corresponding to the said actions.
Let’s start by creating the actions ADD_TODO, REMOVE_TODO, and CLEAR_ALL. For now, I’m going to add all the actions and the reducer inside the TodoContext.js file itself. If this gets too large, feel free to split your code into separate files.
First, I have created a few actions and corresponding action creators, pretty similar to Redux. Then, we have the reducer, which is again a simple pure function that takes state and action as arguments and returns the updated state.
Then, inside our TodoProvider, we are changing the useState Hook to the useReducer Hook. It accepts a reducer and an initial state (unlike in Redux, where we pass the initial state to the reducer, it’s recommended to pass initial state into the useReducer Hook).
The two values returned by useReducer are the state itself and a dispatch function which we can use to dispatch our actions.
Since our consumer components would want to use the dispatch function, we pass it as a value in TodoProvider. Now we are all set to use the state and dispatch actions from our consumer components.
Notice how I have destructured the dispatch method from useTodoContext() and used it to dispatch an action of adding a to-do. Similarly, we use state value and dispatch it along with relevant actions to list to-dos and remove to-dos.
Implement Authentication Using Context+Hooks Store
Now that we have a usable global store implementation, let’s go back to our main requirement and implement authentication.
We need to have a separate Context to store the authentication details. So, our global state would look something like this:
{
  auth: {
    isLoggedIn: true,
    name: "John",
    error: null,
  },
  todos: []
}
We need to have routing configured with base route / displaying a log-in page and a protected route /todos which will display a to-dos page if the user is logged in.
We can update our component hierarchy as follows. Todos component will handle all to-dos and live in the /todo route which will be a private route. If a user is not logged in, they will be redirected to the / route, which will render the Login component.
First, add react-router and set up the components.
yarn add react-router-domWe can follow the same pattern we used for TodoContext to create AuthContext for authentication which is pretty straightforward and self-explanatory.
Before we use the AuthContext, we need to make sure we are providing it at the top of our application.
So, let’s wrap the entire app with AuthProvider. Meanwhile, I’m going to enhance our Greeting component to use the auth state and display a greeting and a log-out button.
Add Login Functionality
Now that we have auth store configured, we can start building the functionality of the Login page.
Inside the log-in page, we need to use the store to check whether the user is already logged in and if so, redirect them to the Todos page.
If not, we display the log-in form and on submit, we call our mocked log-in API. If the login is successful, we can dispatch the loginSuccess action or otherwise dispatch the loginFail action.
Protect the Routes
Next, let’s make the /todos route private so that only a logged-in user can access it. Anyone else will need to be redirected back to the log-in page.
We can do this by simply wrapping the react-router Route component with a higher-order component and using the AuthContext inside it to decide whether to render the route or redirect to the log-in page.
Now we can simply use PrivateRoute instead of Route to make any route inaccessible to logged out users.
Conclusion
And we are done!
We learned how to build a Redux-like store gradually, using Context and Hooks, and you can use this as a simple and lightweight alternative to Redux in your next project.
For the next steps, you can try experimenting with store middleware, check out how to combine Contexts (something like Redux combineReducers()), as well as check out the other Hooks provided by React.
Check out the full source code on GitHub.