Build a Core ML Movie Recommender SwiftUI App Using Create ML
A movie recommender system
Recommender systems are essential today due to the vast amount of content and information every product provides. It’s unfair and unrealistic to expect users to consume and filter this wealth of information as needed; hence, the need for recommender engines arose.
Almost every platform—from Amazon, Netflix, and YouTube to Facebook, Spotify, and even Medium have their own recommender systems to personalize, filter, and present information and content users are likely to enjoy.
Recommender systems are a secret weapon that many products and services invests a lot in in order to deliver relevant content that matters to the user, thereby boosting user engagement and traffic. It’s essential for e-commerce products to get this right. A good recommendation system can boost their sales which eventually leads to better profits.
Types of Recommendation Systems
Typically, recommender systems are built using the following paradigms:
- Content-Based
- Collaborative Filtering
- The content-based method relies on item similarity, based on the various common attributes that the users/items have. For example, for a movie recommendation, tags such as genre, director, and year of release are some of the key attributes that play a role in recommending movies to the user.
On the other hand, collaborative filtering recommends items to a user based on other users' preferences. Based on the kinds of items the user likes, it recommends new items that users with similar preferences had liked in the past.
Both categories have their own sets of pros and cons. While content-based recommendations rely on the user and item information (and thereby threaten to invade a user’s privacy to an extent), collaborative filtering depends only on user-item interactions. Collaborative filtering requires a substantial amount of historical data for building accurate recommendation engines.
Bringing recommendation systems onto mobile devices is a big step in user privacy. It gives the user more confidence over the content it’s interacting with by ensuring that their information stays on the device. Plus, anything that works data-free is a big bonus.
Create ML’s New Recommender Template
Create ML makes model training and deployment super easy and fun since it doesn’t require any machine learning expertise. Xcode 11.3 (currently in beta at the time of writing) introduces the new recommender template to build recommendation models quickly.
Alternatively, or for previous Xcode versions, you can use the MLDataTable and MLRecommender classes for training recommendation systems programmatically using Create ML in macOS playgrounds.
Core ML recommender models help user privacy by staying on-device and data-free with no server dependencies needed.
Our Goal
The idea of this tutorial is to showcase the ease with which mobile machine learning developers can build recommender systems using Create ML.
- We’ll be using Collaborative Filtering to demonstrate a simple movie recommendation system prototype using a small dataset.
- Leveraging the Recommender template that’s a part of Create ML application to train our models. Also, we’ll walk through building the same models programmatically, as well.
- Using the Core ML models built, we’ll predict the top K movie recommendations based on user ratings in a SwiftUI-based iOS application that uses the Combine Framework.
Our Dataset
I’ve created my own small dataset comprised of some movies that were rated by me and my group of friends. The idea is to recommend movies to the newest member of our squad. Based on whether he agrees with our movie recommendations, we’ll decide his/her membership duration with the squad!
The CSV dataset was built using an Excel sheet, which consists of three columns: user_id, item_id (movie title), and rating_id (user ratings). Here’s a glimpse:

Collaborative filtering works using the K-nearest neighbors algorithm to find similar users based on the ratings given by the new user. Subsequently, a weighted sum of the movie ratings that are not yet rated by the new user is computed in order to find the top K most recommended movies.
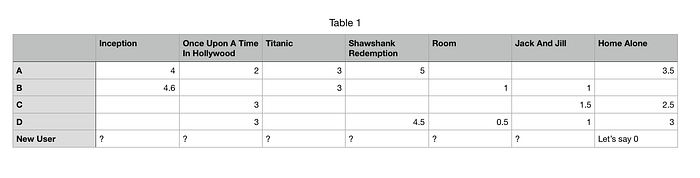
Here’s an illustration of the user-item (movie) matrix, where on the basis of the predictions made by the four users and the new user’s ratings, our model should predict the most similar ones. If a user hasn’t rated a movie, it’s considered as 0.
Building our Create ML Model
Now let’s launch our Create ML application, which is a part of Xcode 11.3 and above, and select the Recommender template. Inside that, the CSV file that we saw earlier would be fed as the input. Create ML automatically identifies the number of unique items.
However, you do need to point the appropriate column names to the User, Items, and Rating inputs, as shown in the right-hand side image below:

Next, just press the training button. Our model should be ready very quickly time given the small size of the dataset. You can then create live users in the output panel and test the recommendations, as shown below:
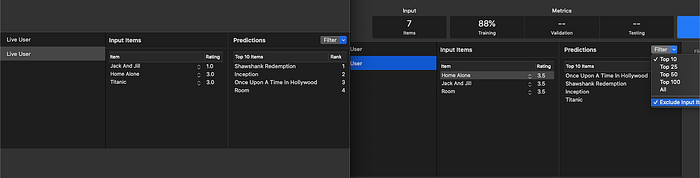
In the above two outputs based on the ratings we give to certain input items, we get the recommended movies depending on the similarity of the input to the past data.
Ratings take up integer values greater than zero. Setting zero values is equivalent to nothing.
Training our Model Programmatically
In case you aren’t using Xcode 11.3 or want to train the model programmatically, launch a new macOS playground, add the CSV to the MLDataTable and create the MLRecommender Core ML model in your Xcode playground, as shown below:
import Cocoa
import CreateMLlet trainingData = try MLDataTable(contentsOf: URL(fileURLWithPath: "/Users/anupamchugh/Downloads/MoviesList.csv"))let model = try MLRecommender(trainingData: trainingData, userColumn: "user_id", itemColumn: "movie_id", ratingColumn: "rating_id")let metrics = model.evaluation(on: trainingData, userColumn: "user_id", itemColumn: "movie_id")let recs = try model.recommendations(fromUsers: ["D"])
print(recs)let metadata = MLModelMetadata(author: "Anupam Chugh", shortDescription: "A model trained to handle recommendations", version: "1.0")try model.write(to: URL(fileURLWithPath: "/Users/anupamchugh/Desktop/MovieRecommender.mlmodel"), metadata: metadata)
The MLRecommender requires the MLDataTable and the three-column arguments as input.
MLDataTable is useful for CSV parsing and also for splitting, adding, merging, deleting tables, rows, and columns. It’s the Pandas equivalent for non-Pythonic mobile application developers.
Now that our Core ML model is ready (either via the template or generated programmatically), we’ll create our SwiftUI-based iOS Application.
Building our SwiftUI Core ML Application
We’ll be building a SwiftUI-based application that uses the Combine Framework to display the Core ML model recommendations. Just drag and drop the model we created from the previous section into your new Xcode project to get started.
For those who aren’t aware of the above-mentioned frameworks, here’s a quick summary:
- SwiftUI is a declarative, state-driven framework that makes it easy to build and modify the UI of our iOS 13 and above applications.
- Combine is Apple’s new Reactive programming-based framework that lets us emit values over time and listen to it.
We’ll bring the Core ML framework into the mix to make our custom movie recommendation application. Let’s get started.
Building our UI
Our user interface consists of a SwiftUI List that’s used to display the top K movie recommendations based on the score. The following code lays out the UI of our application:
The ObservedObject is a property wrapper and is part of the Combine Framework. It’s responsible for updating the SwiftUI List based on the predictions returned from the Core ML model in the Recommender class, which we shall see next.
Before we do that, let’s have a glimpse at our data structure model, which populates each SwiftUI List Row.
struct Movie: Identifiable {public var id = UUID()
public var name: String
public var score: Double}
In the above code, the Swift structure implements an Identifiable protocol, which is responsible for identifying each SwiftUI List row as a unique one.
Note:
ContentView_Previewsare responsible for displaying the SwiftUI views in real-time. Thanks to SwiftUI, we can view our model predictions directly in the Preview canvas without the need to build the project on a simulator or device.
Running our Core ML Recommender Model
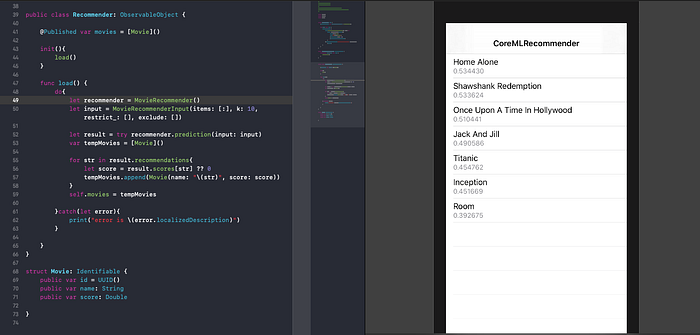
The Recommender class is where we run our recommender model predictions based on user inputs. The following code snippet is responsible for running the model predictions and updating them in the SwiftUI List:
In the above code, we’re doing quite a few things. Let’s list them:
MovieRecommenderInputis the auto-generated class from our Core ML model. We pass our user input here, which is a dictionary of item-rating pairs.kargument takes as a value the number of similar items to be returned by the model output.- In the
restrictargument, we pass the items that we want to see in the recommendation output. Items that we do not want to see are passed in theexcludeargument. - The result returned from the recommender model consists of item
recommendationsandscores, which indicate how similar the items were to the items selected by the user. - Finally, we append the results and their scores in the
moviesarray of Structs. ObservableObjectis a protocol that’s a part of the Combine Framework.PublishedObjectis a property wrapper used on properties that’ll update the SwiftUI views.
Since, in the above code, we didn’t pass any user input, our recommendation model returns us the top movie recommendations based on all the user ratings in the dataset.
In order to pass the new user’s choices to the recommendation model, you can add Picker views on each of the SwiftUI Lists that allow selecting a rating for every movie. For the sake of simplicity of this article, we’ll be skipping that aesthetics portion.
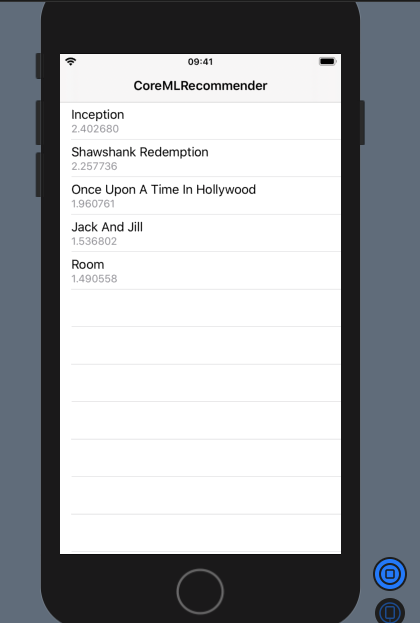
The following code shows the user’s input, which is a dictionary of item-rating pairs that are passed into the Core ML model input:
let ratings : [String: Double] = ["Home Alone": 3.0, "Titanic": 3.5]let input = MovieRecommenderInput(items: ratings, k: 5, restrict_: [], exclude: [])let result = try recommender.prediction(input: input)
In return, we get the following recommendations in our SwiftUI Simulator Preview:
That output looks pretty fine given our small dataset. The full source code of the above SwiftUI Core ML recommender application, including the datasets, is available in this GitHub Repository.
Conclusion
Using the new Create ML Recommender template, we saw how easy it was to build and ship our own recommender system in a SwiftUI application. We used the Combine Framework alongside Core ML to update our SwiftUI views reactively, based on model predictions.
Create ML has been making good strides in the field of mobile machine learning, allowing mobile developers to build their own models interactively without much machine learning expertise.
Moving on from here, you can try building your own recommender systems. There are plenty of datasets available on Kaggle for Netflix, songs, books, and more.
That’s a wrap for this one. I hope you enjoyed reading.

