Build a CLI Tool for Data Masking, Encryption, and Decryption With Rust
Weekend build and learn
I realized I had less time for coding recently — kids’ soccer season plus music classes and my job. Some readers reached out to see if I was OK, which was touching.
Even time is the challenge. However, I did not stop coding; I just wanted to finish this weekend’s build and learn before I could write it up.
I still maintain a short time for observation, thinking, and coding. Our life needs our passion to make it enjoyable, right?
Motivation and Background
Everything starts with motivation. The most recent hot topic is AI, chatGPT, etc.
It will significantly impact the IT industry, and we all hope this progress and innovation will continue in a positive direction that will benefit human society.
If you look into AI, the fundamental keys are the data, compute power, and models.
How we ensure data security and get the most value from the data will be a critical and crucial topic in the industry.
The data is the new “oil” to feed the model training. Data masking and encryption will significantly reduce the risk while preparing for AI’s integration and implementation.
So, for this weekend’s build and learn, I will leverage Rust’s memory/concurrent safety features to build a CLI tool that is simple and extendable with audit capabilities for data masking, encryption, and decryption.
Also, I will link to the open source project in the end, as I hope to help the community protect the data before the AI integration/implementation.
A Tour of M.E.D.
Installation
Currently, there are two ways to install the M.E.D:
Installation with cargo
## install the package via cargo
cargo install med_cli

## navigate to the binary location
cd $HOME/.cargo/bin
Installation with packages
Navigate to the release page in GitHub.
And download the package. The download will differ depending on your current OS. I’m also working on the submission section to allow different types of package managers during the download process.
M.E.D. in action
Let’s say you have a directory containing some csv files and have the name, email, and phone fields you want to mask.
Prepare Configuration File
If you are using the cargo installation, you must prepare the config files; this configuration file applies to both CSV and JSON.
### conf.yaml example
mask_symbols: "#####" # mask symbols
fields: # list of the cols/fields you want to mask
  - name
  - email
  - phone
If you download the packages, a demo folder will contain the demo configuration files and data.
Execution
Let’s get into the execution with the parameters.
- Med has three critical modes: mask, encrypt, decrypt
- When in the encrypt or decrypt modes, we must provide the key and standard [des64, aes128, aes 192, or aes256].
- The default output dir will be in the same dir named output if you don’t specify the custom dir.
Here’s an example:
### mask the csv files in folders
med mask -f demo/data/csv -c demo/conf/conf_csv.yaml -w 3

### encryption the files will need to provide key(-k) and standard(-s) of encryption
med encrypt -f demo/data/csv -c demo/conf/conf_csv.yaml -w 8 -k SERCET_KEY -s des64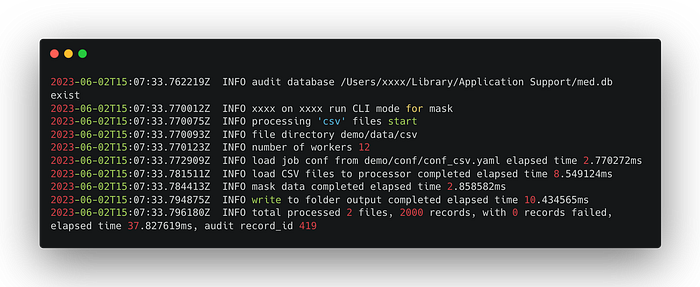
Note: For simplicity, the program will automatically set up the Audit SQLite database, and every execution will be recorded to it. You can find the location in the execution INFO. We will dig into it more in the details below.
After the tour, I hope you will be interested in how these tools are built, so let’s break it down into high-level implementation details.
But first of all, I would like to talk about the design principle of M.E.D.
Why does the design principle matter?
As I mentioned in some of my previous articles, software engineers are sometimes just like an artist; the tools or software we build need to have the “soul” (principle):
How these tools or software can help people, and in what way?
The most important thing about the design principle is that it can help you sharpen and structure the design, build, and maintain the product(application/software) we built.
Design Principles
There are three main principles:
- Simplicity
Simple to use for the user, including the easy to install/set up and configurable. - Extendability
Extendable to different integration patterns, such as standard API or integration-focused SDK. - Audibility
Data manipulation SHALL be traceable, ensuring the overall operation can be auditable end to end, which is part of the enterprise readiness.
Design and Software Architecture
Now, we initial the design, which is based on the three principles above.
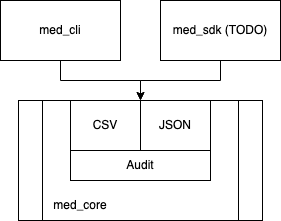
The core component (med_core) contains the following:
- The main processor for CSV and JSON files.
- Capable of creating the audit table.
- Inserts the runtime status/metrics into the audit table.
And break the implementation level down as you can see below:
This implementation details objective is to keep the extendable and reusability based on the trait implementation.
High-level Code Walkthroughs
Workspace setup
Extensibility aims to interact between the M.E.D. core and other components, such as CLI or future SDK.
We are leveraging the Rust workspace setup to decouple the application components in a structured way, which also follows the single responsibilities design pattern.
The workspace will be set up as follows:
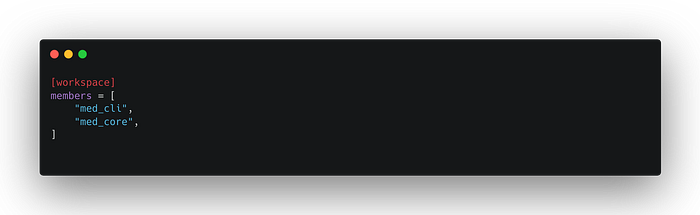
The code structure layout is as follows:
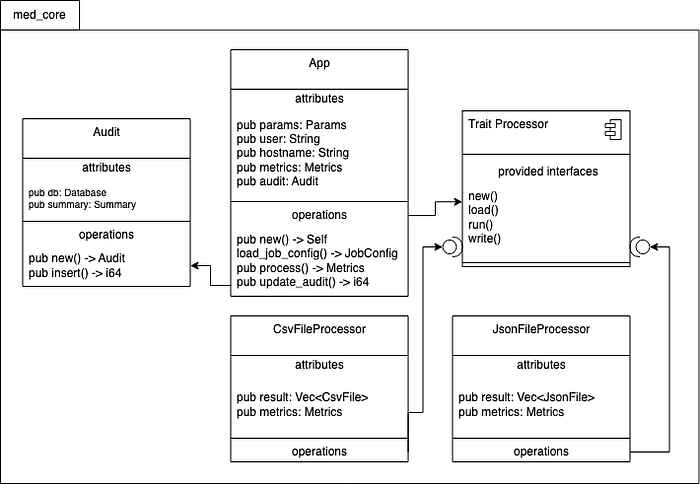
M.E.D. Core
For the m.e.d. core, we will need consistency in implementing different file formats (CSV/JSON). This will be their trait implementation.
And the trait will ensure the CSV/JSON contains the functions as follows:
#[async_trait(?Send)]
pub trait Processor {
    async fn new() -> Self;
    async fn load(&mut self, num_worker: &u16, file_path: &str) -> Result<(), MedError>;
    async fn run(
        &mut self,
        job_conf: &JobConfig,
        mode: &Mode,
        standard: Option<&Standard>,
        cypher: Option<&Cypher>,
    ) -> Result<(), MaskerError>;
    async fn write(&self, output_dir: &str, file_dir: &str) -> Result<Metrics, MedError>;
}
Here’s how to break it down:
- The
newfunction will initiate the new processor for CSV or JSON. - The
loadfunction will load the file to the processor. - The
runfunction will perform mask or encryption/decryption tasks based on the interface input. - The
writefunction will be written back to the file system.
Performance
One of the key considerations of this tool is to ensure it processes large file sizes safely and efficiently. And Rust provided us the memory safety and Fearless Concurrency.
Concurrency and parallelism worker pool
“In programming, concurrency is the composition of independently executing processes, while parallelism is the simultaneous execution of (possibly related) computations. Concurrency is about dealing with lots of things at once. Parallelism is about doing lots of things at once.” — Rob Pike
Combining the concurrent and parallelism for max utilization of the system/user-defined capacities.

To implement this, the worker pool will contain the following:
- Threadpool to load files to the processors [concurrency].
- Rayon Threadpool to execute each file’s tasks [parallelism].
impl Worker {
    pub async fn new(cpu_num: u16) -> Result<Self, MedError> {
        let pool = ThreadPool::new(cpu_num as usize);
        static START: Once = Once::new();

        START.call_once(|| {
            rayon::ThreadPoolBuilder::new()
                .num_threads(cpu_num as usize)
                .build_global()
                .unwrap();
        });

        Ok(Worker { cpu_num, pool })
    }
}

// Example how to csv files load to processor with the worker pool
for entry in WalkDir::new(file_path)
            .follow_links(true)
            .into_iter()
            .filter_map(|e| e.ok())
            .filter(|e| !e.path().is_dir())
{
    let tx = tx.clone();
    debug!("load csv files: {:?}", entry.path().display().to_string());
    files_number += 1;
    new_worker.pool.execute(move || {
        read_csv(tx, entry.path().display().to_string()).unwrap();
    });
}

// Example how to process the masking leverage the rayon (par_iter)
let new_result: Vec<CsvFile> = self.result.par_iter().map(|item| {
  // masking implemenation
}).collect::<Vec<CsvFile>>();
Auditability
For the audit capabilities, I’m leveraging SQLite. This decision supported the “simplicity” requirement because of the following:
“SQLite is a cross-platform DBMS that can run on all platforms, including macOS, Windows, and Linux etc. SQLite doesn’t require any configuration. It needs no setup or administration.”
This means the database can be set up during the runtime and ready to use once the application is installed/run in the runtime machine (cross-platform).
The metadata ensures you follow the enterprise-level audit base standard, mainly focusing on capturing who, when, where (which machine), do what, status, etc.
During the program execution, the metrics struct will stay up to date with the runtime and capture the runtime metrics for the audit update.
match processor.write(&self.params.output_path, &self.params.file_path).await
{
  Ok(metrics) => {
    self.metrics = metrics.clone();
    self.audit.summary.total_files = metrics.total_files;
    self.audit.summary.total_records = metrics.total_records;
    self.audit.summary.failed_records = metrics.failed_records;
    self.audit.summary.record_failed_reason = metrics.record_failed_reason;
    self.audit.summary.successed = true;
  }
  Err(err) => {
    self.audit.summary.process_failure_reason = Some(serde_json::to_string(&err)?);
    info!("{} {:?}", "error".bold().red(), err.to_string());
  }
}
The metadata and migration are available here.
Finally, once the job is completed, we will insert it into the audit table. One essential line of code here is to mask the secret from the user input when executing in encryption and decryption mode.
pub async fn update_audit(&mut self) -> Result<i64, MedError> {
// update the runtime params for the audit record.
// mask the pwd if any for the audit table
if self.params.key.is_some() {
self.params.key = Some("****".to_owned());
}
self.audit.summary.user = self.user.clone();
self.audit.summary.hostname = self.hostname.clone();
self.audit.summary.runtime_conf = serde_json::to_string(&self.params)?;
debug!("audit summary : {:?}", self.audit.summary);
// audit update
let id = self.audit.insert().await?;
Ok(id)
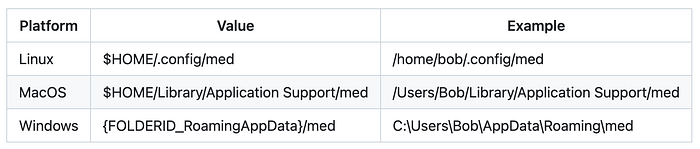
}You can use any database GUI tools to review the audit table. The audit db location will be different depending on your OS.
Finally, tips
You can always see how to use this tool through its help function. Here’s how to do that:
$ med --help
A simple to use, enterprise ready, rust powered data masking/encryption/decription cli tool

Usage: med <MODE> --file <FILE> [OPTIONS]

Arguments:
  <MODE>
          What mode to run the program in
          Possible values:
          - mask:    Mask the data by *
          - encrypt: Encrypt the data with provided KEY
          - decrypt: Decrypt the data with provided KEY

Options:
  -t, --type <TYPE> type of file we will process, available option [csv, json] [default: csv]
  -k, --key <KEY> key for Encrypt and Decrypt the file.
  -s, --standard <STANDARD> set the Encrypt and Decrypt standard
        Possible values:
          - des64:  DES standard 64
          - aes128: AES standard 128
          - aes192: AES standard 192
          - aes256: AES standard 256
  -f, --file <FILE> file path for the
  -c, --config <CONFIG> Sets a custom config yml path [default: conf.yaml]
  -o, --output <OUTPUT> Sets a file/directory path for output [default: output]
  -d, --debug <DEBUG> Sets debug flag [possible values: true, false]
  -w, --worker <WORKER> Sets work flag
  -h, --help Print help (see a summary with '-h')
  -V, --version Print version
Final Words
This project is open-sourced. Please test/try it out at the following link:
Thank you for your reading.
And if you like my week and build and learn, please follow me with Medium.

