Battle of the iOS Architecture Patterns: Model View Controller (MVC)
Getting started with the most common architecture pattern for iOS development

Motivation
Before diving into iOS app development, it’s crucial to carefully consider the project’s architecture. We need to thoughtfully plan how different pieces of code will fit together, ensuring they remain comprehensible not just today, but months or years later when we need to revisit and modify the codebase. Moreover, a well-structured project helps establish a shared technical vocabulary among team members, making collaboration more efficient.
This article kicks off an exciting series where we’ll explore different architectural approaches by building the same application using various patterns. Throughout the series, we’ll analyze practical aspects like build times and implementation complexity, weigh the pros and cons of each pattern, and most importantly, examine real, production-ready code implementations. This hands-on approach will help you make informed decisions about which architecture best suits your project needs.
Architecture Series Articles
- Model View Controller (MVC) — Current Article
- Model View ViewModel (MVVM)
- Model View Presenter (MVP)
- Model View Presenter with Coordinators (MVP-C)
- View Interactor Presenter Entity Router (VIPER)
- View Interactor Presenter (VIP)
If you’re eager to explore the implementation details directly, you can find the complete source code in our open-source repository here.
Why Your iOS App Needs a Solid Architecture Pattern
The cornerstone of any successful iOS application is maintainability. A well-architected app clearly defines boundaries — you know exactly where view logic belongs, what responsibilities each view controller has, and which components handle business logic. This clarity isn’t just for you; it’s essential for your entire development team to understand and maintain these boundaries consistently.
Here are the key benefits of implementing a robust architecture pattern:
- Maintainability: Makes code easier to update and modify over time
- Testability: Facilitates comprehensive testing of business logic through clear separation of concerns
- Team Collaboration: Creates a shared technical vocabulary and understanding among team members
- Clean Separation: Ensures each component has clear, single responsibilities
- Bug Reduction: Minimizes errors through better organization and clearer interfaces between components
Project Requirements Overview
Given a medium-sized iOS application consisting of 6–7 screens, we’ll demonstrate how to implement it using the most popular architectural patterns in the iOS ecosystem: MVC (Model-View-Controller), MVVM (Model-View-ViewModel), MVP (Model-View-Presenter), VIPER (View-Interactor-Presenter-Entity-Router), VIP (Clean Swift), and the Coordinator pattern. Each implementation will showcase the pattern’s strengths and potential challenges.
Our demo application, Football Gather, is designed to help friends organize and track their casual football matches. It’s complex enough to demonstrate real-world architectural challenges while remaining simple enough to clearly illustrate different patterns.
Core Features and Functionality
- Player Management: Add and maintain a roster of players in the application
- Team Assignment: Flexibly organize players into different teams for each match
- Player Customization: Edit player details and preferences
- Match Management: Set and control countdown timers for match duration
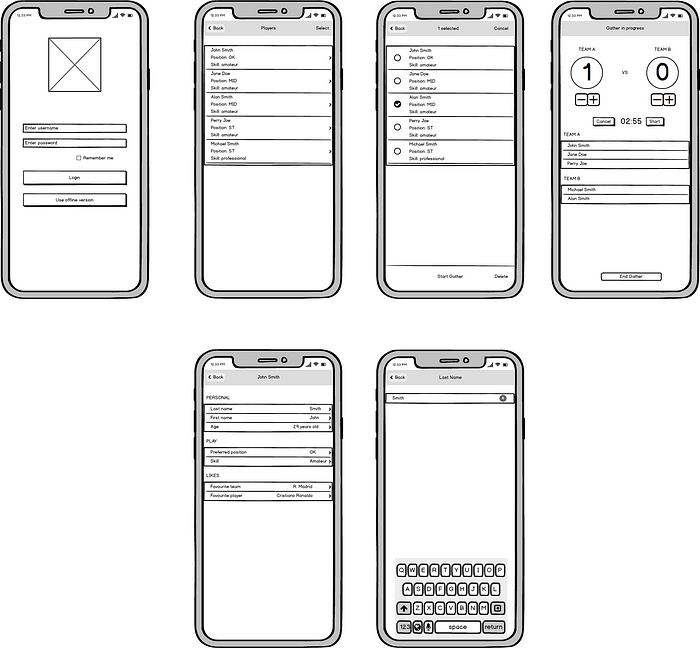
Screen Mockups
Backend
The application is supported by a web backend developed using the Vapor framework, a popular choice for building modern REST APIs in Swift. You can explore the details of this implementation in our article here, which covers the fundamentals of building REST APIs with Vapor and Fluent in Swift. Additionally, we have documented the transition from Vapor 3 to Vapor 4, highlighting the enhancements and new features in our article here.
What is MVC
Model-View-Controller (MVC) is arguably the most widely recognized architectural pattern in software development.
At its core, MVC consists of three distinct components: Model, View, and Controller. Let’s explore each one in detail.
Model
- Encompasses all data classes, helper utilities, and networking code
- Contains application-specific data and the business logic that processes it
- In our application, the Model layer includes everything within the Utils, Storage, and Networking groups
- Supports various relationships between model objects (e.g., many-to-many between players and gathers, one-to-many between users and players/gathers)
- Maintains independence from the View layer and should not be concerned with user interface details
Communication Flow
- User actions in the View layer are communicated to the Model through the Controller
- When the Model’s data changes, it notifies the Controller, which then updates the View accordingly
View
- Represents the visual elements that users interact with on screen
- Handles user input and interaction events
- Displays Model data and facilitates user interactions
- Built using Apple’s core frameworks: UIKit and AppKit
- In our application: LoadingView, EmptyView, PlayerTableViewCell, and ScoreStepper are examples of View components
Communication Flow
- Views never communicate directly with the Model — all interaction is mediated through the Controller
Controller
- Acts as the central coordinator of the MVC architecture
- Manages View updates and Model mutations
- Processes Model changes and ensures View synchronization
- Handles object lifecycle management and setup tasks
Communication Flow
- Maintains bidirectional communication with both Model and View layers
- Interprets user actions and orchestrates corresponding Model updates
- Ensures UI consistency by propagating Model changes to the View
Evolution of MVC
The traditional MVC pattern differs from Apple’s Cocoa MVC implementation. In the original pattern, View and Model layers could communicate directly, while the View remained stateless and was rendered by the Controller after Model updates.
First introduced in Smalltalk-79, MVC was built upon three fundamental design patterns: composite, strategy, and observer.
Composite Pattern
The view hierarchy in an application consists of nested view objects working together cohesively. These visual components span from windows to complex views like table views, down to basic UI elements such as buttons. User interactions can occur at any level within this composite structure.
Consider the UIView hierarchy in iOS development. Views serve as the fundamental building blocks of the user interface, capable of containing multiple subviews.
For instance, our LoginViewController's main view contains a hierarchy of stack views, which in turn contain text fields for credentials and a login button.
Strategy Pattern
Controllers implement specific strategies for view objects. While views focus solely on their visual presentation, controllers handle all application-specific logic and interface behavior decisions.
Observer Pattern
Model objects maintain and notify interested components — typically views — about changes in their state.
A significant drawback of traditional MVC is the tight coupling between all three layers, which can make testing, maintenance, and code reuse challenging.
Applying to our code
In FootballGather we implement each screen as a View Controller:
LoginViewController
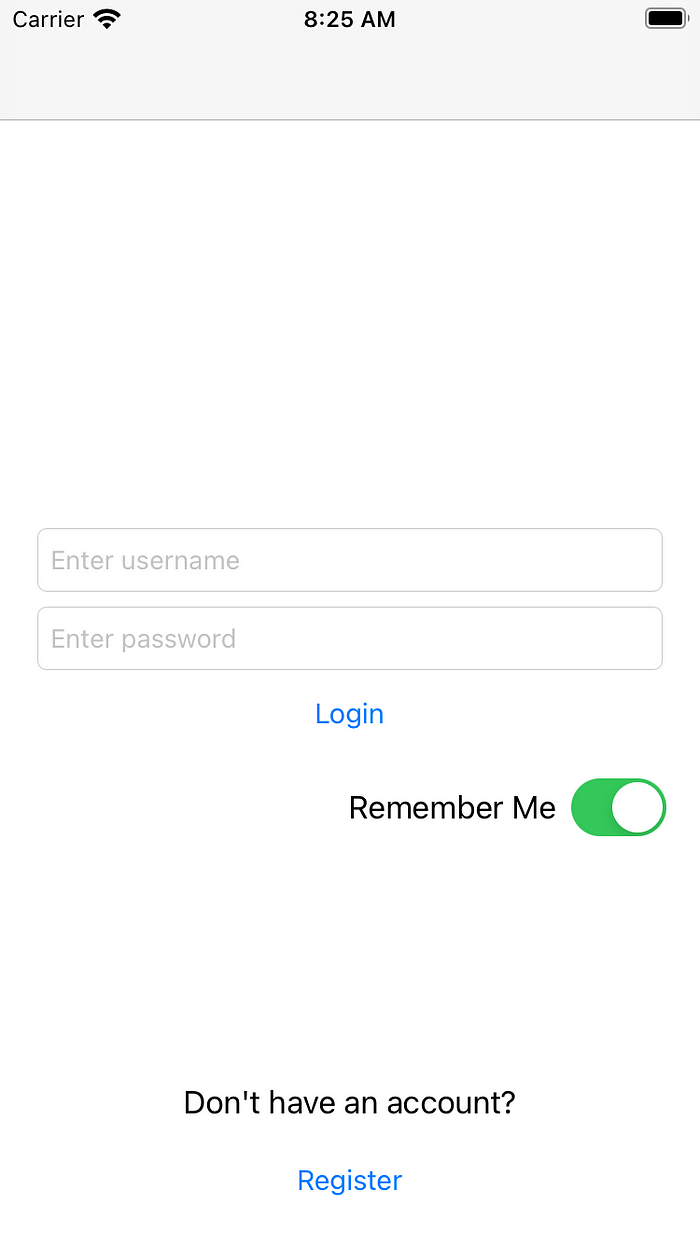
Description
- landing page where users can login with their credentials or create new users
UI elements
- usernameTextField — this is the text field where users enter their username
- passwordTextField — secure text field for entering passwords
- rememberMeSwitch — is an
UISwitchfor saving the username in Keychain after login and autopopulate the field next time we enter the app - loadingView — is used to show an indicator while a server call is made
Services
- loginService — used to call the Login API with the entered credentials
- usersService — used to call the Register API, creating a new user
As we can see, this class has three major functions: login, register and remember my username. Jumping to next screen is done via performSegue.
Code snippet
@IBAction private func login(_ sender: Any) {
    // Validate required fields
    // Both username and password must be non-empty strings
    guard let userText = usernameTextField.text, userText.isEmpty == false,
        let passwordText = passwordTextField.text, passwordText.isEmpty == false else {
            AlertHelper.present(in: self, title: "Error", message: "Both fields are mandatory.")
            return
    }

    // Display loading indicator while authentication is in progress
        showLoadingView()
        // Prepare login credentials model for API request
        let requestModel = UserRequestModel(username: userText, password: passwordText)
        // Attempt to authenticate user with provided credentials
        // Response is handled asynchronously
        loginService.login(user: requestModel) { [weak self] result in
            guard let self = self else { return }
            DispatchQueue.main.async {
                // Hide loading indicator once response is received
                self.hideLoadingView()
                switch result {
                case .failure(let error):
                    // Authentication failed - Display error message to user
                    AlertHelper.present(in: self, title: "Error", message: String(describing: error))
                case .success(_):
                    // Authentication successful:
                    // 1. Save "Remember Me" preference if enabled
                    // 2. Clear stored credentials if disabled
                    // 3. Navigate to main screen
                    self.handleSuccessResponse()
                }
            }
        }
  }
PlayerListViewController


Description
- shows the players for the logged in user. Consists of a main table view, each player is displayed in a separated row.
UI elements
- playerTableView — The table view that displays players
- confirmOrAddPlayersButton — Action button from the bottom of the view, that can either correspond to an add player action or confirms the selected players
- loadingView — is used to show an indicator while a server call is made
- emptyView — Shown when the user hasn’t added any players
- barButtonItem — The top right button that can have different states based on the view mode we are in. Has the title “Cancel” when we go into selection mode to choose the players we want for the gather or “Select” when we are in view mode.
Services
- playersService — Used to retrieve the list of players and to delete a player
Models
- players — An array of players created by the user. This are the rows we see in playerTableView
- selectedPlayersDictionary — A cache dictionary that stores the row index of the selected player as key and the selected player as value.
If you open up Main.storyboard you can see that from this view controller you can perform three segues
- ConfirmPlayersSegueIdentifier — After you select what players you want for your gather, you go to a confirmation screen where you assign the teams they will be part of.
- PlayerAddSegueIdentifier — Goes to a screen where you can create a new player
- PlayerDetailSegueIdentifier — Opens a screen where you can see the details of the player
We have the following function to retrieve the model for this View Controller.
private func loadPlayers() {
    // Disable user interaction during data fetch
    // Prevents multiple requests and shows loading state
    view.isUserInteractionEnabled = false

    // Fetch players from remote service
    // Returns array of PlayerResponseModel or error
    playersService.get { [weak self] (result: Result<[PlayerResponseModel], Error>) in
        DispatchQueue.main.async {
            // Re-enable user interaction after response
            self?.view.isUserInteractionEnabled = true
            switch result {
            case .failure(let error):
                // Handle service error:
                // Display error message and retry options to user
                self?.handleServiceFailures(withError: error)
            case .success(let players):
                // Update data model and refresh UI:
                // 1. Store retrieved players
                // 2. Update table view
                // 3. Handle empty states
                self?.players = players
                self?.handleLoadPlayersSuccessfulResponse()
            }
        }
    }
}
And if we want to delete one player we do the following:
func tableView(
    _ tableView: UITableView,
    commit editingStyle: UITableViewCell.EditingStyle,
    forRowAt indexPath: IndexPath
) {
    // Only handle deletion actions, ignore other editing styles
    guard editingStyle == .delete else { return }

    // Show a confirmation dialog before deleting the player
    let alertController = UIAlertController(
        title: "Delete player",
        message: "Are you sure you want to delete the selected player?",
        preferredStyle: .alert
    )

    // Configure delete action with destructive style
    let confirmAction = UIAlertAction(
        title: "Delete",
        style: .destructive
    ) { [weak self] _ in
        self?.handleDeletePlayerConfirmation(forRowAt: indexPath)
    }
    alertController.addAction(confirmAction)
    // Configure cancel action to dismiss dialog
    let cancelAction = UIAlertAction(
        title: "Cancel",
        style: .cancel,
        handler: nil
    )
    alertController.addAction(cancelAction)
    // Present the confirmation dialog
    present(alertController, animated: true, completion: nil)
}
The service call is presented below:
private func requestDeletePlayer(
    at indexPath: IndexPath,
    completion: @escaping (Bool) -> Void
) {
    // Retrieve player to be deleted from data model
    let player = players[indexPath.row]
    var service = playersService

    // Perform delete request using player's ID
    service.delete(withID: ResourceID.integer(player.id)) { [weak self] result in
        DispatchQueue.main.async {
            switch result {
            case .failure(let error):
                // Handle deletion failure
                // Notify user of error and pass false to completion handler
                self?.handleServiceFailures(withError: error)
                completion(false)
            case .success(_):
                // Deletion successful
                // Pass true to completion handler
                completion(true)
            }
        }
    }
}
PlayerAddViewController
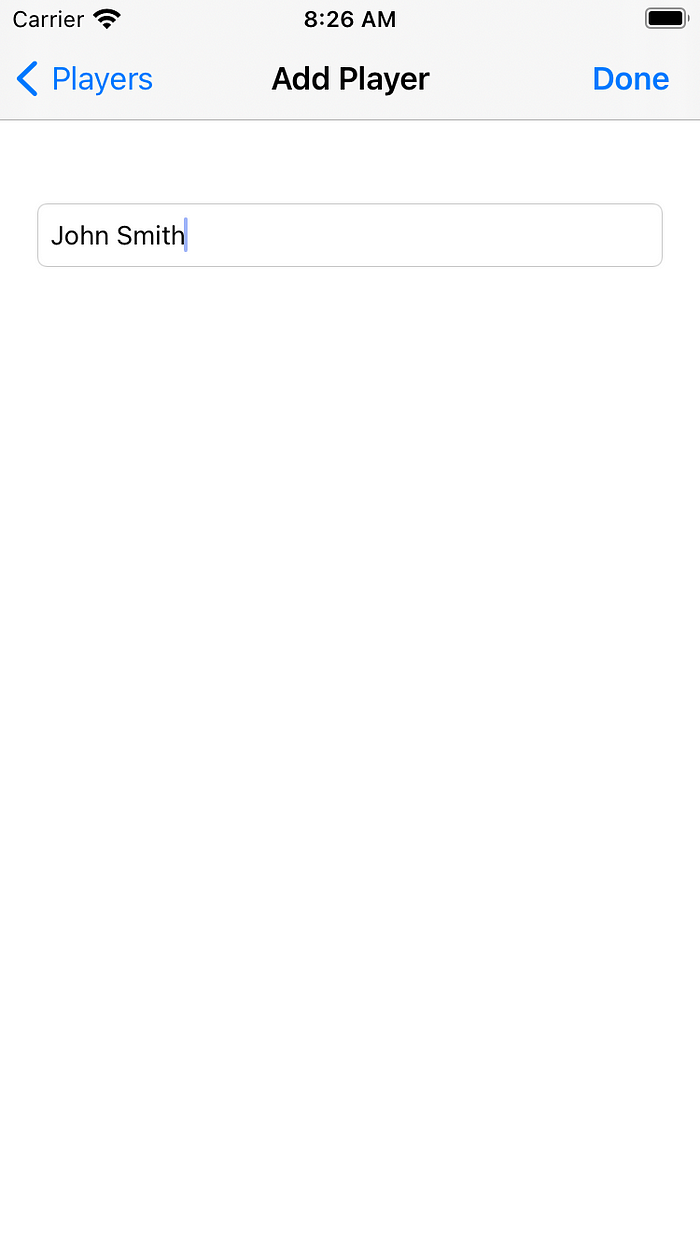
Description
- This screen is used for creating a player.
UI Elements
- playerNameTextField — Used to enter the name of the player
- doneButton — Bar button item that is used to confirm the player to be created and initiates a service call
- loadingView — Is used to show an indicator while a server call is made
Services
- We use the
StandardNetworkServicethat points to /api/players. To add players, we initiate a POST request.
Code snippet
private func createPlayer(
    _ player: PlayerCreateModel,
    completion: @escaping (Bool) -> Void
) {
    // Initialize network service for player creation
    let service = StandardNetworkService(
        resourcePath: "/api/players",
        authenticated: true
    )

    // Perform create request with player data
    service.create(player) { result in
        // Check result of the network request
        if case .success(_) = result {
            // Player creation successful
            completion(true)
        } else {
            // Player creation failed
            completion(false)
        }
    }
}
PlayerDetailViewController
Description
- maps a screen that shows the details of a player (name, age, position, skill and favourite team)
UI elements
- playerDetailTableView — A tableview that displays the details of the player.
Model
- player — The model of the player as
PlayerResponseModel
We have no services in this ViewController. A request to update an information of player is received fromPlayerEditViewController and passed to PlayerListViewController through delegation.
The sections are made with a factory pattern:
private func makeSections() -> [PlayerSection] {
    // Create and return an array of PlayerSection objects
    return [
        PlayerSection(
            title: "Personal",
            rows: [
                // Add player name row
                PlayerRow(
                    title: "Name",
                    value: self.player?.name ?? "",
                    editableField: .name
                ),
                // Add player age row
                PlayerRow(
                    title: "Age",
                    value: self.player?.age != nil ? "\(self.player!.age!)" : "",
                    editableField: .age
                )
            ]
        ),
        PlayerSection(
            title: "Play",
            rows: [
                // Add preferred position row
                PlayerRow(
                    title: "Preferred position",
                    value: self.player?.preferredPosition?.rawValue.capitalized ?? "",
                    editableField: .position
                ),
                // Add skill row
                PlayerRow(
                    title: "Skill",
                    value: self.player?.skill?.rawValue.capitalized ?? "",
                    editableField: .skill
                )
            ]
        ),
        PlayerSection(
            title: "Likes",
            rows: [
                // Add favourite team row
                PlayerRow(
                    title: "Favourite team",
                    value: self.player?.favouriteTeam ?? "",
                    editableField: .favouriteTeam
                )
            ]
        )
    ]
}
PlayerEditViewController


Description
- Edits a player information.
UI Elements
- playerEditTextField — The field that is filled with the player’s detail we want to edit
- playerTableView — We wanted to have a similar behaviour and UI as we have in iOS General Settings for editing a details. This table view has either one row with a text field or multiple rows with a selection behaviour.
- loadingView — is used to show an indicator while a server call is made
- doneButton — An UIBarButtonItem that performs the action of editing.
Services
- Update Player API, used as a
StandardNetworkService:
private func updatePlayer(
    _ player: PlayerResponseModel,
    completion: @escaping (Bool) -> Void
) {
    // Initialize network service for player update
    var service = StandardNetworkService(
        resourcePath: "/api/players",
        authenticated: true
    )

    // Perform update request with player data
    // Use player's ID for resource identification
    service.update(
        PlayerCreateModel(player),
        resourceID: ResourceID.integer(player.id)
    ) { result in
        // Check result of the network request
        if case .success(let updated) = result {
            // Player update successful
            completion(updated)
        } else {
            // Player update failed
            completion(false)
        }
    }
}
Models
- viewType — An enum that can be
.text(for player details that are entered via keyboard) or.selection(for player details that are selected by tapping one of the cells, for example the preferred position). - player — The player we want to edit.
- items — An array of strings corresponding to all possible options for preferred positions or skill. This array is
nilwhen a text entry is going to be edited.
ConfirmPlayersViewController
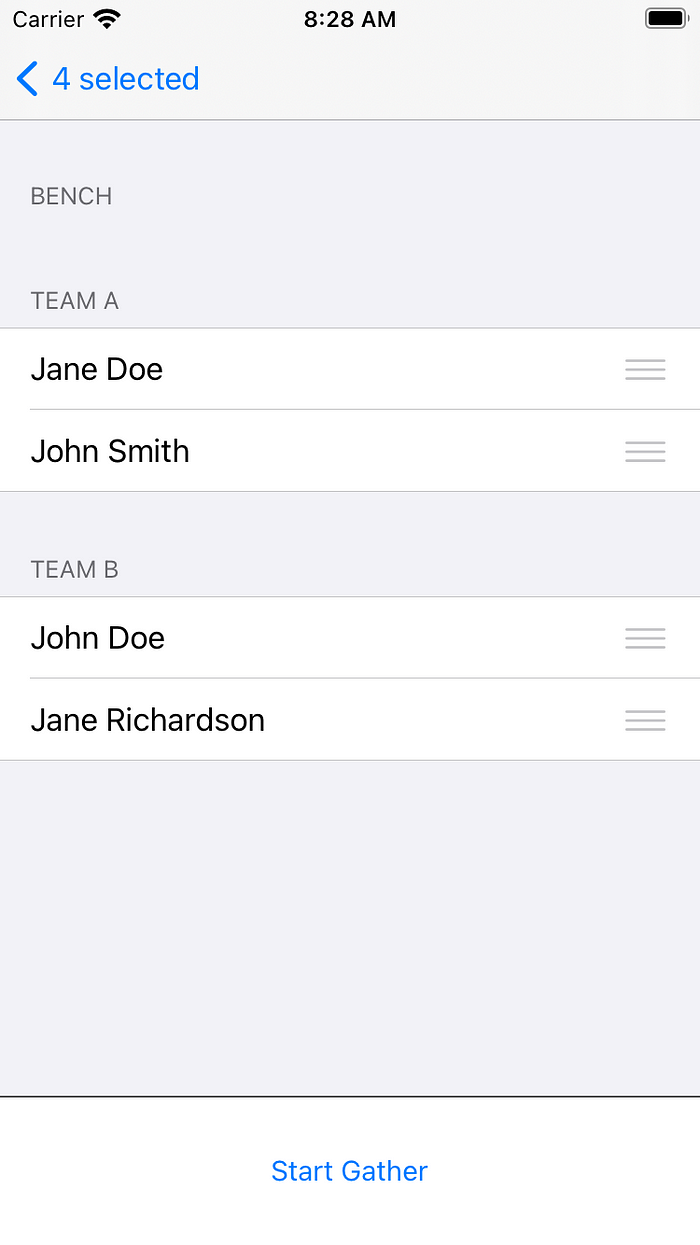
Description
- Before reaching the Gather screen we want to put the players in the desired teams
UI elements
- playerTableView — A table view split in three sections (Bench, Team A and Team B) that shows the selected players we want for the gather.
- startGatherButton — Initially disabled, when tapped triggers an action to perform the Network API calls required to start the gather and at last, it pushes the next screen.
- loadingView — is used to show an indicator while a server call is made.
Services
- Create Gather — Adds a new gather by making a POST request to /api/gathers.
- Add Player to Gather — After we are done with selecting teams for our players, we add them to the gather by doing a POST request to api/gathers/{gather_id}/players/{player_id}.
Models
- playersDictionary — Each team has an array of players, so the dictionary has the teams as keys (Team A, Team B or Bench) and for values we have the selected players (array of players).
When we are done with the selection (UI), a new gather is created and each player is assigned a team.
@IBAction func startGatherAction(_ sender: Any) {
    // Show loading indicator while creating gather
    showLoadingView()

    // Create new gather with authenticated request
    // Returns UUID on success, nil on failure
    createGather { [weak self] uuid in
        guard let self = self else { return }

        guard let gatherUUID = uuid else {
            // Handle gather creation failure
            self.handleServiceFailure()
            return
        }

        // Add selected players to the newly created gather
        // Players will be assigned to their respective teams
        self.addPlayersToGather(havingUUID: gatherUUID)
    }
}
The for loop to add players is presented below:
private func addPlayersToGather(havingUUID gatherUUID: UUID) {
    // Get array of players with their team assignments
    let players = self.playerTeamArray

    // Create dispatch group to handle multiple concurrent requests
    // This ensures all player additions complete before updating UI
    let dispatchGroup = DispatchGroup()
    var serviceFailed = false

    // Add each player to the gather with their assigned team
    players.forEach { playerTeamModel in
        dispatchGroup.enter()

        self.addPlayer(
            playerTeamModel.player,
            toGatherHavingUUID: gatherUUID,
            team: playerTeamModel.team,
            completion: { playerWasAdded in
                // Track if any player addition fails
                if !playerWasAdded {
                    serviceFailed = true
                }

                dispatchGroup.leave()
            }
        )
    }

    // Handle completion after all player additions finish
    dispatchGroup.notify(queue: DispatchQueue.main) {
        self.hideLoadingView()

        if serviceFailed {
            // Handle case where one or more players failed to add
            self.handleServiceFailure()
        } else {
            // All players added successfully - navigate to gather screen
            self.performSegue(
                withIdentifier: SegueIdentifiers.gather.rawValue,
                sender: GatherModel(
                    players: players,
                    gatherUUID: gatherUUID
                )
            )
        }
    }
}
GatherViewController
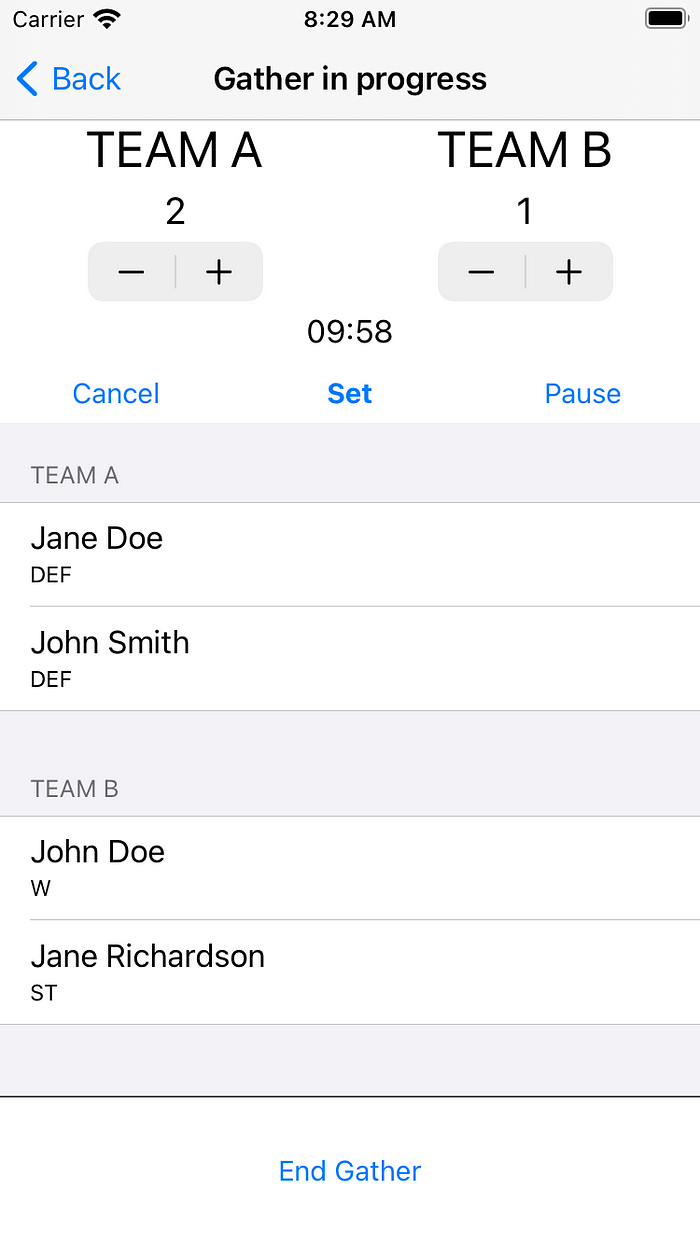
Description
- This is the core screen of the application, where you are in the gather mode and start / pause or stop the timer and in the end, finish the match.
UI elements
- playerTableView — Used to display the players in gather, split in two sections: Team A and Team B.
- scoreLabelView — A view that has two labels for displaying the score, one for Team A and the other one for Team B.
- scoreStepper — A view that has two steppers for the teams.
- timerLabel — Used to display the remaining time in the format mm:ss.
- timerView — An overlay view that has a UIPickerView to choose the time of the gather.
- timePickerView — The picker view with two components (minutes and seconds) for selecting the gather’s time.
- actionTimerButton — Different state button that manages the countdown timer (resume, pause and start).
- loadingView — is used to show an indicator while a server call is made.
Services
- Update Gather — when a gather is ended, we do a PUT request to update the winner team and the score
Models
- GatherTime — A tuple that has minutes and seconds as Int.
- gatherModel — Contains the gather ID and an array of player team model (the player response model and the team he belongs to). This is created and passed from
ConfirmPlayersViewController. - timer — Used to countdown the minutes and seconds of the gather.
- timerState — Can have three states stopped, running and paused. We observer when one of the values is set so we can change the
actionTimerButton's title accordingly. When it's paused the button's title will be Resume. When it's running the button's title will be Pause and Start when the timer is stopped.
When the actionTimerButton is tapped, we verify if we want to invalidate or start the timer:
@IBAction func actionTimer(_ sender: Any) {
    // Check if the user selected a time more than 1 second
    guard selectedTime.minutes > 0 || selectedTime.seconds > 0 else {
        return
    }

    switch timerState {
    case .stopped, .paused:
        // Timer was stopped or paused, start running
        timerState = .running
    case .running:
        // Timer is running, pause it
        timerState = .paused
    }

    if timerState == .paused {
        // Stop the timer
        timer.invalidate()
    } else {
        // Start the timer and call updateTimer every second
        timer = Timer.scheduledTimer(
            timeInterval: 1,
            target: self,
            selector: #selector(updateTimer),
            userInfo: nil,
            repeats: true
        )
    }
}
To cancel a timer we have the following action implemented:
@IBAction func cancelTimer(_ sender: Any) {
    // Set timer state to stopped and invalidate the timer
    timerState = .stopped
    timer.invalidate()

    // Reset selected time to default (10 minutes)
    selectedTime = Constants.defaultTime
    timerView.isHidden = true
}
The selector updateTimer is called each second:
@objc func updateTimer(_ timer: Timer) {
    // Check if seconds are zero to decrement minutes
    if selectedTime.seconds == 0 {
        selectedTime.minutes -= 1
        selectedTime.seconds = 59
    } else {
        selectedTime.seconds -= 1
    }

    // Stop timer if time reaches zero
    if selectedTime.seconds == 0 && selectedTime.minutes == 0 {
        timerState = .stopped
        timer.invalidate()
    }
}
Before ending a gather, check the winner team:
guard let scoreTeamAString = scoreLabelView.teamAScoreLabel.text,
      let scoreTeamBString = scoreLabelView.teamBScoreLabel.text,
      let scoreTeamA = Int(scoreTeamAString),
      let scoreTeamB = Int(scoreTeamBString) else {
    return
}

// Format the score as a string
let score = "\(scoreTeamA)-\(scoreTeamB)"
// Determine the winner team based on scores
var winnerTeam: String = "None"
if scoreTeamA > scoreTeamB {
    winnerTeam = "Team A"
} else if scoreTeamA < scoreTeamB {
    winnerTeam = "Team B"
}
// Create gather model with score and winner team
let gather = GatherCreateModel(score: score, winnerTeam: winnerTeam)
And the service call:
private func updateGather(
    _ gather: GatherCreateModel,
    completion: @escaping (Bool) -> Void
) {
    // Verify gather model exists before proceeding
    guard let gatherModel = gatherModel else {
        completion(false)
        return
    }

    // Initialize network service for gather update
    var service = StandardNetworkService(
        resourcePath: "/api/gathers",
        authenticated: true
    )

    // Perform update request with gather data
    // Use player's ID for resource identification
    service.update(
        gather,
        resourceID: ResourceID.uuid(gatherModel.gatherUUID)
    ) { result in
        // Check result of the network request
        if case .success(let updated) = result {
            // Update successful
            completion(updated)
        } else {
            // Update failed
            completion(false)
        }
    }
}
The private method updateGather is called from endGather:
let gather = GatherCreateModel(score: score, winnerTeam: winnerTeam)

showLoadingView()
updateGather(gather) { [weak self] gatherWasUpdated in
    guard let self = self else { return }

    DispatchQueue.main.async {
        self.hideLoadingView()

        if !gatherWasUpdated {
            // The server call failed, make sure we show an alert to the user
            AlertHelper.present(
                in: self,
                title: "Error update",
                message: "Unable to update gather. Please try again."
            )
        } else {
            guard let playerViewController = self.navigationController?.viewControllers
                .first(where: { $0 is PlayerListViewController }) as? PlayerListViewController else {
                return
            }

            // The PlayerListViewController is in a selection mode state
            // We make sure we turn it back to .list
            playerViewController.toggleViewState()

            // Pop to PlayerListViewController, skipping confirmation screen
            self.navigationController?.popToViewController(
                playerViewController,
                animated: true
            )
        }
    }
}
Testing our business logic
We saw a first iteration of applying MVC to the demo app FootbalGather. Of course, we can refactor the code and make it better and decouple some of the logic, split it into different classes, but for the sake of the exercise we are going to keep this version of the codebase.
Let’s see how we can write unit tests for our classes. We are going to exemplify for GatherViewController and try to reach close to 100% code coverage.
First, we see GatherViewController is part of Main storyboard. To make our lives easier, we use an identifier and instantiate it with the method storyboard.instantiateViewController. Let's use the setUp method for this logic:
final class GatherViewControllerTests: XCTestCase {

    var sut: GatherViewController! // System Under Test (SUT)

    override func setUp() {
        super.setUp()

        // Load the storyboard named "Main"
        let storyboard = UIStoryboard(name: "Main", bundle: nil)

        // Instantiate GatherViewController from the storyboard
        if let viewController = storyboard.instantiateViewController(identifier: "GatherViewController") as? GatherViewController {
            sut = viewController // Assign to SUT
            sut.gatherModel = gatherModel // Set the gather model
            _ = sut.view // Load the view to trigger viewDidLoad
        } else {
            XCTFail("Unable to instantiate GatherViewController") // Fail the test if instantiation fails
        }
    }
//…
}
For our first test, we verify all outlets are not nil:
func testOutlets_whenViewControllerIsLoadedFromStoryboard_areNotNil() {
    // Verify all IBOutlets are properly connected from storyboard
    XCTAssertNotNil(sut.playerTableView)      // Table view showing players
    XCTAssertNotNil(sut.scoreLabelView)       // View displaying team scores
    XCTAssertNotNil(sut.scoreStepper)         // Stepper controls for adjusting scores
    XCTAssertNotNil(sut.timerLabel)           // Label showing countdown time
    XCTAssertNotNil(sut.timerView)            // Container view for timer controls
    XCTAssertNotNil(sut.timePickerView)       // Picker for setting match duration
    XCTAssertNotNil(sut.actionTimerButton)    // Button to start/pause/resume timer
}
Now let’s see if viewDidLoad is called. The title is set and some properties are configured. We verify the public parameters:
func testViewDidLoad_whenViewControllerIsLoadedFromStoryboard_setsVariables() {
    XCTAssertNotNil(sut.title)
    XCTAssertTrue(sut.timerView.isHidden)
    XCTAssertNotNil(sut.timePickerView.delegate)
}
The variable timerView is a pop-up custom view where users set their match timer.
Moving forward let’s unit test our table view methods:
func testViewDidLoad_whenViewControllerIsLoadedFromStoryboard_setsVariables() {
    // Verify initial view setup after loading
    XCTAssertNotNil(sut.title)                    // Check view controller title is set
    XCTAssertTrue(sut.timerView.isHidden)         // Timer view should be hidden initially
    XCTAssertNotNil(sut.timePickerView.delegate)  // Time picker should have delegate set
}
The variable timerView is a pop-up custom view where users set their match timer.
Moving forward let’s unit test our table view methods:
func testNumberOfSections_whenGatherModelIsSet_returnsTwoTeams() {
    // Verify table view has correct number of sections (Team A and Team B)
    XCTAssert(sut.playerTableView?.numberOfSections == Team.allCases.count - 1)
}
We have just two teams: Team A and Team B. The Bench team is not visible and not part of this screen.
func testTitleForHeaderInSection_whenSectionIsTeamAAndGatherModelIsSet_returnsTeamATitleHeader() {
    // Test header title for Team A section
    let teamASectionTitle = sut.tableView(sut.playerTableView, titleForHeaderInSection: 0)
    XCTAssertEqual(teamASectionTitle, Team.teamA.headerTitle)
}

func testTitleForHeaderInSection_whenSectionIsTeamBAndGatherModelIsSet_returnsTeamBTitleHeader() {
    // Test header title for Team B section
    let teamBSectionTitle = sut.tableView(sut.playerTableView, titleForHeaderInSection: 1)
    XCTAssertEqual(teamBSectionTitle, Team.teamB.headerTitle)
}
Our tableview should have two sections with both header titles being set to the team names (Team A and Team B).
For checking the number of rows, we inject a mocked gather model:
private let gatherModel = ModelsMockFactory.makeGatherModel(numberOfPlayers: 4)

static func makeGatherModel(numberOfPlayers: Int, gatherUUID: UUID = ModelsMock.gatherUUID) -> GatherModel {
    // Get all possible player skills and positions
    let allSkills = PlayerSkill.allCases
    let allPositions = PlayerPosition.allCases

    // Initialize empty array to store player-team assignments
    var playerTeams: [PlayerTeamModel] = []

    // Create specified number of players with random attributes
    // For each player
    ...
        // Randomly assign skill and position
        // Alternate between Team A and Team B
        // Create player model with incremental attributes
    ...

    return GatherModel(players: playerTeams, gatherUUID: gatherUUID)
}
Nil scenario when the section is invalid.
func testNumberOfRowsInSection_whenGatherModelIsNil_returnsZero() {
    // Test edge case when gather model is nil
    sut.gatherModel = nil
    XCTAssertEqual(sut.tableView(sut.playerTableView, numberOfRowsInSection: -1), 0)
}

func testCellForRowAtIndexPath_whenSectionIsTeamA_setsCellDetails() {
    // Set up test data for Team A
    let indexPath = IndexPath(row: 0, section: 0)
    let playerTeams = gatherModel.players.filter({ $0.team == .teamA })
    let player = playerTeams[indexPath.row].player

    // Get cell from table view
    let cell = sut.playerTableView.cellForRow(at: indexPath)

    // Verify cell content matches player data
    XCTAssertEqual(cell?.textLabel?.text, player.name)
    XCTAssertEqual(cell?.detailTextLabel?.text, player.preferredPosition?.acronym)
}

func testCellForRowAtIndexPath_whenSectionIsTeamB_setsCellDetails() {
    // Set up test data for Team B
    let indexPath = IndexPath(row: 0, section: 1)
    let playerTeams = gatherModel.players.filter({ $0.team == .teamB })
    let player = playerTeams[indexPath.row].player

    // Get cell from table view
    let cell = sut.playerTableView.cellForRow(at: indexPath)

    // Verify cell content matches player data
    XCTAssertEqual(cell?.textLabel?.text, player.name)
    XCTAssertEqual(cell?.detailTextLabel?.text, player.preferredPosition?.acronym)
}

func testPickerViewNumberOfComponents_returnsAllCountDownCases() {
    // Verify picker view has correct number of components
    XCTAssertEqual(sut.timePickerView.numberOfComponents,
                    GatherViewController.GatherCountDownTimerComponent.allCases.count)
}

func testPickerViewNumberOfRowsInComponent_whenComponentIsMinutes_returns60() {
    // Test number of rows for minutes component
    let minutesComponent = GatherViewController.GatherCountDownTimerComponent.minutes.rawValue
    let numberOfRows = sut.pickerView(sut.timePickerView, numberOfRowsInComponent: minutesComponent)

    XCTAssertEqual(numberOfRows, 60)
}

func testPickerViewNumberOfRowsInComponent_whenComponentIsSecounds() {
    // Test number of rows for seconds component
    let secondsComponent = GatherViewController.GatherCountDownTimerComponent.seconds.rawValue
    let numberOfRows = sut.pickerView(sut.timePickerView, numberOfRowsInComponent: secondsComponent)

    XCTAssertEqual(numberOfRows, 60)
}

func testPickerViewTitleForRow_whenComponentIsMinutes_containsMin() {
    // Test title format for minutes component
    let minutesComponent = GatherViewController.GatherCountDownTimerComponent.minutes.rawValue
    let title = sut.pickerView(sut.timePickerView, titleForRow: 0, forComponent: minutesComponent)

    XCTAssertTrue(title!.contains("min"))
}

func testPickerViewTitleForRow_whenComponentIsSeconds_containsSec() {
    // Test title format for seconds component
    let secondsComponent = GatherViewController.GatherCountDownTimerComponent.seconds.rawValue
    let title = sut.pickerView(sut.timePickerView, titleForRow: 0, forComponent: secondsComponent)

    XCTAssertTrue(title!.contains("sec"))
}

func testSetTimer_whenActionIsSent_showsTimerView() {
    // Test timer view visibility when setting timer
    sut.setTimer(UIButton())
    XCTAssertFalse(sut.timerView.isHidden)
}

func testCancelTimer_whenActionIsSent_hidesTimerView() {
    // Test timer view visibility when canceling timer
    sut.cancelTimer(UIButton())
    XCTAssertTrue(sut.timerView.isHidden)
}

func testTimerCancel_whenActionIsSent_hidesTimerView() {
    // Test timer view visibility when canceling from overlay
    sut.timerCancel(UIButton())
    XCTAssertTrue(sut.timerView.isHidden)
}

func testTimerDone_whenActionIsSent_hidesTimerViewAndSetsMinutesAndSeconds() {
    // Test timer completion setup
    sut.timerDone(UIButton())

    // Get selected time components
    let minutes = sut.timePickerView.selectedRow(inComponent:
        GatherViewController.GatherCountDownTimerComponent.minutes.rawValue)
    let seconds = sut.timePickerView.selectedRow(inComponent:
        GatherViewController.GatherCountDownTimerComponent.seconds.rawValue)

    // Verify timer view state and time settings
    XCTAssertTrue(sut.timerView.isHidden)
    XCTAssertGreaterThan(minutes, 0)
    XCTAssertEqual(seconds, 0)
}

func testActionTimer_whenSelectedTimeIsZero_returns() {
    // Set up components
    let minutesComponent = GatherViewController.GatherCountDownTimerComponent.minutes.rawValue
    let secondsComponent = GatherViewController.GatherCountDownTimerComponent.seconds.rawValue

    // Set time to 00:00
    sut.timePickerView.selectRow(0, inComponent: minutesComponent, animated: false)
    sut.timePickerView.selectRow(0, inComponent: secondsComponent, animated: false)
    sut.timerDone(UIButton())
    sut.actionTimer(UIButton())

    // Verify time remains at 00:00
    XCTAssertEqual(sut.timePickerView.selectedRow(inComponent: minutesComponent), 0)
    XCTAssertEqual(sut.timePickerView.selectedRow(inComponent: secondsComponent), 0)
}

func testActionTimer_whenSelectedTimeIsSet_updatesTimer() {
    // Set up test components
    let minutesComponent = GatherViewController.GatherCountDownTimerComponent.minutes.rawValue
    let secondsComponent = GatherViewController.GatherCountDownTimerComponent.seconds.rawValue

    // Configure initial time (0:01)
    sut.timePickerView.selectRow(0, inComponent: minutesComponent, animated: false)
    sut.timePickerView.selectRow(1, inComponent: secondsComponent, animated: false)

    // Verify initial state
    sut.timerDone(UIButton())
    XCTAssertEqual(sut.actionTimerButton.title(for: .normal), "Start")

    // Start timer
    sut.actionTimer(UIButton())
    XCTAssertEqual(sut.actionTimerButton.title(for: .normal), "Pause")

    // Wait for timer completion
    let exp = expectation(description: "Timer expectation")
    DispatchQueue.main.asyncAfter(deadline: .now() + 2) {
        XCTAssertEqual(self.sut.actionTimerButton.title(for: .normal), "Start")
        exp.fulfil()
    }

    waitForExpectations(timeout: 5, handler: nil)
}
func testActionTimer_whenTimerIsSetAndRunning_isPaused() {
    // Set up test components
    let sender = UIButton()
    let minutesComponent = GatherViewController.GatherCountDownTimerComponent.minutes.rawValue
    let secondsComponent = GatherViewController.GatherCountDownTimerComponent.seconds.rawValue

    // Configure initial time (0:03)
    sut.timePickerView.selectRow(0, inComponent: minutesComponent, animated: false)
    sut.timePickerView.selectRow(3, inComponent: secondsComponent, animated: false)

    // Start timer and verify initial state
    sut.timerDone(sender)
    XCTAssertEqual(sut.actionTimerButton.title(for: .normal), "Start")
    sut.actionTimer(sender)

    // Pause timer after 1 second
    let exp = expectation(description: "Timer expectation")
    DispatchQueue.main.asyncAfter(deadline: .now() + 1) {
        self.sut.actionTimer(sender)
        XCTAssertEqual(self.sut.actionTimerButton.title(for: .normal), "Resume")
        exp.fulfil()
    }

    waitForExpectations(timeout: 5, handler: nil)
}

func testUpdateTimer_whenSecondsReachZero_decrementsMinuteComponent() {
    // Set up test components
    let sender = UIButton()
    let timer = Timer()
    let minutesComponent = GatherViewController.GatherCountDownTimerComponent.minutes.rawValue
    let secondsComponent = GatherViewController.GatherCountDownTimerComponent.seconds.rawValue

    // Set initial time to 1:00
    sut.timePickerView.selectRow(1, inComponent: minutesComponent, animated: false)
    sut.timePickerView.selectRow(0, inComponent: secondsComponent, animated: false)
    sut.timerDone(sender)
    XCTAssertEqual(sut.timerLabel.text, "01:00")

    // Update timer and verify decrement
    sut.updateTimer(timer)
    XCTAssertEqual(sut.timerLabel.text, "00:59")
}
In this test we checked if the seconds are decremented when the minutes component is reaching zero.
Having access to the outlets, we can easily verify the stepperDidChangeValue delegates:
func testStepperDidChangeValue_whenTeamAScores_updatesTeamAScoreLabel() {
    // Simulate Team A scoring
    sut.scoreStepper.teamAStepper.value = 1
    sut.scoreStepper.teamAStepperValueChanged(UIButton())

    // Verify Team A's score label is updated
    XCTAssertEqual(sut.scoreLabelView.teamAScoreLabel.text, "1")
    // Verify Team B's score label remains unchanged
    XCTAssertEqual(sut.scoreLabelView.teamBScoreLabel.text, "0")
}

func testStepperDidChangeValue_whenTeamBScores_updatesTeamBScoreLabel() {
    // Simulate Team B scoring
    sut.scoreStepper.teamBStepper.value = 1
    sut.scoreStepper.teamBStepperValueChanged(UIButton())

    // Verify Team B's score label is updated
    XCTAssertEqual(sut.scoreLabelView.teamAScoreLabel.text, "0")
    // Verify Team A's score label remains unchanged
    XCTAssertEqual(sut.scoreLabelView.teamBScoreLabel.text, "1")
}

func testStepperDidChangeValue_whenTeamIsBench_scoreIsNotUpdated() {
    // Simulate score change for Bench team
    sut.stepper(UIStepper(), didChangeValueForTeam: .bench, newValue: 1)

    // Verify no score labels are updated
    XCTAssertEqual(sut.scoreLabelView.teamAScoreLabel.text, "0")
    XCTAssertEqual(sut.scoreLabelView.teamBScoreLabel.text, "0")
}
Finally, the hardest and probably the most important method we have in GatherViewController is the endGather method. Here, we do a service call updating the gather model. We pass the winnerTeam and the score of the match.
It is a big method, does more than one thing and is private. (we use it as per example, functions should not be big and functions should do one thing!).
The responsibilities of this function are detailed below. endGather does the following:
- gets the score from
scoreLabelViews - computes the winner team by comparing the score
- creates the
GatherModelfor the service call - shows a loading spinner
- does the
updateGatherservice call - hides the loading spinner
- handles success and failure
- for success, the view controller is popped to
PlayerListViewController(this view should be in the stack) - for failure, it presents an alert
How we should test all of that? (Again, as best practice, this function should be splitted down into multiple functions).
Let’s take one step at a time.
Creating a mocked service and injecting it in our sut:
// Set up mock networking components
private let session = URLSessionMockFactory.makeSession()
private let resourcePath = "/api/gathers"
private let appKeychain = AppKeychainMockFactory.makeKeychain()

// Configure mock endpoint and service
let endpoint = EndpointMockFactory.makeSuccessfulEndpoint(path: resourcePath)
sut.updateGatherService = StandardNetworkService(
    session: session,
    urlRequest: AuthURLRequestFactory(endpoint: endpoint, keychain: appKeychain)
)
Testing the success handler. We use a protocol instead of the concrete class PlayerListViewController and we mock it in our test class:
// Protocol definition for view state toggling
protocol PlayerListTogglable {
    func toggleViewState()
}

// Main view controller conforming to protocol
class PlayerListViewController: UIViewController, PlayerListTogglable { .. }

private extension GatherViewControllerTests {
    // Mock implementation for testing
    final class MockPlayerTogglableViewController: UIViewController, PlayerListTogglable {
        weak var viewStateExpectation: XCTestExpectation?
        private(set) var viewState = true

        func toggleViewState() {
            viewState = !viewState
            viewStateExpectation?.fulfil()
        }
    }
}
This should be part of a navigation controller:
// Set up view controller hierarchy
let playerListViewController = MockPlayerTogglableViewController()
let window = UIWindow()
let navController = UINavigationController(rootViewController: playerListViewController)
window.rootViewController = navController
window.makeKeyAndVisible()

// Trigger view loading and verify initial state
_ = playerListViewController.view
XCTAssertTrue(playerListViewController.viewState)
// Set up expectation for state change
let exp = expectation(description: "Timer expectation")
playerListViewController.viewStateExpectation = exp
// Add test view controller to navigation stack
navController.pushViewController(sut, animated: false)
We check the initial viewState. It should be true.
The rest of the unit test is presented below:
// Set up mock score state
sut.scoreLabelView.teamAScoreLabel.text = "1"
sut.scoreLabelView.teamBScoreLabel.text = "1"

// Configure mock networking
let endpoint = EndpointMockFactory.makeSuccessfulEndpoint(path: resourcePath)
sut.updateGatherService = StandardNetworkService(
    session: session,
    urlRequest: AuthURLRequestFactory(endpoint: endpoint, keychain: appKeychain)
)
// Trigger gather end and handle alert
sut.endGather(UIButton())
let alertController = (sut.presentedViewController as! UIAlertController)
alertController.tapButton(atIndex: 0)
// Wait for and verify state change
waitForExpectations(timeout: 5) { _ in
    XCTAssertFalse(playerListViewController.viewState)
}
Because endGather is a private method, we had to use the IBAction that calls this method. And for tapping on OK in the alert controller that was presented we had to use its private API:
private extension UIAlertController {
    // Type definition for alert action handler
    typealias AlertHandler = @convention(block) (UIAlertAction) -> Void

    func tapButton(atIndex index: Int) {
          // Access private handler using key-value coding
          guard let block = actions[index].value(forKey: "handler") else { return }

          // Convert and execute handler
          let handler = unsafeBitCast(block as AnyObject, to: AlertHandler.self)
          handler(actions[index])
      }
}
We don’t have the guarantee this unit test will work in future Swift versions. This is bad.
Key Metrics
Lines of code

Unit Tests

Build Times

* tests were run on an 8-Core Intel Core i9, MacBook Pro, 2019
Conclusion
Model-View-Controller (MVC) remains one of the most widely adopted architectural patterns in iOS development, and for good reason. Throughout this article, we’ve explored its practical implementation in a real-world application.
In our demonstration, we took a straightforward approach by mapping each screen to a dedicated View Controller. While this implementation works for our sample application, it’s important to note that this simplified approach may not be suitable for more complex screens with numerous actions and responsibilities. In production applications, it’s often better to distribute responsibilities across multiple components, such as through the use of child view controllers.
We provided a comprehensive breakdown of each screen in our application, detailing:
- The functional role and purpose of each component
- The UI elements and their interactions
- The underlying data models and controller interactions
- Key implementation methods with practical code examples
Our experience with unit testing, particularly with the GatherViewController, revealed some challenges inherent to the MVC pattern. The need to rely on private APIs (such as with UIAlertController) highlighted potential maintenance risks, as these implementations could break with future iOS updates.
Despite these challenges, MVC remains a powerful architectural pattern when implemented thoughtfully. Its primary advantages include:
- Straightforward implementation for smaller applications
- Lower initial complexity compared to other patterns
- Strong integration with Apple’s frameworks
- Familiar structure for most iOS developers
While our metrics analysis is preliminary, we anticipate that MVC will show advantages in terms of code conciseness, as other architectural patterns typically introduce additional layers and complexity. However, a complete comparison with other patterns will be necessary to draw definitive conclusions.
In the upcoming articles in this series, we’ll explore alternative architectural patterns, providing a comprehensive comparison that will help you make informed decisions for your own iOS projects.
Thank you for following along with this deep dive into MVC! Be sure to check out the additional resources below for more information and practical examples.
Useful Links
- The iOS App — Football Gather — GitHub Repo Link
- The web server application made in Vapor —
GitHub Repo Link,
‘Building Modern REST APIs with Vapor and Fluent in Swift’ article link,
‘From Vapor 3 to 4: Elevate your server-side app’ article link - Model View Controller (MVC) — article and GitHub Repo Link
- Model View ViewModel (MVVM) — article and GitHub Repo Link
- Model View Presenter (MVP) — article and GitHub Repo Link
- Coordinator Pattern — MVP with Coordinators (MVP-C) — article and GitHub Repo Link
- View Interactor Presenter Entity Router (VIPER) — article and GitHub Repo Link
- View Interactor Presenter (VIP) — article and GitHub Repo Link