Authentication and Authorization using JWT with Node.js

This article will help you grasp different concepts behind Node.js and will empower you to create production ready applications. This article expects the reader to know Babel and how to set it up. Please read this article if you need to learn Babel setup.
This article will focus only on the usage of JWT for providing authentication to our REST APIs. If we want to read more about authentication methods and see how to use Redis to perform the same, please read the 6th article of the series.
JSON Web Token (JWT) is an open standard that defines a compact and self-contained way of securely transmitting information between parties as a JSON object. This information can be verified and trusted because it is digitally signed.
Authorization is the most common scenario for using JWT. Once the user is logged in, each subsequent request will include the JWT, allowing the user to access routes, services, and resources that are permitted with that token. Single sign-on is a feature that widely uses JWT nowadays, because of its small overhead and its ability to be easily used across different domains.
There are some advantages of using JWT for authorization:
- Purely stateless. No additional server or infra required to store session information.
- It can be easily shared among services.
In its compact form, JSON Web Tokens consist of three parts separated by dots (.), which are:
- Header
- Payload
- Signature
Therefore, a JWT typically looks like the following.
xxxxx.yyyyy.zzzzz
TK Let us start with a boiler plate I’ve made, which will be used in future articles. If you have followed the series from the start, the boiler plate should be very clear.
We will be using an npm module to implement JWT :
Install the above module in the project:
npm install jsonwebtoken --saveWe will build two APIs. The first API is a “login” API, which should return a new session token, and the other API would be to update the password which will need a valid session token of a logged in user.
Let’s first add a service method to update the user’s password.
So finally services/UserService.js should look like this:
Now let’s edit our common/authUtils.js file to handle the desired scenarios.
import jwt from 'jsonwebtoken';const newSessionRoutes = [{ path: '/user/login', method: 'POST' }];
const authRoutes = [{ path: '/user/password', method: 'PUT' }];const SECRET_KEY = "JWT_SECRET";
Import the jsonwebtoken module and define three constants, the first one containing the array of the API methods which need a new session, and the second one containing an array of API methods which need a valid session. The third one should keep the secret key to be used for encryption of the data.
Add the above methods to check if the passed API needs a new session or the old session.
The generateJWTToken() method should take the user data, encrypt it with the predefined secret key and then generate the jwtToken string.
The verifyToken() method should take the jwtToken string and return the decrypted data. In case of an invalid token string, it will go to the catch block and return null.
So our authUtils file should look like this:
Now let’s edit the app.js file.
import {clientApiKeyValidation} from './common/authUtils';Update the above line as below:
import { clientApiKeyValidation, isNewSessionRequired, isAuthRequired, generateJWTToken, verifyToken } from './common/authUtils';Now add the following code just after the line where we have injected clientApiKeyValidation.
With the above code we’re injecting another request handler which will handle session related stuff for all APIs. First we check if a new session is required for the invoked API. In this case, we just set a boolean field which we will use later in the response handler.
Now for the second case:
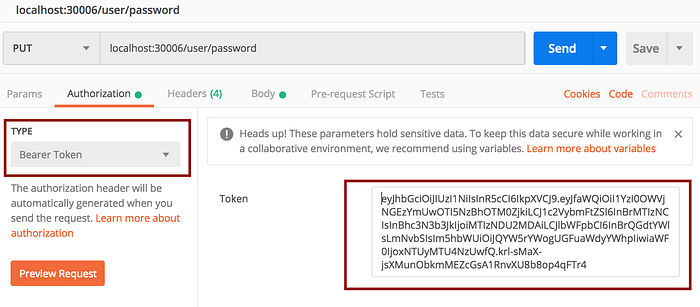
Here we assume that the request will come with a Bearer Token header as below:
We’ve passed the JWT token to the verifyToken method we defined earlier. If we get the decrypted user data, we set the same data to a field in the request object.
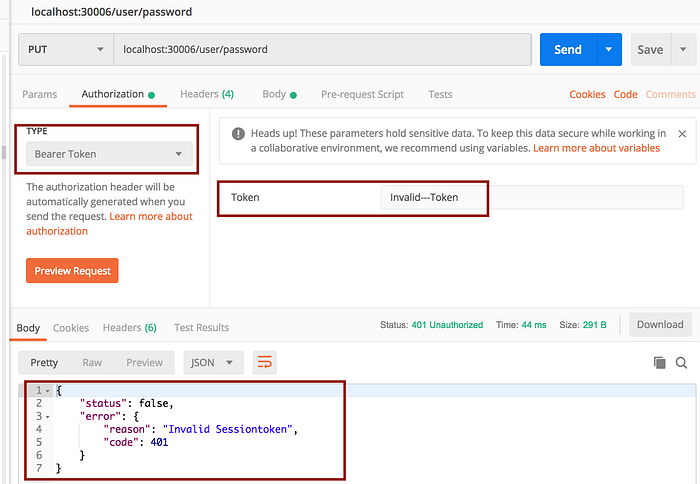
Otherwise we send an error with an Invalid session-token message.
Now after all our route injections, let us modify the response handler for all our APIs too.
In the case where a new session is required, we generate the JWT Token and send it in the API response.
In the other case, where the session token is passed to the API, we send the same session token in the response.
So our app.js code looks like:
Now let’s move to our routes/user.js file.
Update the import statement to include the updateUserPassword method too.
import { getUserDetails, updateUserPassword } from '../services/UserService';The code for the login API is as below:
Here we can also add another condition to check if username or password are missing from the request data. First, we try to get the user details with the username being passed. In the case of missing data, we send an error stating “invalid username”. Otherwise we try to compare passwords.
In the case of password mismatch we send an error. Otherwise we update the user data in both the response data object and request session object. The same data will be used in our response handler to create the JWT token.
Now let’s add code for the updated password API.
This is an interesting part of the code. Here we will see how to get all the user details from the session token. The user details or the username was not mentioned anywhere in the request. But our session handler which we injected as a request handler must have injected the user data in our request session object.
let uname = req.session.userData.username;We get the username from the request session object and then we perform all actions needed to update the user’s password.
Now let’s test our code. Run the project using Node index.js command.
Hit the login API now:
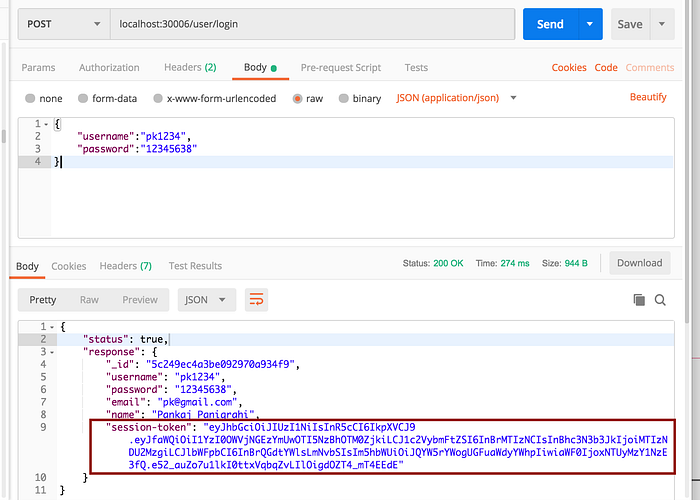
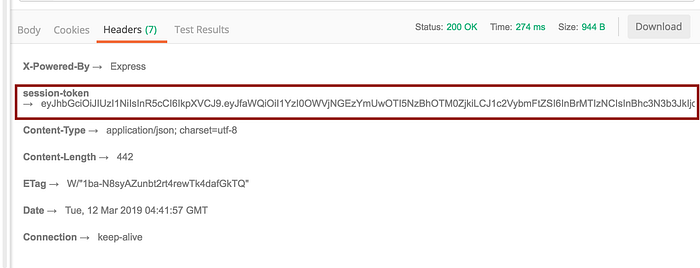
We send the session token in both response header and body.
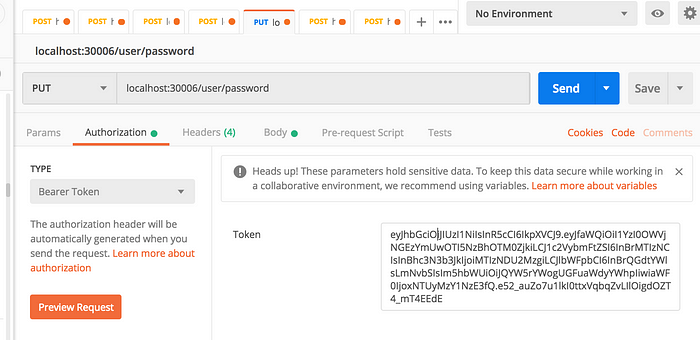
Now try to hit the update password API with an invalid token:
Copy the session token we got earlier in the login API response and pass it in the header of the update password API.

In a previous article we achieved the same result using Redis. Both methods can be used to achieve stateless authentication.
I prefer using Redis because of the disadvantages of using JWT, which are:
- Less control over clients: Suppose for some reason, we would like to invalidate all sessions in your system. You can do that easily in Redis by deleting all keys. At a certain point in time, one doesn’t know the number of logged in clients. Suppose you want to push some messages to the logged in devices. It is impossible to do that in JWT implementation.
- Payload overhead: In Redis, the token size is fixed. But in JWT, the token size is directly proportional to the amount of data you want to add to the session. This definitely hampers the API performance if you have a large amount of data to store.
- Changing session: In certain cases, you would like to modify the session data in a running session. You can easily do that with the Redis approach as the token doesn’t change. But in JWT, the token changes when the data changes. Thus the client has to keep track of this, which makes the integration cumbersome.
Having said all this, JWT still solves a lot of use-cases and is very easy to implement.
If you liked the article, you can 👏 the story and share it with others.

