Analyzing Autonomous Art NFT Smart Contract
Decoding smart contract 02

Autonomous Art is an NFT project created by Moxie Marlinspike. It allows users to create and mint NFT collectively through visual contribution and make money by sharing the subsequent minting fee. It is an experiment that went really well. According to Moxie’s own words:
My autonomous graphics NFT was supposed to be a joke, but now $1.5M has gone into it and there’s a literal billboard for it floating in the water off Miami Beach.
In this article, I will explain the smart contract of Autonomous Art. This article is beginner-friendly, so feel free to skip any section. If you know this project well and are familiar with NFT, you might want to navigate to “Explain by Functionality” section.
Who is the target audience?
If you are new to NFT and want to learn how to develop an NFT smart contract by yourself, this is the right article for you. If you are curious about how the technology behind NFT works, this article would also help.
Prerequisites
If you understand ERC-721 and have coding experience, you are good to skip this section. Otherwise, it is better to understand the following.
- NFT Concepts: It is important to understand what is an NFT, what makes it non-fungible. To learn more, you can read my previous article: Analyzing Pepsi NFT Smart Contract (specifically, the NFT in Contract section).
- Solidity: Most NFT contracts use Solidity. Having a basic understanding can help you understand the contract code. The official document is a good starting point to learn.
- ERC-721: Autonomous Art NFT leverages the ERC-721 smart contract implemented by Open Zeppelin. ERC-721 standard provides the basic functionality of NFT, including transfer, check account balance, mint, etc. This is a good overview: ERC-721 Non-Fungible Token Standard.
What is Autonomous Art?
Before diving into the contract, let’s understand how this project works first. There are two aspects: (1) How to create art collectively? (2) How does the economy work?
(1) How to create art collectively?
You can find the collectively generated artwork on the Autonomous Art website. Till this moment, there are 633 users left their mark on this digital painting. You can make a visual contribution (eg. add a shape, specify a color) on top of the previous picture and then mint it as an NFT. The video below shows the evolution of this artwork.
(2) How does the economy work?
To mint an NFT, you have to pay a price that goes up over time. This fund will be distributed equally to all the previous contributors. And you will make money in the same way due to all subsequent mint.
It is probably hard to understand this project. If you want to learn more, please go to Autonomous Art website to try things out or leave a comment.
Prep Work
To start, let’s locate the most relevant contract code.
Where to find the contract code?
The smart contract address is 0x3a56AB63c7ef4f07fe353bEb132e0Fd5AD270Ca0, and its code is in the ‘Contract’ section of this Etherscan page.
Which contract?
There are 13 contracts on the Etherscan page. However, we only need to look at the first one, CollectiveCanvas.sol. The other contracts are open source templates from Hardhat and OpenZeppelin, which we will not cover.
You can find CollectiveCanvas.sol on my Github.
Contract Structure
Next, let’s take a look at the structure of the contract.
The contract might look complicated at first glance, but it is well organized. Fig.1 visualizes the structure of this contract. This structure applies to almost all smart contracts. If you are familiar already, you might want to skip to the next section, where we discuss the functions of this smart contract.

- SPDX License Identifier (line 1) indicates how other people can use this code. There is a full list of SPDX License.
- Solidity Version (line 2) lets the compiler translate the code correctly, and then the EVM can understand. In this contract,
^0.8.0indicates version 0.8.0 or higher, but not higher than 0.9.0. - Import dependencies (line 4 - 9) then the contract use the ERC-721 contract as its blueprint, and also adding functionalities like base64 encoding.
- Autonomous Art is the NFT contract that consists of State Variables, a Constructor, and Functions. I will explain by functionality in the next section.
Explain by Functionality
There are 6 main functions. Let’s look into them!
1. On-chain Metadata
This contract stores metadata on-chain, which guarantees the information of NFT is safely stored and immutable as long as the blockchain itself is not compromised. This solution is more reliable than relying on any external storage.
You might ask if the on-chain solution is better, why would projects store metadata on IPFS? A great question. The answer is that storing information can be a costly operation. According to this source, storing 1kB of data can cost around 0.02 ETH ($54). Crazy, right?
This project uses two tricks for on-chain storage: (1) SVG format image (2) base64 encoding.
(1) SVG format image: SVG stands for Scalable Vector Graphics. It is a language that describes vector graphics. To draw a circle, you only need the following string. Try past it in this SVG viewer to see how it looks.
<svg viewBox="0 0 200 200" xmlns="http://www.w3.org/2000/svg">
  <circle cx="100" cy="100" r="100"/>
</svg>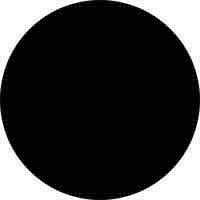
Storing the same circle image in JPG or PNG format will result in 3 or 4 kB file size, which will cost around $200 gas fee.
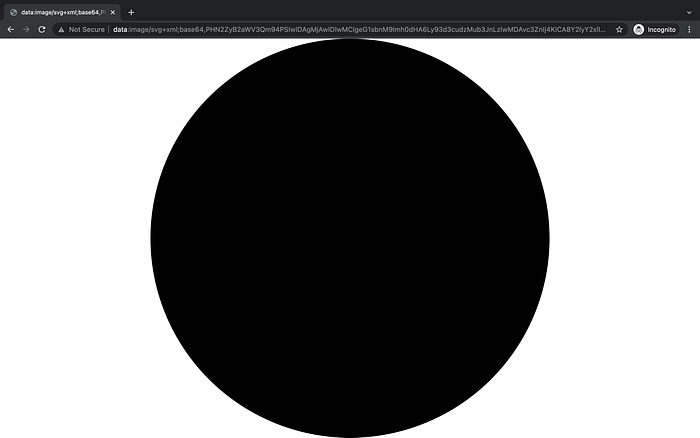
(2) Base64 encoding is essentially a way to encode (structured) data into a string. For example, using an online Base64 encoder, the SVG code can be encoded as the following:
PHN2ZyB2aWV3Qm94PSIwIDAgMjAwIDIwMCIgeG1sbnM9Imh0dHA6Ly93d3cudzMub3JnLzIwMDAvc3ZnIj4KICA8Y2lyY2xlIGN4PSIxMDAiIGN5PSIxMDAiIHI9IjEwMCIvPgo8L3N2Zz4=Then if we prepend a string data:image/svg+xml;base64, to it, our browser will be able to understand the whole string and show the circle image. Try to copy-paste the following string into your browser’s address bar and see what will happen!
data:image/svg+xml;base64,PHN2ZyB2aWV3Qm94PSIwIDAgMjAwIDIwMCIgeG1sbnM9Imh0dHA6Ly93d3cudzMub3JnLzIwMDAvc3ZnIj4KICA8Y2lyY2xlIGN4PSIxMDAiIGN5PSIxMDAiIHI9IjEwMCIvPgo8L3N2Zz4=Figure 4 shows my result.
Now we can encode an image into a string, the same applies to the JSON format metadata. To do that, first, encode the JSON data using Base64. Then, prepend data:application/json;base64, to it.
Below is the contract function that provides on-chain metadata given a tokenId:
It first checks the existence of a token, then retrieves the Base64 encoded SVG image string from the function _encodeSvgUriAtTokenId. Line 6 encodes combine and encode metadata JSON string into Base64 format. Lastly, prepend the string data:application/json;base64,, and the on-chain metadata is generated!
2. SVG Handling
The following code handles SVG.
This is collective art has a lot of contributors. To reconstruct each historical state of the artwork, each contribution is stored separately in the array variable _layers. For example, if I added the above circle to the artwork and mint it as an NFT, this string <circle cx=”100" cy=”100" r=”100"/> will be added to _layers as its last element. Additionally, the index of circle string in _layers is the same as my NFT tokenId.
Function _encodeSvgAtTokenId reconstructs the historical state given a tokenId, by iterating _layers from the beginning to the tokenId-valued index, and adding each element to the SVG string.
Function _encodeSvgUriAtTokenId encodes SVG string into Base64 format, and then prepend the string data:image/svg+xml;base64, to it for browser compatibility.
In my learning, I was amazed by the use of SVG to store and reconstruct the historical states of the artwork. So creative!
We have not covered everything. There is a function _validateLayer that checks the validity of each SVG element, specifically, the SVG grammar, before adding it to _layers. I did not look into this function because knowing its existence seems to be enough for understanding this smart contract.
3. Price Calculation
Congratulations! You have just learned the most difficult part of this smart contract. Later sections will be easier.
As mentioned above, the NFT price goes up with the number of tokens minted. The code below justifies the design.
Just two things to add: (1) the length of _layers equals the amount of minted NFT tokens as discussed in the previous section. (2) The basePrice is set in the constructor as 0.024 ETH.
4. Mint
Nothing crazy here, just two requirements: (1) transaction is enough to cover the NFT price, (2) the SVG code is valid. Then mint the NFT and save metadata in a mapping state variable _tokenMetadata.
5. Value Distribution
One of the reasons for this NFT project went viral is the value distribution mechanism. As a token holder, you can make a lot of money by sharing subsequent minting fees. Let’s dig into it!
Function balanceOfToken calculates the balance owned by your NFT. It iterates the subsequent minting, calculates your share, and adds the values together to derive the total fund owned by you. Then subtract this value with the withdrawn part to derive the withdrawable balance.
Function withdraw allows NFT owners to transfer the balance, and update the withdrawn amount stored in _tokenMetadata.
6. Others
There are other utility functions that set the base price or calculate the total fund accumulated in this project. These functions are pretty standard and easy to understand. Although I will not cover them in this article, feel free to leave a comment if you have any questions!
The End
There you have it! I hope you find this tutorial helpful and fun. Please feel free to leave a comment if you have any questions or suggestions. I am also open to suggestions. If you know an interesting project and want me to look at it, let me know!
Want to Connect?Please feel free to reach out (my LinkedIn) if you have any questions, feedback, or even just a random chat.

