An Introduction to RxSwift + MVVM
Apply the RxSwift-enhanced MVVM version in your iOS applications

The purpose of this article is to introduce you, as someone interested in reactive programming, to the RxSwift framework and let you apply it in the fastest way possible.
I’ve discovered many different and great articles on RxSwift across the internet. However, I found that several were either too theoretical or too advanced in their approach or even slightly outdated. In comparison to the imperative programming style, reactive programming has a relatively steep learning curve. That is why I will leave out any marble diagrams and deep theory and start applying the RxSwift framework as soon as possible.
I hope this article offers you some direction and lets you pick the path you would like to explore further on your own.
Topics we will cover:
- The MVVM version
- The RxSwift-enhanced MVVM version and RxSwift basics
- RxSwift best practices
- Unidirectional flow
Overview
As part of this article, we will create two different logins for our Fruit Inc company. Nothing too fancy. There are two input fields and one login password. The login button is enabled after we have some input.
The first approach will follow the “classical” MVVM approach. The second login screen will build upon the first approach and use the reactive method instead.
The full project code is available on GitHub:
MVVM Version
MVVM is an acronym for the Model-View-ViewModel software architectural pattern. It facilitates the separation of the UI and business/backend logic. The code for the MVVM version relies heavily on callback closures. The protocol gives a good overview:

In the pure MVVM approach, we override the username and password properties’ didSet methods. Each update of those properties updates the internal login’s allowed state, and this state gets passed into the canLoginCallback callback. The LoginViewController declares itself as the handler of the callback and updates the login button state.

Let’s see how the RxSwift version will handle this. But first, let’s quickly dive into the RxSwift theory. We’ll keep it brief.
(Very) Short Introduction to RxSwift
Observable
Observable is the core of reactive programming. Observable represents a sequence — a stream of events.
Observer
An Observer can subscribe to the Observable sequences to receive any updates as new events arrive. Each sequence completes normally or gets terminated by some error event. The most important one is that it can receive the data asynchronously.
Traits
An Rx trait is a wrapped Observable with additional functionality and helps us do things faster. There is a wide variety of them, and you can find extensive documentation on what they do and how they differ in the official Traits documentation.
For this article, we will only use the Driver trait. The Driver is part of the RxCocoa module, and as the documentation states:
“Its intention is to provide an intuitive way to write reactive code in the UI layer.”
The main advantages are that it can’t error out, and observing occurs on the main scheduler.
RxSwift is a compelling and overwhelming framework. Everything looks like a nail when you are holding a hammer in your hand. My advice would be to start small. The Driver trait and the Observable are enough for most cases, especially if you’re only getting started. This is an idea I’ve borrowed from the Surviving RxSwift article by Ian Keen. It defines a good set of rules to start with.
Rx-Enhanced MVVM Version
The main difference between the pure MVVM and the Rx-enhanced version is the binding handling. We removed the closures and replaced them with RxSwift bindings. As stated earlier, observables and observing sequences are the main ideas around which reactive programming is built. This is where the framework shines. For example, compared to the closure approach, the reactive RXLoginViewModel can be reduced to half of its previous size (~20 lines vs. ~40 lines of Swift code).
The Driver and Observable are enough to cover the functionality we need.
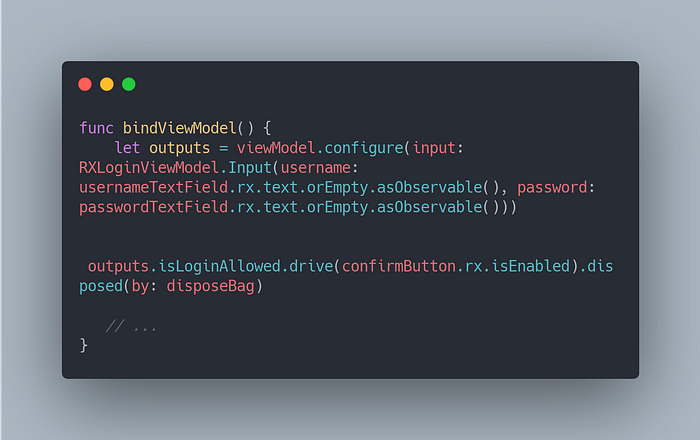
You might wonder what those Input and Output structs are. This is an idea that I borrowed from this Kickstarter project. It is explained in greater detail on GitHub. As the names of the struct state, the two structs define the expected inputs and the expected outputs of this view model. What goes in is determined by the Input struct and represented with the Observable type. The Output struct defines what gets out. Note that Output only uses Driver types. The Driver trait lets us observe it safely on the main thread.

The clear unidirectional flow provides more clarity, establishes a better structure, and makes the naming easier. In our example, we have two text fields as input and a boolean flag — enabling or disabling the login button — as output. The configure function handles the logic here and returns the output struct with all the Driver traits. The view controller drives the button-enabled state.
Please note that the RXLoginViewModel is not getting initialized from the view controller. The view controller receives the view model at the init phase. I’ve read many articles that exemplify the opposite approach and let the view controller initialize the view model instead. This approach, in my opinion, makes it harder to test the view model.
Instead, we inverse the control and provide the view model to the controller. This pattern is described commonly as dependency injection. It simplifies the testing and couples the objects loosely.
Resources
- The code for this article: https://github.com/kmpnz/PracticalRxSwift
- Surviving RxSwift article by Ian Keen
- A deeper dive into RxSwift Subjects by Dimitris Kalaitzidis
- Kickstarter’s ViewModel structure guidelines