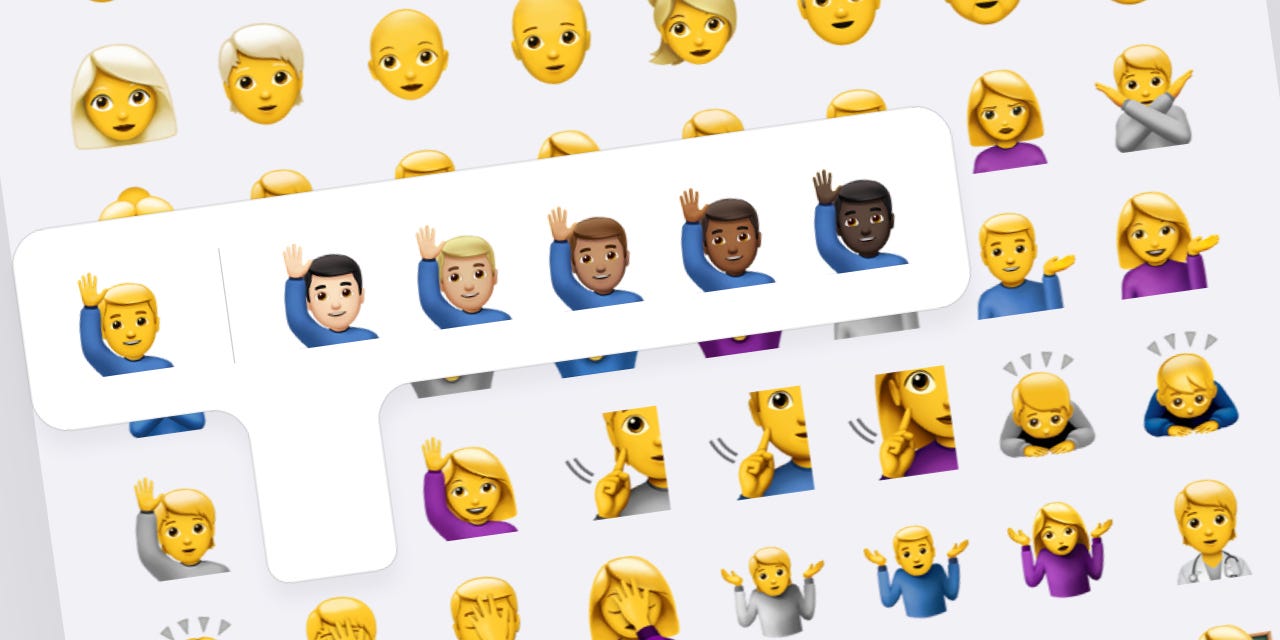
How I Built an Emoji Picker Library for iOS
An emoji selection element similar to macOS
The choice of emojis is a common phenomenon in apps because they have become a popular way for users to express themselves digitally. They can be used to add individuality and emotions to text messages or additional meaning to various elements of the application.
For example, in my Timetable app, which is designed for keeping track of a schedule, it was necessary to add the ability to attach an emoji to the schedule title.

It can only be done in a systematic way using UITextField or UITextView + a keyboard type workaround. In my case, this was not suitable and I started looking for other ways. I found several libraries, but they all did not work for me for various reasons.
In some cases, there was a lack of localization and there were various bugs, in some cases, the UI was not suitable, etc. The main thing for me was that this element was in the Apple style, worked correctly, and was localized for all languages.
I found a suitable solution in MacOS. There is exactly a system element that appears in the right place for you and has an arrow that shows which element is the starting point.

In the end, I made the decision to create a similar element for iOS. Next, I will describe the difficulties I encountered and the solutions I used during development.
Searching for a List of Emojis
At first, I started searching for an organized list of emoji, which is categorized. I first looked towards Apple’s system solutions, but unfortunately, they don’t provide any lists. After that, I went on the internet and immediately found a lot of lists, but after a slightly more detailed examination, the problem with emoji compatibility arose.
That is, an emoji added in iOS 15 will be a black square with a question mark in the center on all previous versions, and in all such lists there are just arrays of string values in the form of emoji. What versions of iOS do they support — nobody knows 🤷🏻♂️
And if I want to support not only the latest version of iOS, I need to find a list where it is indicated when the emoji was added. The first thought was that they are categorized by iOS versions, but as I delved deeper, I remembered that there is also Android…
It turned out that emojis are divided into their Unicode versions.

This list can be found on the website — unicode.com. There are also the necessary files with emoji lists that I need, but there is no localization, only English 🥲 But more about that later.

In this emoji file, emojis consist of one or several hexadecimal values. To obtain the emoji itself from these values, it is necessary to convert it into an array of hexadecimal values and perform the following:
print(
    [0x1F600]
        // Converting hex value into a 32-bit integer representation of emoji in the Unicode table.
        .map({ UnicodeScalar($0) })
        // Removing the optional.
        .compactMap({ $0 })
        // Converting a 32-bit integer to a character for correct representation.
        .map({ String($0) })
        // Combine all the received values to get the final emoji.
        .joined()
) // "😀"
After learning to convert the hexadecimal representation of an emoji into a string, I needed to convert the list into an ordered array for interaction with the code.
To obtain the model from the emoji-test.txt file, I quickly wrote a parser that went through the lines, breaking them into the values I needed. In the end, I got an array of emojis in the desired model:
MCEmoji(
    // An array of hex keys.
    emojiKeys: [0x1F600],
    // A flag reflecting whether this emoji has different skin tone variations available.
    isSkinToneSupport: false,
    // The emoji version.
    version: 1.0
)
Next, I sorted them into categories, and then the organized list that I had been searching for was ready.
Backward Compatibility
After the list of emojis was organized with the respective Unicode versions, it was necessary to correlate the Unicode versions with iOS.
There is no super native way to do this, so it was done after a few hours of studying the emojipedia.org website. There are similar news in the format of: “In March 2022 iOS 15.4 included brand new emojis from Emoji 14.0” which made it possible to correlate everything.
This is how it looks in the code:
private let maxCurrentAvailableEmojiVersion: Double = {
    let currentIOSVersion = (UIDevice.current.systemVersion as NSString).floatValue
    switch currentIOSVersion {
    case 12.1...13.1:
        return 11.0
    case 13.2...14.1:
        return 12.0
    case 14.2...14.4:
        return 13.0
    case 14.5...15.3:
        return 13.1
    case 15.4...:
        return 14.0
    default:
        return 5.0
    }
}()
Now, to make sure the necessary emojis are displayed for the desired version of iOS, I just need to check that the emoji version is less than or equal tomaxCurrentAvailableEmojiVersion.
Skin tone selection.
Before starting the implementation of the skin tone selection logic, my first thought was to store an array of emojis with all skin tone variations for each (P.S. That’s what many do. Well, what else?).
After another review of the emoji list, I noticed one pattern. It was that if the smiley supported skin tone selection, then all elements of the array remain unchanged, but a certain value for each skin tone is inserted in the second place in the array.

And this pattern repeats for each emoji that has the option to choose a skin tone.
It turned out that at the bottom of this file there is a “Components” section, where a list of hexadecimal values for each skin tone lies.

This saved me from having to duplicate multiple emoji with different skin types. Now I can substitute the second position in the emoji values array with the desired skin tone value and end up with the desired emoji. And I can store in the model only the original values array.
After selecting the skin tone, the MCEmojiSkinTone.rawValue is saved in UserDefaults for the desired emoji, which serves as the key for the record.
After that, I can update the model and get the emoji with the chosen skin tone.
Two-part Emojis
However, there are also “dual-component” emojis.

The photo shows that for the left and right sides of the emoji, there is a line with skin tones at the top of this element. And on each line, the opposite side of the emoji is filled with a solid color.
Unfortunately, there was no skin tone in that file that would fill the emoji with a solid color 🥲
I suspect that there is a similar code for simplification that can be inserted and the emoji will become filled. But I haven’t found it yet. So I couldn’t make this element.
P.S. If you know the solution to this problem, please contact me 🙏 I really want to make this element too.
UI. What could have gone wrong here?
Category icons.
Since it was desired to make the element identical, the category icons should also have been the same.

It turned out to be not so easy to find them. They didn’t show up in a Google search and even if I was able to find them, they were of poor quality.
After long searches through various resources, I was able to find them in the system’s private framework of MacOS. The path to the desired folder looks like this: /System/Library/PrivateFrameworks/CharacterPicker.framework/Versions/A/Resources
They are there in excellent quality, in pdf format.
But I didn’t want to pull images into the library and wanted to practice drawing with code. The program PaintCode helped me a lot with this. This way I was able to kill two birds with one stone: reduce the number of library files and practice with UIBezierPath.
After practicing with category drawing, element preview layout, and skin tone selection, the task already seemed quite achievable.
Skin tone preview and selection element
The skin tone selection element for emojis in MacOS predictably does not look in the style of iOS.

So I decided to take this element, and also the emoji preview element from the standard keyboard on the iPhone.

With the preview element, everything was easy: fixed sizes and a fixed position in the center of the clicked cell.
But with the skin tone selection element, everything was slightly more complicated. Because it was already necessary to take into account:
- The location of the selected emoji along the X axis (based on this value, the direction of the upper rectangle with skin types is selected).
- It was also necessary to track that the upper rectangle does not go beyond the edges of the picker itself.
- Process all gestures correctly.
The layout code and calculations turned out to be too large to insert into the article, so I’ll leave links:
There was one unresolved issue there. In Apple’s skin tone selection implementation, you can start selecting as soon as this element appears, without lifting your finger from the screen. Moving your finger to the right or left will highlight the skin tone that matches the X position of your finger on the screen.
I repeated this functionality, but I was unable to make it so that after pressing, you can immediately process the screen movement event without lifting your finger. None of the gestures in my case worked.
You can try fixing it in the repository of the project on GitHub and submit a pull request. I will be very happy if you succeed!
Localization
The localization was also difficult. If I found the localization of the keys for finding emoticons with difficulty, I could not find the localized list of names for emoji categories.
I did not want to localize through a translator, as there would be 100% errors in this case.
The solution was very primitive, but it gave me a correct translation 100%. I sat for several hours manually switching the language on my phone, taking screenshots of the names of all 9 categories. Fortunately, my iPhone learned to recognize text in photos and I could copy the names from the images obtained (but not all languages were so easily recognized and sometimes I had to use Google Translate to determine the correct text in the photo).
In the end, I was able to collect the localization for all 40 standard iOS languages.
This is not where the adventures ended. In the library, I wanted to support two dependency managers at once: Swift Package Manager and CocoaPods. But localization is set up differently in both.
In Swift Package Manager, the reference to the localization resource looks like this:
NSLocalizedString(”a_localized_string”, bundle: Bundle.module, comment: “a comment”)As a parameter, bundle is passed Bundle.module. This static parameter automatically adds the SPM itself.
CocoaPods cannot do this. There, in order to access the localization resource, the following must be done:
let path = Bundle(for: LibraryName.self).path(
 forResource: "LibraryName",
 ofType: "bundle"
) ?? ""
NSLocalizedString(”a_localized_string”, bundle: Bundle(path: path) ?? Bundle.main, comment: “a comment”)
This problem was solved with the help of an extension for Bundle, which will only be added if the library is not used through the Swift Package Manager.
#if !SWIFT_PACKAGE
extension Bundle {
    static var module: Bundle {
        let path = Bundle(for: MCUnicodeManager.self).path(
            forResource: "MCEmojiPicker",
            ofType: "bundle"
        ) ?? ""
        return Bundle(path: path) ?? Bundle.main
    }
}
#endif
This extension makes it possible to always have access to Bundle.module in the library, regardless of which dependency manager is being used.
Conclusion.
In total, I ended up with a library that allows you to add an emoji picker to your application with literally three lines of code.
Additionally, it:
- Supports Swift Package Manager and CocoaPods.
- Weighs only 795 kilobytes.
- Is the only one among its peers that supports all standard localizations (at the time of publication, of course 🙃).

I didn’t expect such a simple, at first glance, element to become such an interesting challenge.
Next, I have to work on optimization because it turns out that displaying emojis in a UILabel is a memory-intensive task.
Also, from the not yet implemented standard functions, it remains to add: search and division of recently used emoji. I plan to finish them soon.
You can view my repository below:
Thank you for reading.

