A Data Validation Solution Utilizing Swift Property Wrappers and SwiftUI View Extensions
Data validation in Swift and SwiftUI

For better or worse, the Swift programming language does not provide a unified approach to validation. As a result, each developer must develop their own approach. In this article, I share my hard-won solution to data validation.
“To err is human, to validate devine.” — (not) Alexander Pope
At a basic level, validation requires detecting and communicating invalid data. Ideally, validation logic should be reusable and allow for incorporation at multiple levels of the codebase: within the model, view, and/or anywhere in between. I present a validation package that accomplishes all of those goals as well as the ability to correct and format user-entered data. The foundation of this approach is a rule-based system. With that system in place, we can leverage the power of Swift property wrappers and SwiftUI view extensions to apply our validation schema across the codebase.
Creating a Validation Rule
Let’s begin with the creation of a relatively simple Swift protocol. Here’s the code:
The validation logic will reside with the validate function, which accepts a value type and returns a Result type. Under the hood, a result type is an enum with two potential outcomes (or cases): success and failure. Importantly, these two cases also have associated values that allow us to pass on details about our validation outcome.
Within the protocol, there is a single property that defines a fallback value. In our rule, this value can be used as an initial value and can also be used to replace invalid data. The fallback value will be especially important in allowing us to create a well-functioning property wrapper (see below), where we are able to provide default values for our fallback value with extensions.
Before we can begin creating a validation rule, we first need to define an error type that we will use to satisfy the associated Failure type within our protocol. Any error type will do. For this example, we will create a string alias called ErrorMessage in two lines of code:
Using our new Rule protocol and error type, let’s create a simple rule that we can then use to validate a string. Here’s the code:
We can make the same rule customizable by adding an additional initializer and variable to the rule. In this case, we will allow modification of the rule so that we can define the maximum length of our word, as you can see below:
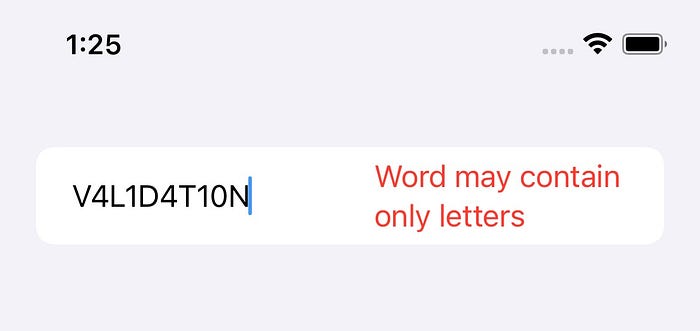
We can also add more validation logic as needed. By adding another guard statement within our validate function, we can check to make sure that all of the entered characters are letters, which is shown below:
Up to this point, we have returned different error types using the .failure case of our validation result. It is also possible to change the return value for successes as well. In essence, we can use this ability to make our rule auto-correcting or to add formatting. In the following example, we will trim any whitespace before and after the word. We will then return the trimmed value within our validation result, which you can see below:
Now that we have finally created a rule, we can use it as a stand-alone validating object, shown here:
The above examples are rather simple and straightforward but demonstrate the ability to use custom initializers, include complex logic, and transform values. Use cases for combining validation and formatting would include phone numbers, postal codes, etc. Good validation rules often become quite involved in my hands as I try to foresee as many edge cases as possible.
Good validation is hard work!
Validating Using a Swift Property Wrapper
The true power of our validation rule becomes clear as we explore different ways to use our validation logic throughout the codebase. A prime place to perform validation using a custom Swift property wrapper is at the property level. Let us jump straight into the code:
The above property wrapper successfully “wraps” our validation rule and the value we want to validate. Unsurprisingly, the main initializer requires both a validation rule and value. We will also include other initializers for our property wrapper to allow smooth integration in our projects. In these initializers, we are providing default values for our rule and our value, which is shown below:
With a semi-complete property wrapper, we can now incorporate property validation directly within our model or ViewModel. With the multiple property wrapper initializers we defined above, we have multiple syntactic options for wrapping our property.
However, our property wrapper is incomplete as we cannot easily access the validation result. Here is where we utilize a projected value. In Swift UI state management, many of the projected values are Bindings. But in a custom property wrapper, we can set the projected value to whatever we like. In this case, we will return our validation result using a computed property, as you can see:
Now that we have defined a projected value, we can access our validation result at any time using the $ symbol.
Despite all of our hard work above, the wrapped property remains more limited than the original “unwrapped” property in some important aspects. Specifically, while a String is Encodable and Decodable (aka Codable), our new wrapped property is not. This can be remedied by extending our property wrapper to include conformance to those protocols (or any other). Here is how we add protocol conformance to our property wrapper via an extension:
Adding Encodable conformance is more than just a convenience. Notice that in the encode function only valid values are encoded. If a value is invalid, it is not encoded. Instead, the fallback value is used in its place. This ensures that an invalid value will never be passed inside of encoded data!
Validation Inside a SwiftUI View
At this point, we can now directly validate data using our rule object. We can also use a property wrapper to incorporate our validation directly within the model (or the view model). But what if we want to incorporate validation within a SwiftUI view? A view extension is well suited for this task, as you’ll see below:
Some important things are happening above. Notice that the escaping validation function is fired when the bound value changes. This returns a validation result via closure which can then be used within the view. By using a closure, we can handle the validation result as we please and respond accordingly with UI changes.
When the field is submitted, we again check to make sure that the validated value matches the bound value when appropriate. If a value underwent transformation (such as trimming whitespace), it will update the bound value on submission.
Here is what our new view extension would look like in a proper view:
With our new view extension, the UI can react immediately to invalid data entry. Possible UI changes include displaying an error message in text, changing the text color, or displaying an error icon. In other scenarios, it may be preferable to prevent saving or to suspend navigation until the errors are successfully resolved. The possibilities are endless.
Conclusion
And finally, this is what our validated view looks like in action:
I hope you found this tutorial useful and that it prompts you to think more about the use of validation in your projects. If you enjoyed the article, please subscribe to encourage me to write more.
Happy coding!
Resources
A packaged version of this code can be found at GitHub. Please feel free to use it in your projects.

