6 Ways to Do Component Communications in Svelte
Sharing reactive data and events between components
Modern web applications are built on top of reactive components. Svelte application is composed of one or more components. A component is a reusable self-contained block of code that encapsulates HTML, CSS, and JavaScript that belong together written into a .svelte file.
Designing the user interface with components the main challenge will be, managing the application state on different components. In Svelte, we have powerful techniques to communicate the components effectively.
“Great communication begins with connection.“
— Oprah Winfrey
Let’s start connecting the dots by using the techniques of components communications with an understanding of the requirements and its solutions.
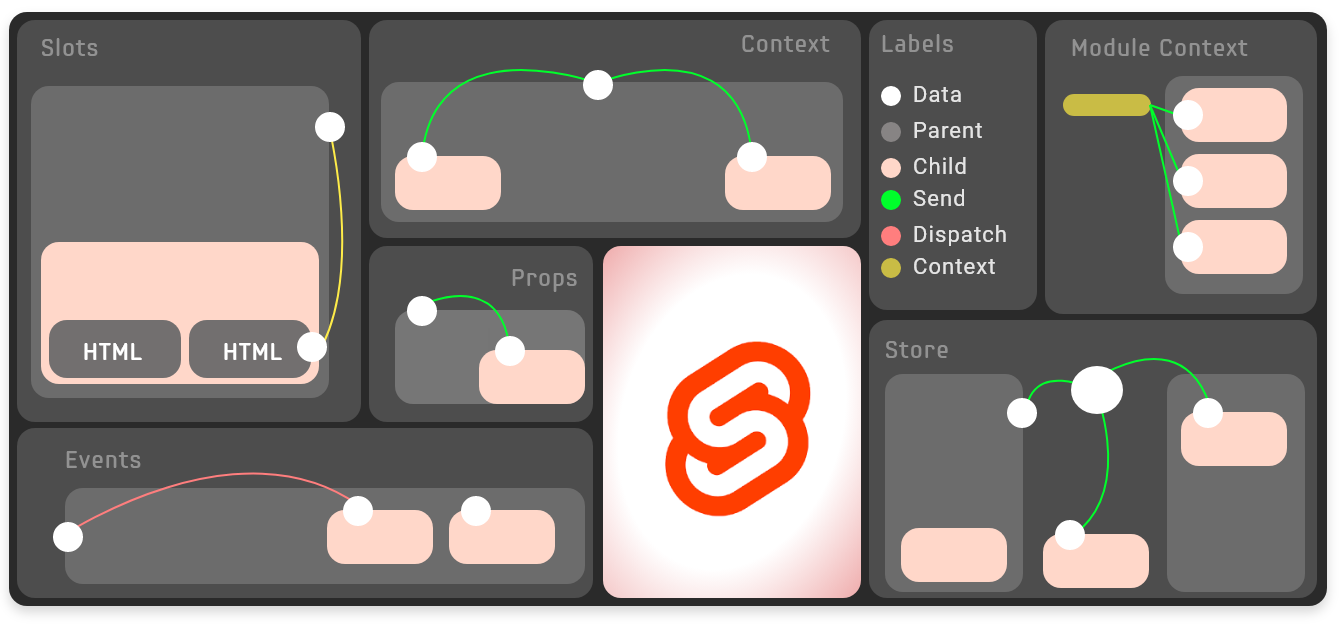
- Send data parent to child: Props
- Render HTML inside your components: Slots
- Child notify event to its parent with optional data: Events
- Ancestor shares data to all of their descendants: Context API
- Share data between all instances of a component: Module Context
- Share data with any components: Store
In this article, we can make sample child components and apply all the different techniques of Svelte component communications. it's not going to cover every bits and piece but it gives a better idea of that essence. if you follow each example step by step as it starts with basic to advanced.
1. Props
In any real application, you’ll need to pass data from one component down to its children. To do that, we need to declare properties, generally shortened to “props.” In Svelte, we do that with the export keyword.
Check out the following highlighted code with the export keyword inside Card.svelte component.

Simply import the Card components and send user data as props.
<script>
  import Card from './Card.svelte';
</script><Card userid="#2312312" name="Jhon Doe"/>
Tip: Using Typescript in Svelte will solve the type checking of the properties inside components.
2. Slots
Components may have multiple children by using slots we can define the positions of the children where to render. It is based on the web components slots proposals.
<div class="card">
  <slot/>
</div>
The default slot can be defined as <slot> HTML tags in the child components.
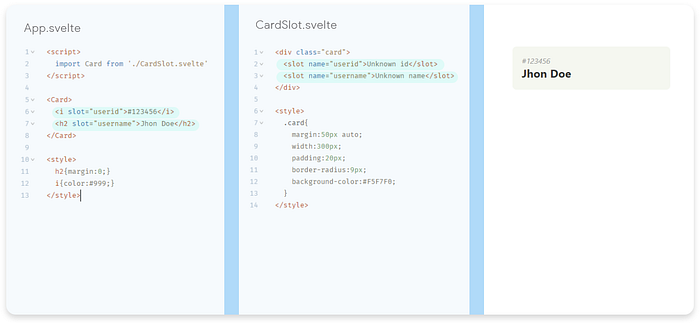
The slots help us to design components as a template and we inject our HTML based on named slots. The following example will show named slots components with fallback.
3. Events
Capturing the event from the child component is to be an interesting thing when we design components. Let us update our card component with the favorite toggle heart button and showing it filled based on the user event.

To dispatch the event, we have to import {createEventDispatcher} from Svelte. On the child event function, we send the data and event name want to trigger.
dispatch(<eventName>, <data-object>) derived from createEventDispatcher
Let’s check out the following code how it's done.
We get three properties id, name, favor from the parent and dispatch the event with data once heartIcon is clicked.
We use the spread operator {...}to set user objects as props of the child component and listening to the favorite click event, when it happens we call the whenFavored()function and set the value to the parent object.
Bonus Methods
- On multi-level nested components, the event can be forwarded using event forward methods like
<card on:favorite />it passes the event to its parent. it also applicable for the DOM events. - We can also bind the child components as a reference to the parent object and access all exported child methods. For example, we reference the
Cardcomponent in auserCardobject as<Card bind:this={userCard} />.
4. Context API
We are now entering the advanced but useful feature of communication techniques. The context API gives us the powerful mechanism to “talk” to the child components without passing around data and functions as props or dispatching lots of events.
“Communication is only effective when we communicate in a way that is meaningful to the recipient, not ourselves.“
— Rich Simmonds
The ancestor (top-level component) required to use setContext() and all of its descendants (child component) will get the data using getContext() Looks simple, right? YES, it’s that simple.
//App.svelte<script>
 import Card from './CardContext.svelte'
 import {setContext} from 'svelte'; let user ={
  id:123456,
  name:'Jhon Doe',
  favor : true
 }
 setContext('user', user);</script><Card/>
We set the user object by using the key 'User' to use all of its descendants.
The state of the context only available to its descendants. This can be helpful if you want to use several instances of a component without the state of one interfering with the state of the others.
5. Module Context
Share data between all instances of the same component is as easy as adding the variables inside <script context='module'></script> the module script.
Let us see with an example of clicking the tag in one component and highlight the tag name on other instances of the same components in a fun way.

Create all card instances in the App.svelte parent component using the users object and send the user data as a prop.
We also added a module method {clearAll} to clear the highlights when clicking the button “Clear All.”
The variable tagSelected is shared between all the instances. In a fun way of understanding, we have added a set interval with 100ms to update the tags highlighted. As you see all the logic was added inside the child component and its “talk” to each other instances.
6. Store
As an app grows, adding more features means adding more components. it tends to increases complexity. At this point, we are required to hold the application state out of the component's hierarchy. The built-in Svelte stores come as handy to do that.
In the Svelte store, we can hold a single object or an array. There are many different kinds of stores available in Svelte. The store can be writable, readable, derived, or custom.
Let's create a simple writable book store with form and list components.
BookStore.js
import { writable } from 'svelte/store'export let bookStore = writable([
 {name:"Hamlet",author:"William Shakespeare"},
 {name:"The Great Gatsby",author:"F. Scott Fitzgerald"}
]);
BookList.svelte
<script>
 import { bookStore } from './BookStore.js'
</script>
<ul>
 {#each $bookStore as book}
  <li>{book.name} - {book.author}</li>
 {/each}
</ul>
BookForm.svelte
<script>
 import { bookStore } from './BookStore.js'
 let bookName;
 let author;
 const addNew = ()=>{
  $bookStore = [{name:bookName, author:author},...$bookStore,];
 }
</script>
<input type="text" bind:value={bookName} placeholder="Book Name"/>
<input type="text" bind:value={author} placeholder="Author Name"/>
<button on:click={addNew}>+ Add Book</button>
App.svelte
<script>
 import BookList from './BookList.svelte'
 import BookForm from './BookForm.svelte'
</script>
<BookForm/>
<BookList/>
We created bookStoreas a writable array. it is imported inside both form and list components by using sugar syntax $ to access the data. Yes! $bookStore is reactive and can be used anywhere in our application.
Context vs Store
Context and Store both are similar. it only differs where the store can be accessible in any part of our application, while context only available to its descendants.
Resources
Get play around all the examples explained in this article that are available in Svelte REPL. To test update the App.svelte file by importing the different card components to check the result. (demo)
Conclusion
Structure the communication between the components is the most important part of application design. In Svelte we have built-in functionalities for state management that can give us good flexibility to design better applications.

