5 Essential Terraform Tools To Use Everyday
Gain efficiency with Terraform and leverage your code

Terraform is now an essential infrastructure-as-code (IaC) tool to have in your toolbox as a DevOps practitioner. Such as many open-source projects, the community creates and shares many tools to make it more powerful.
Sometimes there are too many tools and plugins around a project and you may feel lost. That’s why here, I’m going to present you 5 Terraform tools I use on a daily basis.
They allow you to gain velocity and have even more fun working with Terraform:
- Switching between different Terraform versions in your projects.
- Detect errors and improve your code.
- Generate automatically your code documentation.
- Detecting potential security issues in your code.
- Estimating cloud cost of your changes.
1. TFSwitch
Terraform is a tool that evolves quite fast and changes versions. You need to download and install the correct version from the HashiCorp website. For each different version, you need the associated binary. When you have several Terraform projects with different versions it can quickly become very heavy to manage.
TFSwitch is a command-line tool and solves this problem. It allows you to select the version of Terraform you want to work with and install it automatically.
Installation on Mac
$ brew install warrensbox/tap/tfswitchInstallation on Linux
$ curl -L https://raw.githubusercontent.com/warrensbox/terraform-switcher/release/install.sh | bashQuickstart

[1]: Type tfswitch and press “Enter” on your terminal
[2]: Select the version of Terraform you want to use by using the up and down arrow.
[3]: Hit enter to select the Terraform version.
You can also supply the Terraform version on the command line:

2. TFLint
Syntax errors are sometimes not easy to understand when running your code. Linters provide crucial information to speed up debugging and save time in your development. You can also integrate them into your CI/CD pipeline to implement continuous improvement.
Terraform is based on the HCL (HashiCorp Language), a language describing the state of your infrastructure. TFLint is a pluggable linter supporting Terraform and its language. In addition to linting, it is also a framework with expandable features through plugins.
Here is what using TFLint can do for your IaC project:
- Find possible errors for major cloud providers: AWS/Azure/GCP.
- Warn about depreciated syntax and unused declarations.
- Enforce best practices and naming conventions.
Installation on Mac
$ brew install tflintInstallation on Linux
$ curl -s https://raw.githubusercontent.com/terraform-linters/tflint/master/install_linux.sh | bashInstallation on Windows
$ choco install tflintQuickstart
TFLint inspects files under the current directory by default. You can change the behavior with the following arguments:
$ tflint --help
Usage:
  tflint [OPTIONS] [FILE or DIR...]Application Options:
  -v, --version                                           Print TFLint version
      --init                                              Install plugins
      --langserver                                        Start language server
  -f, --format=[default|json|checkstyle|junit|compact]    Output format
                                                          (default: default)
  -c, --config=FILE                                       Config file name
                                                          (default: .tflint.hcl)
      --ignore-module=SOURCE                              Ignore module sources
      --enable-rule=RULE_NAME                             Enable rules from the
                                                          command line
      --disable-rule=RULE_NAME                            Disable rules from
                                                          the command line
      --only=RULE_NAME                                    Enable only this
                                                          rule, disabling all
                                                          other defaults. Can
                                                          be specified multiple
                                                          times
      --enable-plugin=PLUGIN_NAME                         Enable plugins from
                                                          the command line
      --var-file=FILE                                     Terraform variable
                                                          file name
      --var='foo=bar'                                     Set a Terraform
                                                          variable
      --module                                            Inspect modules
      --force                                             Return zero exit
                                                          status even if issues
                                                          found
      --no-color                                          Disable colorized
                                                          output
      --loglevel=[trace|debug|info|warn|error]            Change the loglevelHelp Options:
  -h, --help                                              Show this help message
You can also pass a configuration file to TFLint according to this priority:
- Current directory (
./.tflint.hcl) - Home directory (
~/.tflint.hcl)
In the .tflint.hcl , you can make the following actions:
- Define the TFLint configuration
- Declare plugins to use
- Enable/Disable specific TFLint rules
Here is an example of a TFLint configuration file:
config {
  plugin_dir = "~/.tflint.d/plugins"

  module = true
  force = false
  disabled_by_default = false

  ignore_module = {
    "terraform-aws-modules/vpc/aws"            = true
    "terraform-aws-modules/security-group/aws" = true
  }

  varfile = ["example1.tfvars", "example2.tfvars"]
  variables = ["foo=bar", "bar=[\"baz\"]"]
}plugin "aws" {
  enabled = true
  version = "0.12.0"
  source  = "github.com/terraform-linters/tflint-ruleset-aws"
}rule "aws_instance_invalid_type" {
  enabled = false
}
Run TFLint is simple:
$ tflintIf you do not get the expected behavior, you can see the detailed logs with debug mode:
$ TFLINT_LOG=debug tflintUse plugins for cloud providers
When you are using AWS, Azure, or GCP providers, you can use the corresponding plugin:
The code blocks below indicate to use the AWS plugin:
plugin "aws" {
  enabled = true
  version = "0.12.0"
  source  = "github.com/terraform-linters/tflint-ruleset-aws"
}
The following command installs the plugins:
$ tflint --initTerraform does not validate the provider-specific issues. Here is an example with the following configuration file:
resource "aws_instance" "foo" {
  ami           = "ami-0ff8a91507f77f867"
  instance_type = "t1.2xlarge" # invalid type!
}
The t1.2xlarge is an invalid instance type. An error will occur when you run terraform apply. But the terraform validate and terraform plan commands do not show any error. It is an issue-specific from the AWS provider not from Terraform syntax. TFLint plugin helps to detect this error before the application of the code:
3. Terraform-docs
Documenting your code is an important point for teamwork and reusability. Terraform-docs is a quick utility to generate docs from Terraform modules in various output formats.
Installation on Mac
$ brew install terraform-docs Installation on Windows
$ choco install terraform-docsInstallation on Linux
$ curl -Lo ./terraform-docs.tar.gz https://github.com/terraform-docs/terraform-docs/releases/download/v0.16.0/terraform-docs-v0.16.0-$(uname)-amd64.tar.gz
$ tar -xzf terraform-docs.tar.gz
$ chmod +x terraform-docs
$ mv terraform-docs /usr/local/terraform-docs
Quickstart
Creating Terraform modules implies using inputs, outputs, resources, and eventually data sources. The following Terraform snippet creates an AWS EC2 instance from an AMI (Amazon Machine Image). Although everything is in one file, it can be considered as a module:
terraform {
  required_version = ">= 1.0.0"
  required_providers {
    aws = {
      source = "hashicorp/aws"
    }
  }
}variable "aws_region" {
  description = "The AWS region where to deploy the EC2 instance."
  type        = string
  default     = "us-east-1"
}variable "tags" {
  description = "The tags to associate to the EC2 instance."
  type        = map(string)
  default     = {}
}provider "aws" {
  region = var.aws_region
}data "aws_ami" "ubuntu" {
  most_recent = truefilter {
    name   = "name"
    values = ["ubuntu/images/hvm-ssd/ubuntu-focal-20.04-amd64-server-*"]
  }filter {
    name   = "virtualization-type"
    values = ["hvm"]
  }owners = ["099720109477"]
}resource "aws_instance" "default" {
  ami           = data.aws_ami.ubuntu.id
  instance_type = "t2.micro"tags   = merge({
    Name = "my-ec2-instance"
  }, var.tags)
}output "arn" {
  description = "EC2 instance ARN."
  value       = aws_instance.default.arn
}
The command line below will generate the Terraform documentation in markdown and store it in a README file:
$ terraform-docs markdown table --output-file README.md .In the README file, we find the different elements used by the module and link to the official documentation for each one:
<!-- BEGIN_TF_DOCS -->
## Requirements| Name | Version |
|------|---------|
| <a name="requirement_terraform"></a> [terraform](#requirement\_terraform) | >= 1.0.0 |## Providers| Name | Version |
|------|---------|
| <a name="provider_aws"></a> [aws](#provider\_aws) | 3.74.0 |## ModulesNo modules.## Resources| Name | Type |
|------|------|
| [aws_instance.default](https://registry.terraform.io/providers/hashicorp/aws/latest/docs/resources/instance) | resource |
| [aws_ami.ubuntu](https://registry.terraform.io/providers/hashicorp/aws/latest/docs/data-sources/ami) | data source |## Inputs| Name | Description | Type | Default | Required |
|------|-------------|------|---------|:--------:|
| <a name="input_aws_region"></a> [aws\_region](#input\_aws\_region) | The AWS region where to deploy the EC2 instance. | `string` | `"us-east-1"` | no |
| <a name="input_tags"></a> [tags](#input\_tags) | The tags to associate to the EC2 instance. | `map(string)` | `{}` | no |## Outputs| Name | Description |
|------|-------------|
| <a name="output_arn"></a> [arn](#output\_arn) | EC2 instance ARN. |
<!-- END_TF_DOCS -->
4. Checkov
Checkov is a static code analysis tool for scanning infrastructure as code files including Terraform. It looks for misconfiguration that may lead to security or compliance problems. It has 750 predefined policies to check for common misconfiguration issues.
Installation
$ pip install checkovQuickstart
We will take the code of the part presented on the part on terraform-docs. We will generate the Terraform plan and analyze it with Checkov :
$ terraform init
$ terraform plan -out tf.plan
$ terraform show -json tf.plan  > tf.json
$ checkov -f tf.json

       _               _
   ___| |__   ___  ___| | _______   __
  / __| '_ \ / _ \/ __| |/ / _ \ \ / /
 | (__| | | |  __/ (__|   < (_) \ V /
  \___|_| |_|\___|\___|_|\_\___/ \_/By bridgecrew.io | version: 2.0.528
Update available 2.0.528 -> 2.0.829
Run pip3 install -U checkov to updatecloudformation scan results:Passed checks: 0, Failed checks: 0, Skipped checks: 0, Parsing errors: 1Error parsing file tf.json
terraform_plan scan results:Passed checks: 2, Failed checks: 4, Skipped checks: 0Check: CKV_AWS_88: "EC2 instance should not have public IP."
 PASSED for resource: aws_instance.default
 File: /tf.json:0-0
 Guide: https://docs.bridgecrew.io/docs/public_12Check: CKV_AWS_46: "Ensure no hard-coded secrets exist in EC2 user data"
 PASSED for resource: aws_instance.default
 File: /tf.json:0-0
 Guide: https://docs.bridgecrew.io/docs/bc_aws_secrets_1Check: CKV_AWS_79: "Ensure Instance Metadata Service Version 1 is not enabled"
 FAILED for resource: aws_instance.default
 File: /tf.json:0-0
 Guide: https://docs.bridgecrew.io/docs/bc_aws_general_31Check: CKV_AWS_126: "Ensure that detailed monitoring is enabled for EC2 instances"
 FAILED for resource: aws_instance.default
 File: /tf.json:0-0
 Guide: https://docs.bridgecrew.io/docs/ensure-that-detailed-monitoring-is-enabled-for-ec2-instancesCheck: CKV_AWS_135: "Ensure that EC2 is EBS optimized"
 FAILED for resource: aws_instance.default
 File: /tf.json:0-0
 Guide: https://docs.bridgecrew.io/docs/ensure-that-ec2-is-ebs-optimizedCheck: CKV_AWS_8: "Ensure all data stored in the Launch configuration EBS is securely encrypted"
 FAILED for resource: aws_instance.default
 File: /tf.json:0-0
 Guide: https://docs.bridgecrew.io/docs/general_13
5. Infracost: Estimate Cloud Cost From Your Code
Changes made by Terraform may alter the status of resources hosted by a cloud provider. Depending on these, costs may vary. It is important to keep this dimension in mind when writing IaC code.
Infracost shows cloud cost estimates for infrastructure-as-code projects such as Terraform. It helps to quickly see a cost breakdown and compare different options up front.
Installation on Mac
$ brew install infracostInstallation on Linux
$ /usr/local/bin
curl -fsSL https://raw.githubusercontent.com/infracost/infracost/master/scripts/install.sh | sh
Quickstart
Register infracost with your email address to receive an API key:
$ infracost registerNow your API key is in $HOME/.config/infracost/credentials.yml
You can use infracost to have the full monthly breakdown of costs:
$ infracost breakdown --path .
Detected Terraform directory at .
  ✔ Checking for cached plan... not found
  ✔ Running terraform plan
  ✔ Running terraform show
  ✔ Extracting only cost-related params from terraform
  ✔ Retrieving cloud prices to calculate costsProject: .Name                                                 Monthly Qty  Unit   Monthly Costaws_instance.default
 ├─ Instance usage (Linux/UNIX, on-demand, t2.micro)          730  hours         $8.47
 └─ root_block_device
    └─ Storage (general purpose SSD, gp2)                       8  GB            $0.80OVERALL TOTAL                                                                   $9.27
──────────────────────────────────
1 cloud resource was detected, rerun with --show-skipped to see details:
∙ 1 was estimated, 1 includes usage-based costs, see https://infracost.io/usage-file
You can also detect the change in monthly cost due to a code change:
$ infracost diff --path .
Detected Terraform directory at .
  ✔ Checking for cached plan... change detected
  ✔ Running terraform plan
  ✔ Running terraform show
  ✔ Extracting only cost-related params from terraform
  ✔ Retrieving cloud prices to calculate costsProject: .~ aws_instance.default
  +$21.90 ($9.27 → $31.17)~ Instance usage (Linux/UNIX, on-demand, t2.micro → t3.medium)
      +$21.90 ($8.47 → $30.37)Monthly cost change for .
Amount:  +$21.90 ($9.27 → $31.17)
Percent: +236%──────────────────────────────────
Key: ~ changed, + added, - removed1 cloud resource was detected, rerun with --show-skipped to see details:
∙ 1 was estimated, 1 includes usage-based costs, see https://infracost.io/usage-fileAdd cost estimates to your pull requests: https://infracost.io/cicd
You can also generate an HTML report:
$ infracost breakdown --path . --format html > report.html
Detected Terraform directory at .
  ✔ Checking for cached plan... found
  ✔ Extracting only cost-related params from terraform
  ✔ Retrieving cloud prices to calculate costs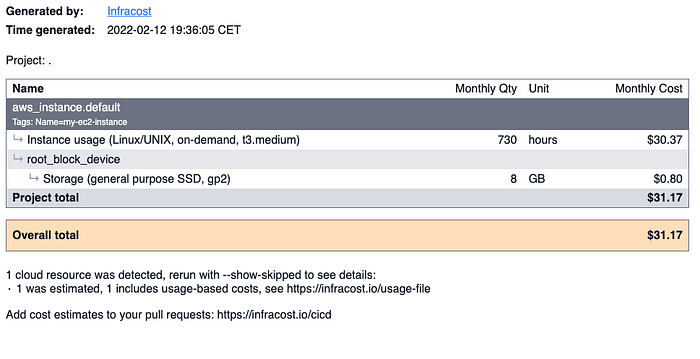
Conclusion
The 5 Terraform tools we have seen together in this article will bring you benefits in several aspects:
- Debugging your code faster and anticipate errors with TFLint
- Limiting recurring tasks: version management with TFSwitch and automation of documentation with Terraform-Docs.
- Identify security issues during development with Checkov
- Get visibility on the cost impact of your infrastructure changes with Infracost
You can also integrate all these tools into your CI/CD pipelines!
Thank you! 🙏 I hope this article helped you to find your next awesome Terraform tool. Want to learn more about DevOps? To check out more articles like this one, it’s down below! ⬇️